Practicing instructional design professionals use digital audio and video in learning materials for a variety of reasons including content presentation, feedback, and assessment. Some audio and video materials used for purposes like feedback and assessment may have a narrow audience and may not require high production value (i.e. the editing needed to make audio and video materials professional and polished). For those uses, you simply record and share.
Depending on the resources of a project, instructional designers may create these materials themselves or work with media production professionals. Because modern smartphones have access to basic media production tools, it is possible for anybody to capture and edit audio and video. This is an acceptable solution for materials with a narrow audience or materials that will not be shared widely. However, media that is included in professional learning materials needs to have a polished and professional look and feel.
This chapter will provide an overview of audio and video tools that instructional designers can use to capture, edit, and share professional learning materials with limited resources. In addition, terms and issues associated with audio and video production will be introduced. This introductory knowledge will help guide you as you seek to enhance your skills and will also help you communicate effectively with media production professionals during your career.
Lossless and Lossy Media
Audio and video files are commonly referred to as media files. There will be other media files that you work with as an instructional design professional, but these are the foundations of most media production projects.
Because so much of the work we do is shared digitally on the Internet, working with any type of media is a compromise between the highest quality and the smallest file size. Which is why you need to learn how to compress uncompressed media files. We sometimes refer to uncompressed media as lossless and compressed media as lossy.
A lossless file is uncompressed and is at the highest digital quality. “Lossy” media has lost some of the original quality. This means that it has been exported to a file size and type that can be used and shared easily. An exported file is a compromise between file size and quality. Lossless media is media captured in its highest quality. This allows us to edit in the highest quality available and then export it in the most appropriate format. Audio and video examples are included below.
Audio
The most common lossless audio file you will work with is a .wav file (Waveform Audio Format. Pronounced wave). There are others, but .wav files are the most commonly used. (See https://edtechbooks.org/-Coyb for a list). A .wav file is uncompressed and at its highest quality. After the audio is recorded, it is edited for length, clarity, and production quality and exported to a lossy compressed format. The most common compressed audio file is an .mp3 file. The sound quality of a .wav file is higher in quality and preferred by professional musicians and audio engineers. However, a .wav file can be as much as ten times larger than an .mp3 file. Given the file size difference, instructional designers often use .mp3 files as a compromise between file size and quality.
Video
The quality of the video recorded is determined by the camera used. Video quality is referred to as video resolution and measured by pixel dimensions. See Table 1 for common types of video resolution from lowest quality to highest quality.
Common Video Resolutions
|
Video Resolution
|
Abbreviation(s)
|
Pixel Dimensions
|
|
Standard Definition
|
SD
|
720x480
|
|
High Definition
|
HD
|
1280x720 (Also written as 720p)
|
|
Full High Definition
|
Full HD
|
1920x1080 (Also written as 1080p)
|
|
Ultra High Definition or 4K
|
Ultra HD or 4K
|
3840x2160
|
Note. See https://edtechbooks.org/-CgI and https://edtechbooks.org/-CgI for more details.
The quality of the camera determines the highest quality of the video available to you. As of the writing of this chapter, newer smartphones record in HD and Full HD, though some newer phones do allow for 4K recordings. Professional video cameras, and many consumer level cameras, will record in 4K. Once the video is edited for length, content, and production values, the final resolution can be determined when the video is exported and saved to a lossy file type to share, typically an .mp4 file.
How to Compromise Between Quality and File Size
This will depend on several factors such as:
- how you will deliver the materials,
- the content of the materials, and
- where you will be using the materials.
For example, if you were recording music and wanted to distribute it on a compact disc, you would want to export your audio file in a .wav format. You would want the highest quality so that the nuances of the music could be enjoyed by the listener. If you are recording a podcast, lecture, or some other type of voice file and your plan is to distribute that through a learning management system or some other internet-based option, an .mp3 file is preferred. An .mp3 file has levels of audio quality, or fidelity, which are measured by the bitrate. The lower the bitrate, the lower the quality or fidelity to the original recording. A bitrate of 96 would be a lower quality .mp3 while a bitrate of 320 would be the highest quality. The bitrate is chosen when the audio file is exported. For more information on bitrate, see https://edtechbooks.org/-Zavu.
When exporting video, it also depends on what you plan to do with the video. If you are broadcasting the video through a television network or streaming service, you would likely want to export in 4k or Full HD (1080p). If you are distributing your video through an online streaming service such as YouTube or Vimeo, you could likely use a lower resolution HD file. Your choice of resolution will depend on the content of the video. If you were creating a highly technical video that requires significant granular detail, such as repairing a piece of equipment, or performing surgery, you would want a higher resolution, likely 4K (Ultra HD) or Full HD (1080p). If you were recording a lecture or a narrated PowerPoint presentation a lower resolution such as HD (720p) would be fine. It would depend on the content and how you are distributing it. It is unlikely that you would ever export in Standard Definition (SD). That is the resolution that was common to many video cassette recorders. We include it here as you may see it if you are including older recorded materials in a project.
Recording and Editing Digital Audio
Before you can compress your audio as an .mp3 file, you must capture, or record the audio. On the face of it, recording audio is relatively straightforward, assuming you have a recorder:
- Press the record button.
- Talk.
- Press the stop button.
- Export it as an .mp3 file.
Recording high quality audio is more difficult. Where you record is an issue to consider. Field recording, such as interviews in offices, classrooms, or outside areas are different from recording in a single stationary place, like a studio. This chapter primarily covers the fundamentals of audio recording in a stationary space with limited resources.
Additional Resources
If you are interested in field recording, Michael Helms’ podcast and website are helpful resources (https://michaelthesoundguy.com).
To record professional sounding audio, you have to think about a number of factors such as what microphone you are using, how close you are to your microphone, where you are recording, and how to edit your audio before you export it and share it. We will cover each in turn.
Microphone Quality
For professional sounding audio, you need a better microphone than the one in your computer or your smartphone. You also need a microphone that records in stereo. Mono (also known as monaural or monophonic) audio plays in a single channel. Stereo plays in two channels, left and right. Put more simply, mono audio plays in only one ear of your headphones. Stereo plays in both. Space limits our discussion of every type of microphone, and there are many such as dynamic and ribbon microphones. For more information on dynamic and ribbon microphones, see: https://edtechbooks.org/-SHa. If you have access to recording engineers and their studio, they will have professional microphones available. We are focusing our chapter on a versatile microphone for instructional designers, the condenser microphone.
Condenser microphones have electronics inside of them to help provide a better-quality recording. They typically connect directly to your computer through a USB port. They provide for greater fidelity in sound, which means the microphone can provide a recording that is very close to the original performance. If you listen to live music and a recording of the same performance, you will hear things differently. Your ears will pick up sounds at a live performance that even the best microphone cannot capture. Better microphones will provide recordings as close as possible to the original. So higher fidelity means better quality. And better microphones produce higher fidelity.
Condenser microphones capture a wide range of frequencies well. They make the low tones richer and the high tones sound crisp without sounding “tinny.” Condenser microphones can be very expensive. You can pay thousands of dollars for a condenser microphone, and if you were a recording engineer working with symphonies or studio musicians, you would. However, for the type of recording most instructional design professionals do—mostly voice recordings for .mp3 files or voice overs for video—you need a good microphone, not a great one. There are many to choose from and an internet search for comparisons will yield many. What you choose will likely depend on your budget.
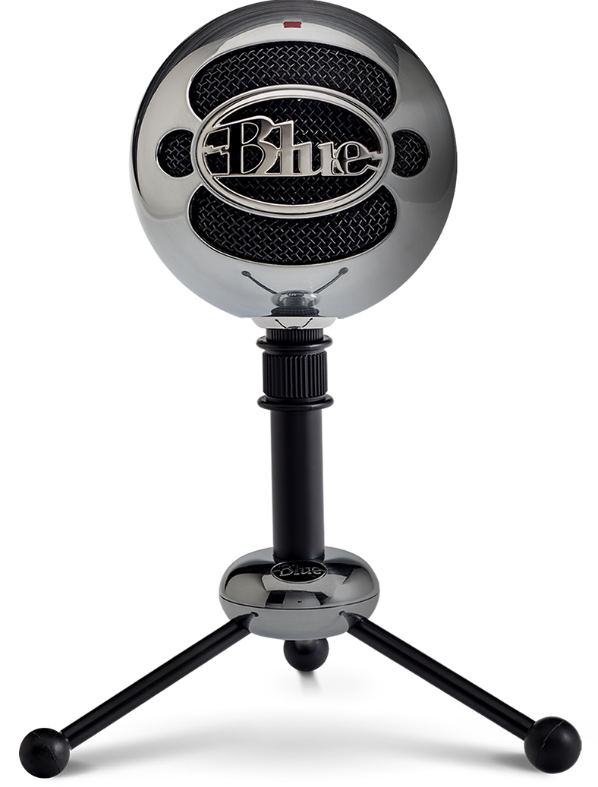
The “Snowball” microphone by Blue is an example of a compromise between cost and quality. It is an example of a good, but not great, microphone. This USB microphone provides good sound quality at a reasonable price and is a good addition to your instructional designer tool kit. It is available at many retailers or from the website directly. Our inclusion of the Snowball microphone is used as an example only and should not be considered a commercial endorsement.
Figure 1
Blue Snowball Condenser Microphone
Note. Visit https://edtechbooks.org/-qFv for more information.
Distance from Your Microphone
The closer you are to your microphone, the better the sound quality. How close depends on the microphone, so it is best to experiment until you get to know your microphone better, but think two–six inches away as being close.
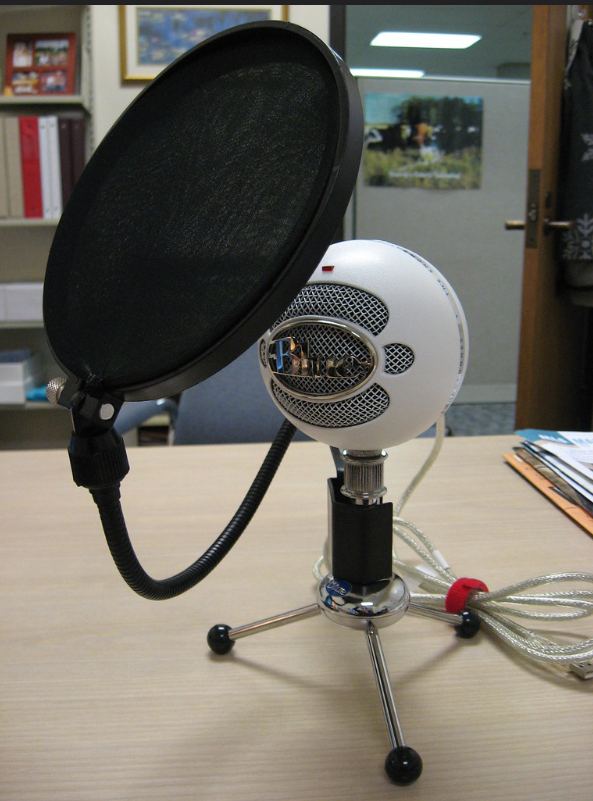
Your microphone will record every sound in the room. When you record, think about air conditioners, fans, and other ambient noises. Also, think about air. The air between you and your microphone is recorded as dead air. If there is a lot of air between you and your microphone, you will get a hissing noise when you turn up the volume. While the microphone can and will pick up all of the sounds, the mic will pick up sounds closer to the microphone more clearly. Which is why you want to be close to the microphone. However, if you get too close to a microphone you may “pop the mic”. Popping the mic is the term used to describe the noise that you hear when hard consonants like p, t, d, etc. are used close to the microphone. The microphone may pick these sounds up and produce an annoying popping sound on a recording. To lessen mic popping, use a pop filter. These devices provide a mesh like fabric that rests between you and the microphone and help diffuse the sound of the hard consonants.
Figure 2
Blue Snowball Mic with Pop Filter
Note. Source: https://edtechbooks.org/-FzAV
Pop filters are relatively inexpensive. Because a person sits close to a pop filter when speaking, they are likely to spread aerosols as they speak. We recommend you treat them as personal items.
Room Size
The best place to record audio is in a recording studio. Recording studios have baffling, soft material on the walls and ceilings, to lessen echo in the room. If you do not have access to a recording studio, consider the size of your room. Large rooms may produce more echo. Small rooms will produce less. The less echo in a recording the better.
The larger the room, the greater the problems for recording. Your microphone will pick up ambient noises like your air conditioner, but it will also pick up the echoes of the room. Rooms with a lot of tile and glass and tile (think kitchens and bathrooms in your home) allow the sound to “bounce” off the hard surfaces. Audio recording in large rooms produces audio that may sound thin and produce unwanted echoes.
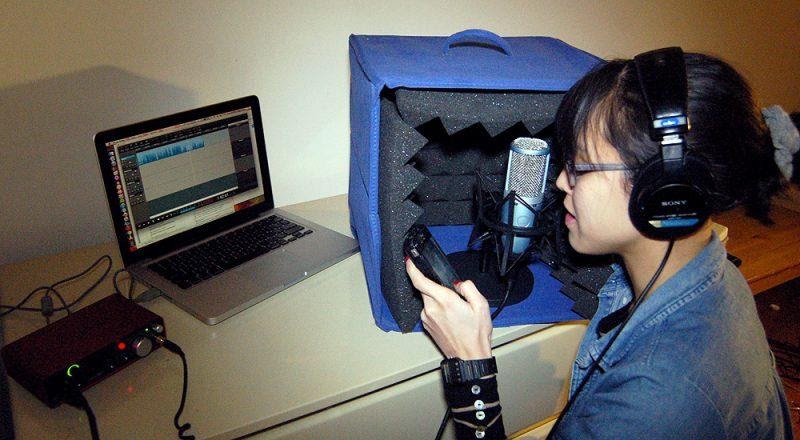
When possible, use a small room with carpets, drapes, and other fabrics to help absorb excess sound. You can also create a better environment with boxes to contain the microphone and soft materials to surround it. In the image below, the person has placed their microphone in a box with foam to absorb excess sound. You could also achieve this effect with a box and any kind of fabric like towels or small pillows. Notice that the microphone is close to the foam in the box. This will help keep sound on the other side of the microphone from being recorded as well and helps eliminate dead air.
Figure 3
Creating a Better Recording Environment
Note. See https://edtechbooks.org/-Vod for more information.
Audio Software
To create a professional sounding recording, you need multitrack software to edit audio. A finished audio file is a number of tracks, or layers of audio, edited together for quality and clarity. Each track is a type of audio. One track might be your voice, and another track your background music (see Figure 4). Audio software allows you to mix your audio. Mixing audio means that you adjust levels of each track to make your voice loud enough and your background music soft enough to blend well together.
Figure 4
Multiple Audio Tracks
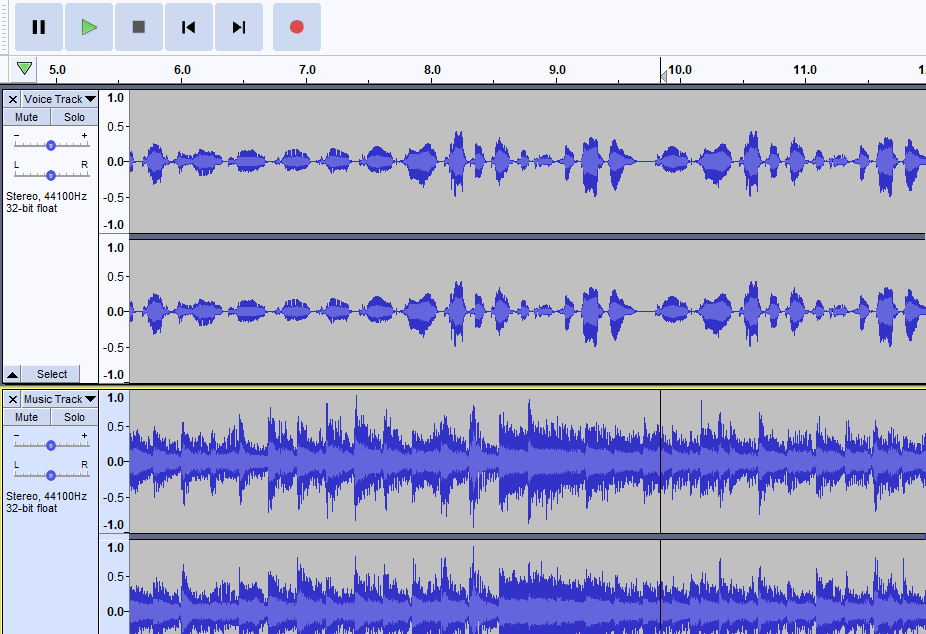
Note. The top track is a voice track and the bottom track is a background music track.
There are many professional options available, but Audacity is a free, open source tool that we recommend. It is available for both Mac and PC computers. Below are a set of tutorials that will help you get started with Audacity (version 2.3.2) and audio editing.
- Audacity: An Introduction
A brief tutorial demonstrating the user interface and basic functions of Audacity audio software.
- Audacity: Adding Background Music To Your Project
How to add background music to your podcast using Audacity. The video covers importing a music file and how to use "fade in" and "fade out" to make the final version sound more polished.
- Audacity: The Effects Menu
This short tutorial introduces the Effects menu in Audacity and demonstrates how to apply a change in pitch effect.
- Audacity: The Time Shift Tool
This tutorial introduces the Time Shift Tool in Audacity. Use the Time Shift Tool to move an audio track horizontally on your timeline.
- Audacity: Exporting Audio as an. Mp3 File
This brief tutorial demonstrates how to export your Audacity project as an mp3 file so it can be shared with others. This is the stage of the production process when you would choose the bitrate for an .mp3 file.
Digital Video
Most people have a better-than-average video camera in their pocket or bag. Modern smartphones contain impressive cameras and can record quality video. Because everybody can create video easily now, we think of video as being easy. On the face of it, digital video is easy. Sound and lighting are hard.
Video and Expectations
Without the resources of professional videographers and filmmakers, you should not expect to make videos that will look like the ones you see on television or in the movies. Those videos require resources including multiple cameras, multiple camera angles, good field recording equipment, professional lighting kits, sophisticated video editing software, personnel, and more. However, depending on the needs of your learners and the type of content you need to create, it is possible to make compelling and professional looking videos with limited resources. What follows are some resources to help you produce video with limited resources. Experience producing video yourself will help you work with professional video production teams during your career.
Video Terminology
Below is an alphabetical list of terms used in capturing, editing, and sharing videos that you are likely to encounter. While this is far from a complete list, some knowledge of these terms will help you both produce your own video and work with professional video producers.
Video Terminology
| Aspect Ratio |
The relationship between the width and height of your video. It is expressed numerically such as 4:3 and 16:9. |
| Boom Mics |
High quality microphones that can attach to your camera to allow better sound while you are shooting video. |
| B Roll |
Supplemental background footage. This is stock footage that is used while voice over audio plays. For example, if there is a news report about vaping, you will often see video clips of random people not associated with the story vaping. Those clips are B Roll footage. |
| Clip |
A piece of video. You can take one long video clip and split it to make multiple small clips. You can take multiple small clips and order them to create a final product. |
| Compression |
The amount of data in a video file. Smaller files have higher compression rates. High-definition video has lower compression rates. |
| Credits |
Information at the end of a video detailing information about the creator of the video, actors, or other important information about the video. |
| Dissolve |
An editing term. A transition between two elements in your video. You might dissolve between two video clips, or between a clip and a title. |
| Export |
“Saving” your video in a format that can be shared with others or uploaded to a video sharing site, typically an MP4 file. |
| Fade |
An editing term. It is the transition between a visual and a black screen. As in “Fade to Black”.
|
| Filters |
An editing term. Color Corrections that can be made to a video clip. Much like filters you might add to an image in image editing software. |
| Preview Window |
The area of the screen in a video editor that lets you see the movie in part or in entirety within the software as you edit the video. |
| Project Library |
An area in your editing software that contains all of the video clips, still images, and audio files you have imported to use in your video. |
| Timeline/Storyboard |
In video editing software, the area of the screen that contains clips that you have moved from the library for editing and inclusion in your project. The timeline/storyboard is typically found at the bottom of the screen. |
| Scrub |
An editing term. To fast forward or rewind a video or audio clip on the Timeline/Storyboard. |
| Shot List |
A list of all of the shots, or video you need to collect, that you will need in your project. |
| Split |
An editing term. To cut a single video clip into two separate clips. You would do this to isolate the video you want to remove by splitting it before and after the video you want to remove and then deleting the piece in the middle. You would split a clip to insert something before or after the clip, such as a title, still image, or another video clip. |
| Titles |
Text that appears on a solid color or an image that helps mark the beginning of the video or provides a section break descriptor for the video. |
| Trim |
An editing term. To remove content from the beginning or the end of a video clip. Trimming does not allow you to remove video from the middle of a clip. To do that, you would need to split the clip. |
| Tripod |
A three-legged stand used to hold a camera still during filming. |
Note. A more complete collection of terms is available from Vimeo.
Video Cameras
Professional video cameras used by professional videographers are more expensive and sophisticated than consumer level cameras. Nevertheless, quality video can be captured with consumer level cameras. For example, most modern Digital Single Lens Reflex (DSLR) cameras are capable of shooting Full High Definition video. Many mirrorless cameras are capable of shooting in 4K or Ultra High Definition video. If you are recording a speaker, you would likely need an external microphone, such as a boom microphone, for your live audio. However, if you are able to use voice over audio, the information on audio recording in this chapter would help you create your audio track.
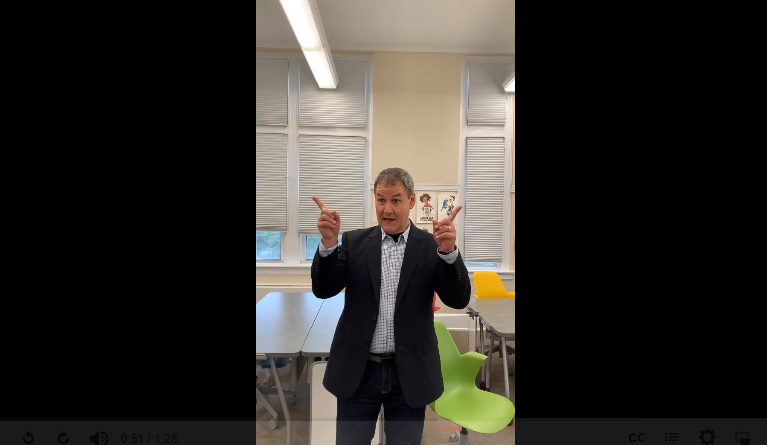
Smartphones are capable of shooting high quality video. As with DSLRs and Mirrorless Cameras, you will need an external microphone to record live audio. When shooting with a smartphone, always orient the camera in landscape mode (see Figure 5). Recording video with a smartphone in portrait mode will produce black bars on either side of the video when you edit (see Figure 6).
Camera technology changes rapidly. While 4K video is the current highest resolution commonly available, 8K video technology is available as of the writing of this chapter. If you are considering purchasing video equipment, it is best to research current standards before you purchase. The website, digitaltrends.com, has buying guides that are a good place to begin your search.
Figure 5
Still Frame of Smart Phone Video Shot in Landscape Mode
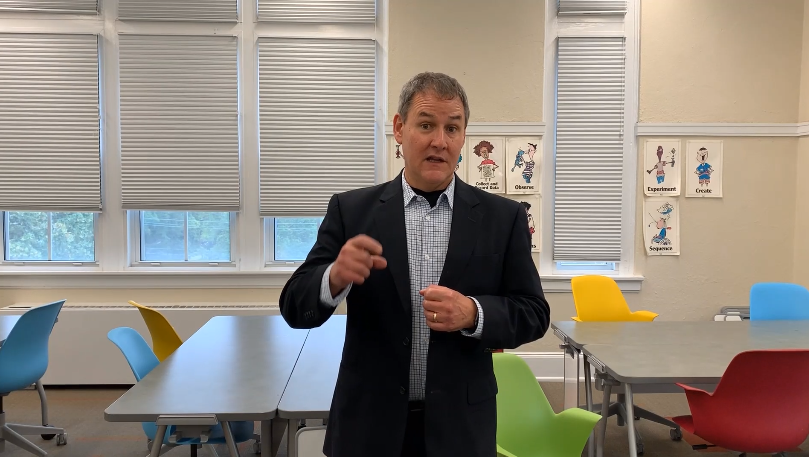
Figure 6
Still Frame of Smart Phone Video Shot in Portrait Mode
Video Editing Tools
Once the video is recorded, you will want to edit the video for quality and clarity. To edit the video you need to import the video into a video editor. Much like word processors let you edit the length, quality, and appearance of text, video editors do the same for video. Video editors range from the basic and introductory, such as the free Windows Video App available in Windows 10 and iMovie available on Apple computers, to the professional level tools Adobe Premiere and Final Cut Pro. As you might imagine, professional video tools are more sophisticated, more complicated to use, provide better final products, and are expensive. Windows Video App and iMovie are included in your system software and require no additional purchase.
If you have never used a video editor, Windows Video App, available in Windows 10, and iMovie, available on Apple computers, are excellent places to start. Tutorials for both are widely available online, but we offer these introductory tutorials on the Windows Video App. For non Windows users, these videos can also introduce you to the basic interface of video editing software and some of the tools and features common to all video editing software applications.
- Windows Video App Interface
- This short video is an introduction to not only the Windows Video App interface, but also to what video editors look like. You will see examples of the Project Library, the Storyboard/Timeline, and the Preview Window.
- Introduction to Editing
- This short video provides an introduction on editing video with the Windows Video App. While the tutorial is specific to the Windows Video App, the terms and techniques are mirrored in most video editors.
- Editing and Special Effects
- This short video provides more editing options and demonstrates how to use special effects in the Windows Video App.
There are free open source video editing tools available as well. Shotcut and OpenShot are cross platform video editors with sophisticated features rivaling those of paid professional video editing software.
Screencasts
Screencasts are recordings of the action displayed on a computer or mobile device screen. They are often used as tutorials to demonstrate how to use a particular function of a piece of software. The cursor is often highlighted by a halo of color so that it is easy for a viewer to track the cursor’s movement on the screen. The person demonstrating the task on screen typically narrates these videos in real time. Screencasts may or may not include a thumbnail video image of the speaker overlaid on the screencast. The videos used to demonstrate the audio editing software above are examples of screencasts. Screencasting video can be uploaded into video editing software and used as a clip in a longer video or edited for clarity and quality.
Screencasting Software
There are multiple options for screencasting software, including free and paid versions.
- Camtasia
- Camtasia offers a suite of video capturing and editing tools. It is available for a free trial but does require a paid account for the most sophisticated features.
- Loom
- Loom is advertised as a video communication tool, but its functions include screencasting.
- Screencastify
- Screencastify is popular with users because of its integration of screencasts with Google products.
- Screencast-o-matic
- Screencast-o-matic has a free and paid version. The paid version removes the watermark, extends your recording time, and offers video editing tools. The free version is quite robust.
Video and Your Computer
Video is memory intensive and, depending on your computer’s processor and memory, may tax your computer quickly. You should save early and often. At times, your video editing software will start to do things that you know it is not supposed to do. For example, you may insert a title and it will show up in the wrong place. This is a memory management issue. Quitting and restarting the application will clear the working memory and the software should work properly. It may be necessary to do this multiple times when editing.
Tips for Creating Video
It is possible for instructional designers and developers to create good, effective learning materials with limited video resources. For example, adding titles and credits to a screencast will help give it a more polished and professional look. Editing out unwanted pieces of a video will help focus the learner. When creating video with limited tools, there are some basic things to remember.
Length
For videos produced with limited resources, typically the shorter the better. For example, instead of creating one long video that demonstrates the five functions of the Audacity audio editing software, five shorter videos were created. This allows learners to watch what they need without rewinding and fast forwarding. If you are recording an hour-long lecture, break that lecture up into shorter videos. This allows the learner to watch pieces when they have time. It can seem overwhelming to sit down to watch an hour-long lecture. If these shorter videos are labeled well when placed in a learning management system, it also allows the learner to locate and rewatch only the parts they feel they need remediation on.
Special Effects
Use them judiciously. Use them sparingly. When people first use video editing software and realize how easy it is to use special effects and transitions, it can be tempting to overuse them. We advise people new to video editing to make a video early that uses every wipe, fade, and explosion they can find and get it out of their system. After that, use them only when they make sense in context of the content.
Lighting
When shooting video with limited resources, shoot in places that provide as much indirect natural light as possible. Look for rooms with windows on multiple walls. Notice the direction the light is coming from as it may cast shadows on subjects. Avoid filming in front of windows to avoid backlights making your subject appear as a shadow. If professional lighting is not available, look for lamps that you can place on either side of your subject to balance the light and avoid shadows.
Audio
Capturing live audio will sound better in a smaller space. If you are recording in a large room, use an external microphone like a lapel microphone or boom microphone to capture your audio. Unless you have professional level skills and equipment, do not record your audio source separately from your video source. Synching the audio with the video can be difficult for users with limited resources and may result in the person's lips not matching their words. When possible, use voice-over narration and the recommendations presented in the audio section of this chapter for the best quality.
B Roll Footage
When added carefully and paying attention to the needs of your content, high quality B Roll footage can dramatically improve the look and professionalism of your video project. The websites pexels.com and pixabay.com provide free high quality B Roll footage that you can use in your projects.
Conclusion
With free and open source software and some reasonably priced pieces of equipment, it is possible for instructional design professionals to create quality audio and video learning materials with limited resources. The tools, resources, and tips provided here are a starting point for you to begin work with audio and video. Once you have worked with entry-level skills you will be able to expand upon those during your career as an instructional design professional.