Teaching and Learning Goal
The goal of creating personalized virtual stages for guest speakers in online classes is to maximize the ability of the visuals in Adobe Connect to:
Technical details and steps Technical details and steps- Support guest speakers in building a connection with the students
- Create a classroom environment that invites students to ask questions and engage with the guest speaker
- Maximize the visibility of any presentation materials the guest speaker will use
Technical details and steps
Considerations for preparing custom guest speaker layouts
When designing layouts for guest speakers, the primary goal is to resize both the webcam and chat pods to match the teaching style of your presenter. In addition, you may want to create multiple layouts for the same guest speaker, to use during different parts of their presentation. For example, they may want to ask poll questions during one part of their presentation, show slides during another part, speak directly to students without visuals during another part, and create space for questions or dialogue with students during another part.
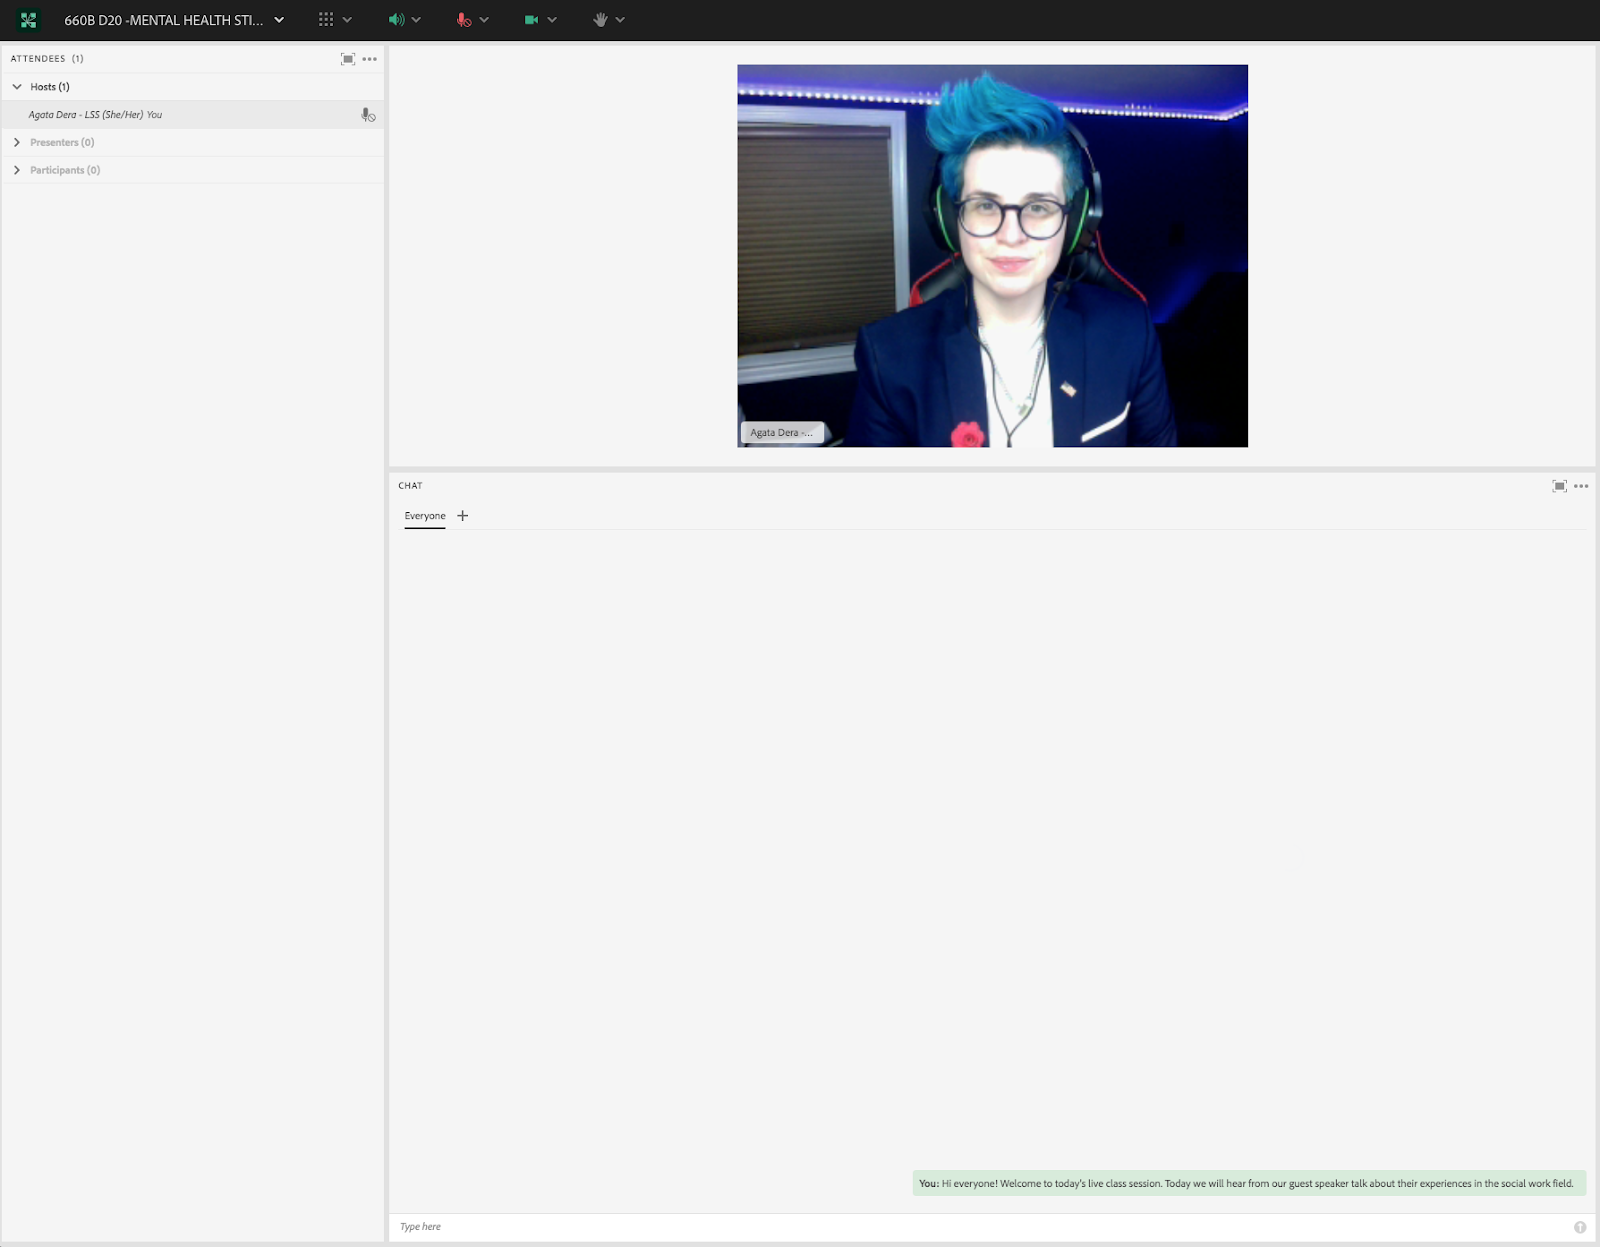
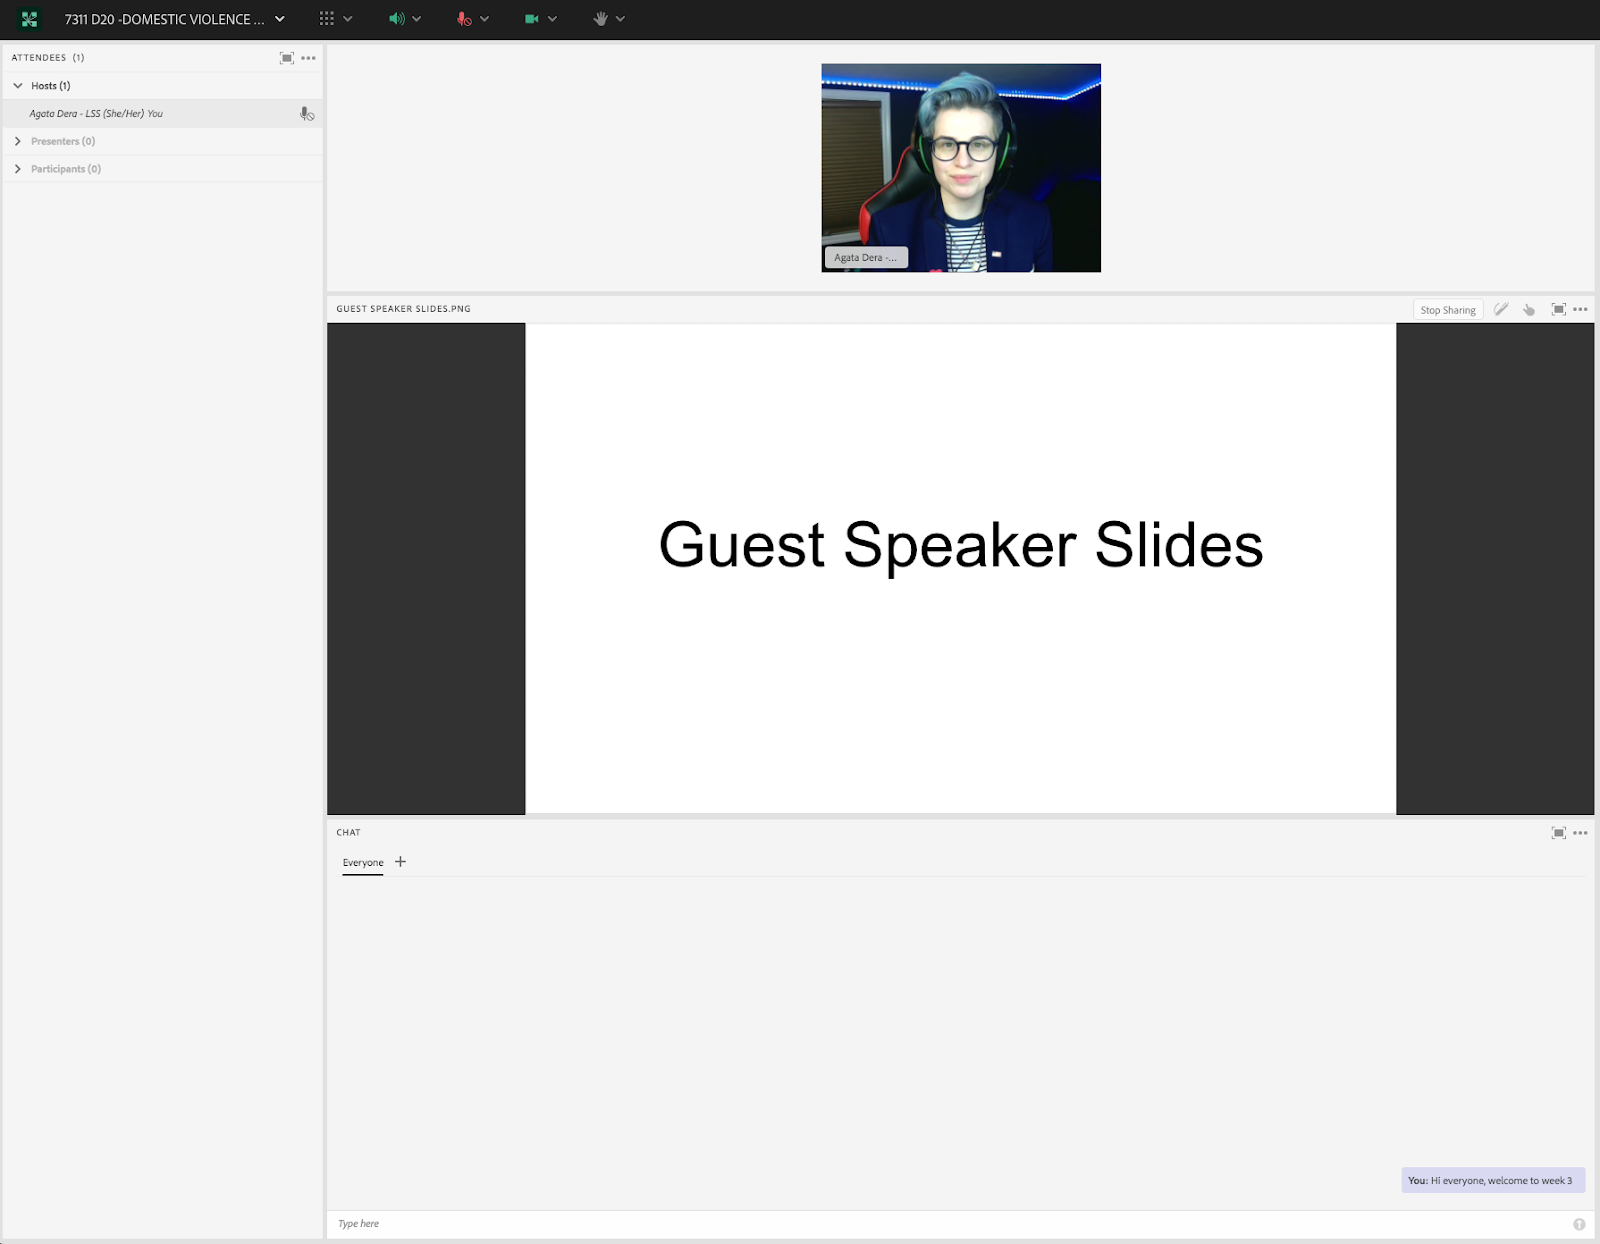
In my role as an LSS, when it comes to guest speakers I predominantly work on creating the virtual stage and helping them prepare technically and logistically. However, I have personally been invited to speak in numerous online courses on topics such as Policy, Human Sexuality, Disability Advocacy, and Technology in Online Education, as well as my own professional experience. Part of my preparation for each of the presentations was adapting my materials to the class and the topic discussed. For example, while presenting on policy, my visual materials were likely to include more substance on each slide, such as numerous sources, data and other supplementary information. This type of content-focused presentation requires a larger share pod for the slides (Image 3) to ensure all text is legible to every member of the class. In contrast, when wrapping up a presentation on my professional experiences within the field, I usually end with a short Q&A. In that case, my primary focus would be enlarging the chat box to address student questions/comments written in the chat (Image 2).
Reasons to prepare layouts with larger webcams:
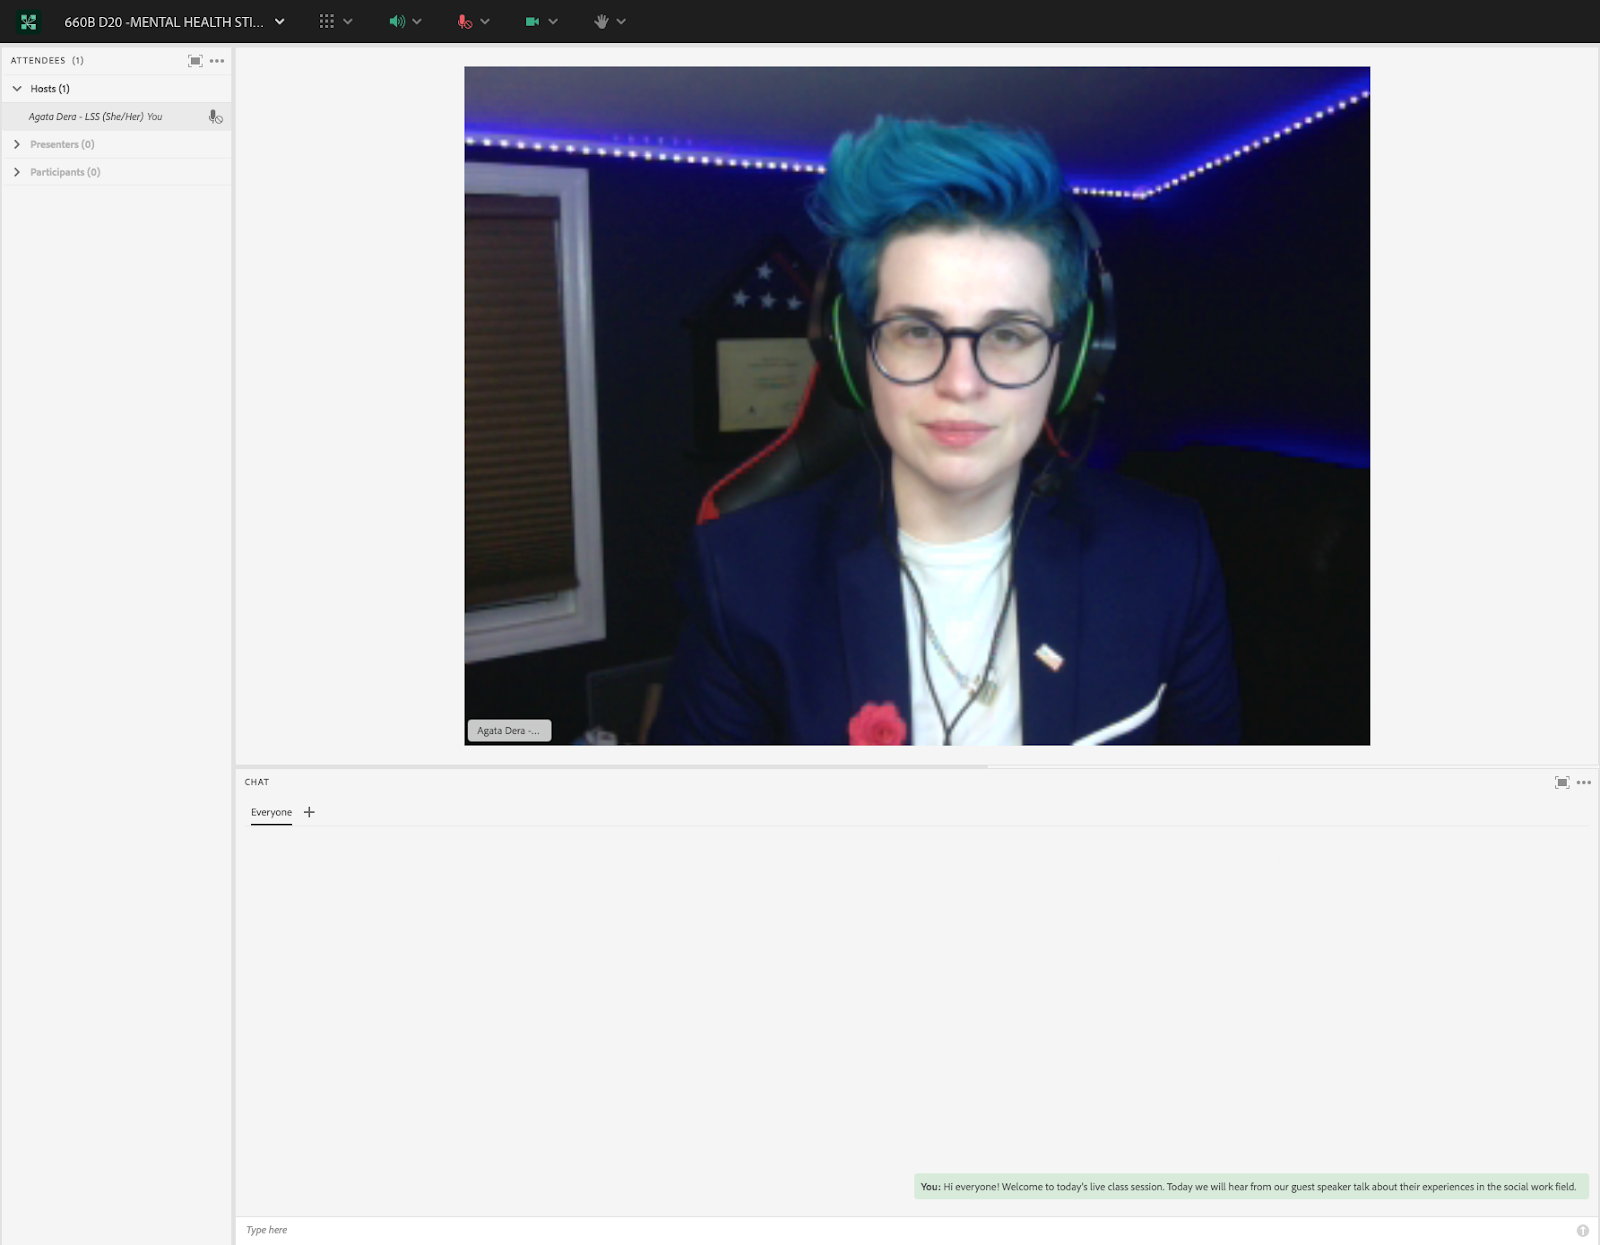
- As our guest speakers have significantly less time to build a relationship with their audience than Instructors who meet with students weekly, a larger video pod (Image 1) can seem more personal and therefore can help expedite that process. Instructors have much more time to do things like simulate making eye contact with the students by often looking directly into the webcam to build a sense of connection over the semester.
- In addition, during the questions and answers (Q&A) portion of the presentation, if students come up on webcam to ask questions, a larger video pod tends to feel more personal and generally more inviting to the class.
Reasons to prepare layouts with larger chat pods:
- Physically enlarging the chat pod (Image 2) can signal to students that their questions and opinions are valid and listened to. This can initiate more engagement from students using the chat pod.
Reasons to prepare layouts with larger share pods to show slides:
- Some presenters might prepare slide presentations which will display more text/images than others. It is important to take this into consideration as slides (uploaded into a share pod) with statistics, graphs, research data and generally more text on each slide will need to be enlarged in order to be legible. Ensuring all pods fit nicely within the layout, the size of the webcam and chat pods will depend on the size of the slide presentation in the share pod.
Tips for setting up the custom layouts
In my experience it is best to prepare Adobe Connect layouts prior to a live class session. Although this can be done during the session using the “Prepare Mode”, having already created layouts specifically for the guest speaker presentation allows for much smoother transitions between sections of the class agenda. It can also be helpful to have the layouts already set up for guest speakers who are available to do a quick dress rehearsal or tech check in the days before class.
The steps to customizing the sizes of each pod displayed in the room include:
Step 1: With your mouse, hover over your cursor to the bottom right corner of the pod you wish to resize.
Step 2: With your mouse, begin to drag the corner of the pod to expand or contract its size.
Step 3: When the pod is at the desired size, release your mouse.
Helpful tip for planning layouts that work with different screen sizes
When deciding how much space each pod will take on the screen (layout), it is important to recognize that students use monitors that vary in size. As I began supporting online courses while personally using a large monitor, I was unsure of how my Adobe Connect room setups would translate to much smaller monitors. Therefore, while setting up the Adobe Connect room each week, I periodically logged into the classroom using an older laptop to check that all pods were fully visible on the screen. After supporting many live class sessions, I developed a sense of how resizing various pods will affect what students see on their screens. If you are new to Adobe Connect and do not have access to a different size monitor to check your new layout, I recommend that when making significant changes to the pod sizing you ask students (to share in the chat or via a status icon change) whether they see all of the pods fully. If you are using a large monitor, you can also resize the Adobe Connect window to different sizes to show you what the room will look like on different sizes of monitor.
Teaching team structure and the Live Support Specialist role
One unique aspect of the Columbia University School of Social Work’s Online Program is the implementation of teaching teams in every single online course. Thus, prior to the start of a semester, each of our Instructors is paired with a Live Support Specialist (LSS) like myself. A Live Support Specialist is an alumni of the program whose role is to utilize technology to assist the Instructor in creating the best learning environment possible. This includes many responsibilities such as: uploading each week’s class materials into the room and setting up the week’s layouts, supporting the Instructor with planning interactive and engaging teaching activities each week, assisting students and the Instructor with any troubleshooting, writing a session participation report, and many others.
What this looked like in Adobe Connect
Image 1: A panel view layout with a larger video pod can include the Attendee pod on the left side of the screen, a Video pod for webcams, and the Chat pod. The person pictured in the room is the author. Adobe product screenshot(s) reprinted with permission from Adobe. Screengrab taken by Agata Dera, 2022.
Image 1 Alt-Text: In this Panel View layout, on the far left, the Attendees pod is narrow and stretches from top to bottom. Next, the Video pod is in the center of the screen taking up the majority of the layout space. Finally, the Chat pod is included on the bottom of the screen, directly under the Video pod. In the Chat pod, there is a message that says “Hi everyone! Welcome to today’s live class session. Today we will hear from our guest speaker talk about their experiences in the social work field.”

Image 2: A panel view layout with a larger chat pod would include the Attendee pod on the left side of the screen, a Video pod for webcams, and the Chat pod. The person pictured in the room is the author. Adobe product screenshot(s) reprinted with permission from Adobe. Screengrab taken by Agata Dera, 2022.
Image 2 Alt-Text: This screengrab shows the same room as in Image 1. The difference is that in this layout, the Video pod is smaller, and the Chat pod takes up most of the layout’s space. The Chat pod includes the same message as in Image 1.

Image 3: A panel view layout with a powerpoint presentation would include the Attendee pod on the left side of the screen, a Video pod for webcams, a Share Pod (powerpoint presentation) and the Chat pod. The person pictured in the room is the author. Adobe product screenshot(s) reprinted with permission from Adobe. Screengrab taken by Agata Dera, 2022.
Image 3 Alt-Text: In this Panel View layout, on the far left, the Attendees pod is narrow and stretches from top to bottom, taking up approximately 20% of the total width of the screen. Next, three pods are stacked one on top of the other and take up the rest of the layout. The Video pod is on top with the author on webcam, the Share pod is in the middle with a sample slide that says “Guest Speaker Slides,” and the Chat pod is on the bottom with a message that says “Hi everyone, welcome to week 3.”

Acknowledgements
I would like to take this opportunity to thank Matthea Marquart for her wonderful leadership. To Beth Counselman Carpenter, (the first Instructor I ever supported) a remarkable person I am honored to call my friend.
To my incredible lifelong mentors: Jill Cermele for her guidance and for inspiring me to pursue a career in higher education; Michelle Ballan for her impact on my professional accomplishments and Paul Blodgett for his impact on my development as an athlete and person.
Lastly to my phenomenal friend: Magdalena Tyrpien; and to my amazing mom!