In this chapter we will show how dedicated chat pods in Adobe Connect were used in a simulated client role play video exercise in a motivational interviewing skills-based lab for master’s level social work students. We will also discuss how these particular features and functions in Adobe Connect helped support the experiential learning approach for clinical skills training.
Teaching and Learning Goal
The learning goals for this activity are for students to:
- Develop clinical skills through their own practical experience of implementing the skills in a simulated “real world” client scenario.
- Reflect on their experiences in the exercise to then be able to assess how to infuse clinically effective and meaningful skills.
- Engage in peer-to-peer observation and feedback.
The Motivational Interviewing Skills-Based Lab Program
A motivational interviewing (MI) skills-based lab program was developed to help prepare master’s levels social work students for entry into first year field practicum (Zweben et al., 2022). The training program was adapted from an empirically-supported experiential learning approach. This approach is characterized as learning by doing – in which students gain knowledge and skill through heavily interactive, practical-based activities and exercises, with minimal didactic teaching by the instructor. Experiential learning is highly regarded by educators interested in improving field education (Bogo, 2015; Cheung & Delavega, 2014; Huerta-Wong & Schoech, 2010) and for trainings in motivational interviewing (Madson et al., 2009; Martino et al., 2011; Schwalbe et al., 2014).
In the MI lab program, experiential learning is a multi-phase model (Kolb, 1984): first, students learn how to apply the skills empirically with a role play exercise. Second, students are then able to reflect upon their concrete experience in the role play by exploring how and why the particular skills were effective and/or helpful in meeting the goals of the exercise. Third, students practice providing feedback based on their observations of their peers’ practice, and finally, fourth, they link their praxis to established concepts.
Skills-Based Lab Exercise in Adobe Connect
The use of specific Adobe Connect features and layout design helped maintain the above learning model in the execution of this particular role play exercise in a virtual classroom (Piepmeier & Marquart, 2020; Whitfield, et al 2021). The simulated client role play video exercise is a multi-step process: students watch the client give a statement, then the students role play by generating their own response to the statement in the role of a practitioner. They are then prompted to reflect on why they chose their specific response and how it would be helpful/effective for client engagement. Finally, they review other examples of client responses made by their peers and provide feedback. This process is repeated after each new statement given by the client.
To facilitate this in Adobe Connect, the video pod is centrally located in the layout (Image 4) so students are able to view the client as if they are meeting face-to-face (the client video was filmed in such a way where the actor playing the client is facing directly toward the camera). To accommodate students having to respond to multiple successive prompts we used dedicated chat pods for respective prompts. One “primary” chat pod was designated for students to type in their response to the client statement. A secondary chat pod was dedicated to students’ reflections and feedback on the role play responses from the primary chat pod. They used the secondary chat space to elaborate further on why they chose their specific response, discuss how it may be clinically effective for the client, and identify the specific skills they used in their response. The secondary chat pod was also used for students to then provide feedback to their peers’ response from the primary chat pod. This provided a chance for students to be exposed to alternative methods for client response which can help encourage them to think more openly about strategies in the clinical setting.
There are many advantages to this layout for the success of this exercise. The use of dedicated chat pods allows for all students to participate simultaneously in a timely manner (versus having only a select number of students share one by one which could be time consuming). Dedicated chat pods also help organize the volume and type of responses coming in from students thereby easing the process of locating and reading specific responses when it comes to reflecting on the experience of the exercise. Furthermore, this layout is more accommodating to the fact that students work at different paces and reduces the risk of some steps in the activity getting overlooked. A fast-paced single chat pod in which students type everything would likely place undue pressure on the students and result in rushing or only partial participation in the activity. Ultimately, the use of dedicated chat pods ensure a higher level of participation and a higher level of quality of work from the students.
Technical Details and Steps
Steps for managing the technology for this exercise:
- When prompted to play the video, I pressed play and allowed the video to play its introduction, which is immediately followed by the client actor giving their first statement. After the client finished their statement, I paused the video and the students were prompted to generate a response to the client.
- The students typed their replies to the client into the primary chat pod labeled “Video exercise response” (Image 4).
- Once the students completed their response, they were then prompted by the instructor to use the secondary chat pod to identify the skills they used in crafting their response to the client, and why those skills would be helpful and/or effective for the client.
- Once students completed the above two steps, then the class was directed by the instructor to review the “Video exercise response” chat pod and choose a peer’s response that they found particularly effective and why. Students provided this feedback in the secondary chat pod.
- Steps 1-4 were repeated for each client statement in the video.
Setting up the layout in Adobe Connect
There are two ways to set up a layout. The first way is to create a new layout from a duplicate layout. This means that you create a copy of an existing layout and modify it to meet your needs. The second way is to select a new layout and add all the pods that you need individually. Below, I explain both ways to set up the layout for this activity.
Steps for setting up a duplicate layout:
- In the layout manager (which will be located on the right or left of the Adobe Connect window depending on how you have your Adobe Connect window set up) (see Image 1), I selected the “+” sign to create a new layout . Another option is to click on the *** drop down menu for layout (it can be found on the layout ribbon next to where it says Layout) and select “create new.”
- I selected “Duplicate Existing Layout” and then chose a layout I had previously set up in the room. This layout was one that we used when showing the session slides, and already contained a share pod, attendees pod, chat pod and video pod that will be needed for this layout. It gave me the option to rename the layout, and for the purpose of this article I left it as “slides view_copy.”
- I moved the video pod, share pod, and attendee pod to the left side of the screen and resized them to allow for additional pods to be added. Because the share pod was duplicated from the prior layout, the slides on the share pod were synchronized across layouts, so that if I clicked through the slides in one layout, they also progressed in the other layout. I left the chat that was duplicated from the other layout on the bottom of the layout so that students could continue the same conversation across different layouts (see Image 2).
- I added a new share pod and a new chat pod. The newly added share pod will contain the video for the exercise and is placed above the existing chat pod. The newly added chat pod creates a space for the students to respond to the video exercise and it is placed to the right of the new share pod (see Image 3).
- I completed the layout by uploading the video exercise and making sure the slides in the carried over share pod were on the correct page. The second chat pod was renamed “Video Exercise Response” (see Image 4).
Steps for setting up a new layout:
- In the layout manager I selected the “+” sign to create a new layout. This caused Adobe Connect to create a new layout and place it at the bottom of the Layouts ribbon (see Image 1). Adobe Connect also pre-named it “New Layout.” You can change the layout’s name; for the purpose of this chapter I choose to leave it.
- I then added a share pod, video pod and attendee pod and moved them to the left side of the screen (see Image 5).
- I located the chat from the main slides page in the pods menu and added that to the bottom of the screen so that discussions from previous layouts could be carried over to this layout (see Image 6).
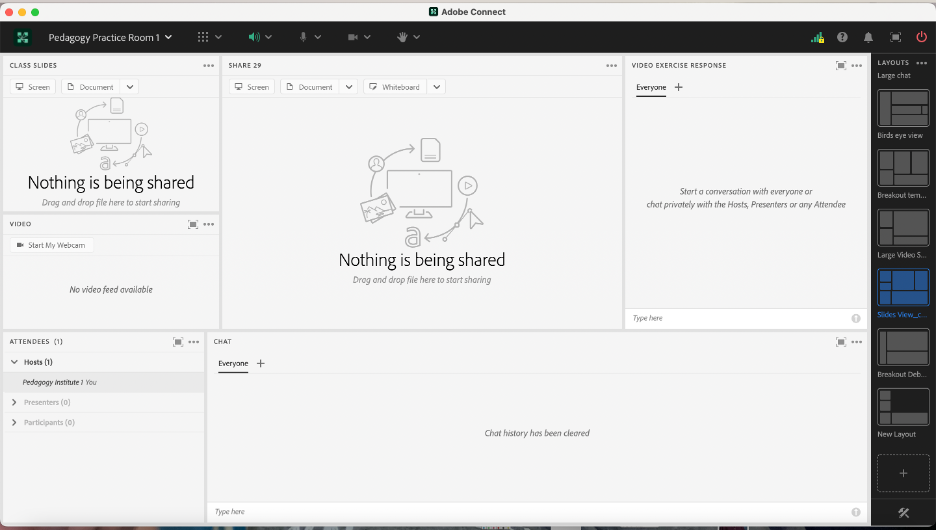
- I added a second share pod above the existing chat pod and second chat pod to the right of the newly added share pod. Once all the pods were added, I re-sized everything to allow for proper spacing. I also renamed the second chat box: “Video exercise response” (see Image 7).
- I completed the layout by uploading the video exercise, adding the slides, and making sure the slides in the share pod were showing the correct slide (see Image 4).
What this looked like in Adobe Connect:
Image 1: Blank Adobe Connect classroom layout with drop down menu showing. Adobe product screenshot(s) reprinted with permission from Adobe.
Image 1 Alt-Text: This image is a screengrab of an Adobe Connect classroom. In the menu bar across the top, on the left the room is titled “Pedagogy Practice Room 1,” and this is followed by icons for a room options dropdown menu, pods dropdown menu, device speaker, microphone, webcam and raise hand feature. On the right side of the menu bar, there are icons that represent: Internet connection status, report a problem, links to support resources, notifications, maximize to full screen, and end session. Under the end session icon, there is the “Layouts” ribbon. The dropdown menu for layouts is open and the choices include “Create New, Manage, Lock, Reset to Default, Dock to Right, Dock to Left, Auto Hide and Close.” Under the dropdown menu there is the vertical Layout panel with the icons for several different layouts. The selected layout is blue in color while the rest are grayed out.
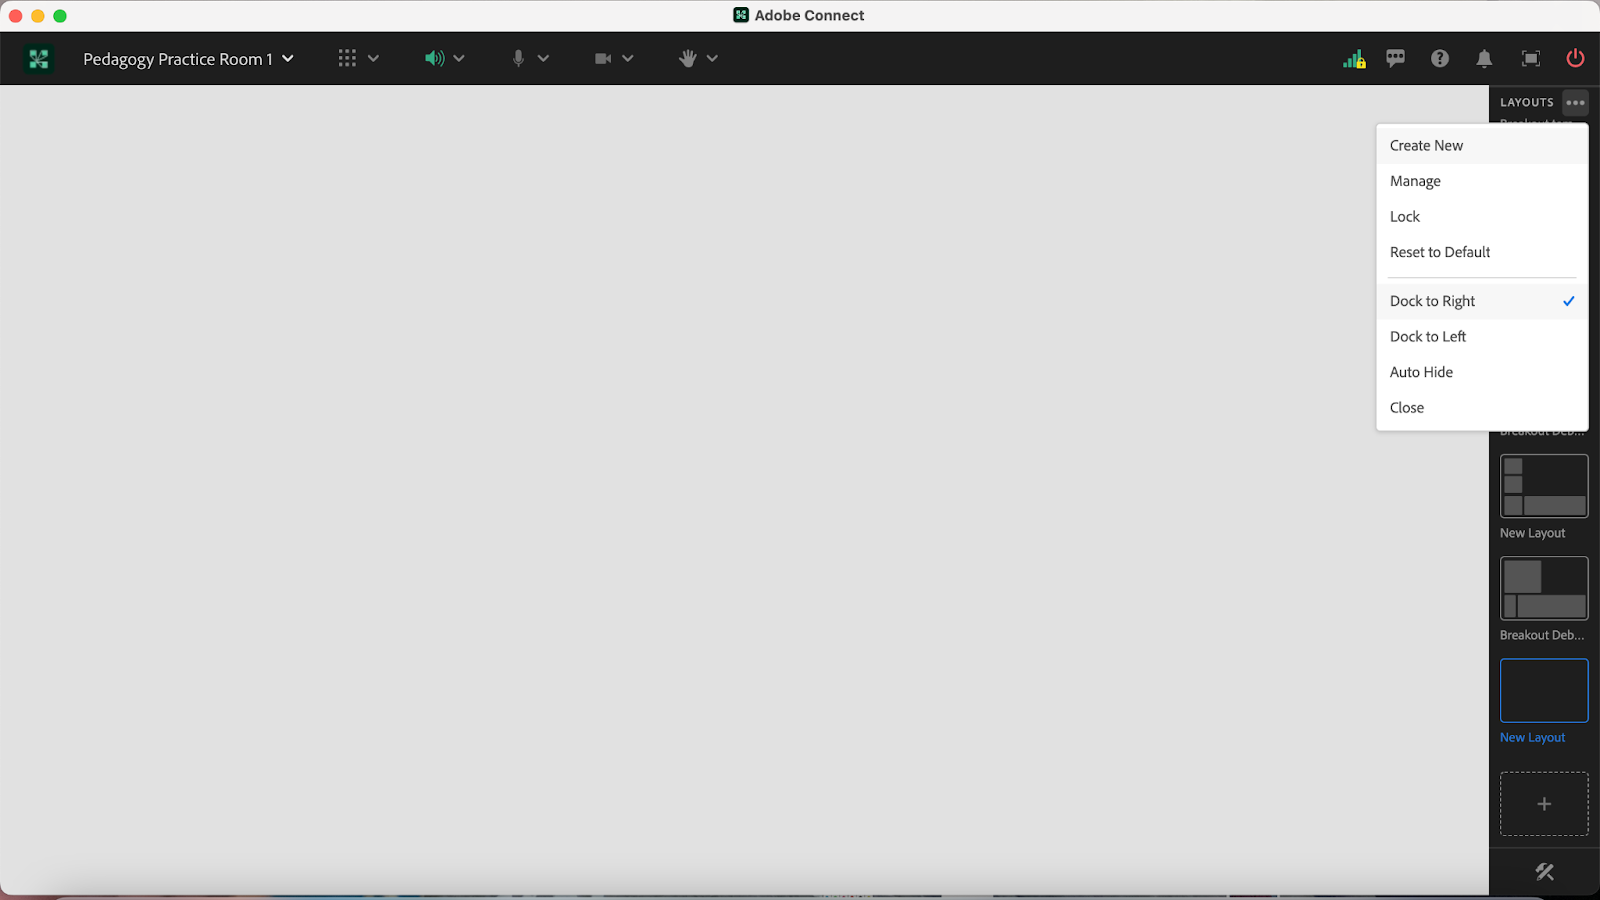
Image 2: Adobe Connect Classroom Layout with a Share Pod, Video Pod and Attendee Pod on the right side. The slides in the share pod contain a PowerPoint that is the property of MI Training Program at CSSW. There is a chat pod located on the bottom of the layout and an empty space above the chat for additional pods. The video pod includes an image of one of the authors on webcam. Adobe product screenshot(s) reprinted with permission from Adobe.
Image 2 Alt-Text: This is a screengrab of an Adobe Connect classroom. In the top left corner of the layout is a share pod showing a slide that is labeled “Video: ‘Annie.’” The slide has three bullet points. The first says “Annie will get a series of statements. For every statement, a prompt will appear to write down a response to that specific statement.” The second bullet point says “After each statement: (1) share your response with class, (2) indicate if it is an affirmation, reflection, or summary, and (3) give reason(s) for why/how you chose your specific response.” The third bullet point says “Group replies with feedback: Did the responses show an accurate understanding of Annie’s perspectives of her situation? Would it facilitate engagement and rapport building?” Beneath the share pod is a video pod with a woman with dark hair pulled back, a blue shirt and a light-yellow background. In the bottom left of the video window the webcam is labeled with her name “Pedagogy Institute.” She is smiling for the camera. Below the video feed there is an Attendees pod, and within the pod there are three labels: Host, Presenter and Participants. There is only one attendee logged in to the room; the attendee is named “Pedagogy Institute (you). To the right of the attendees pod there is a blank area, with a chat pod below. The chat pod is labeled “Chat Everyone,” and it is blank, with text in the middle that states “Start a conversation with everyone or chat privately with the Hosts, Presenters or any Attendee.” On the right side of the screen is the Layout panel described in Image 1.
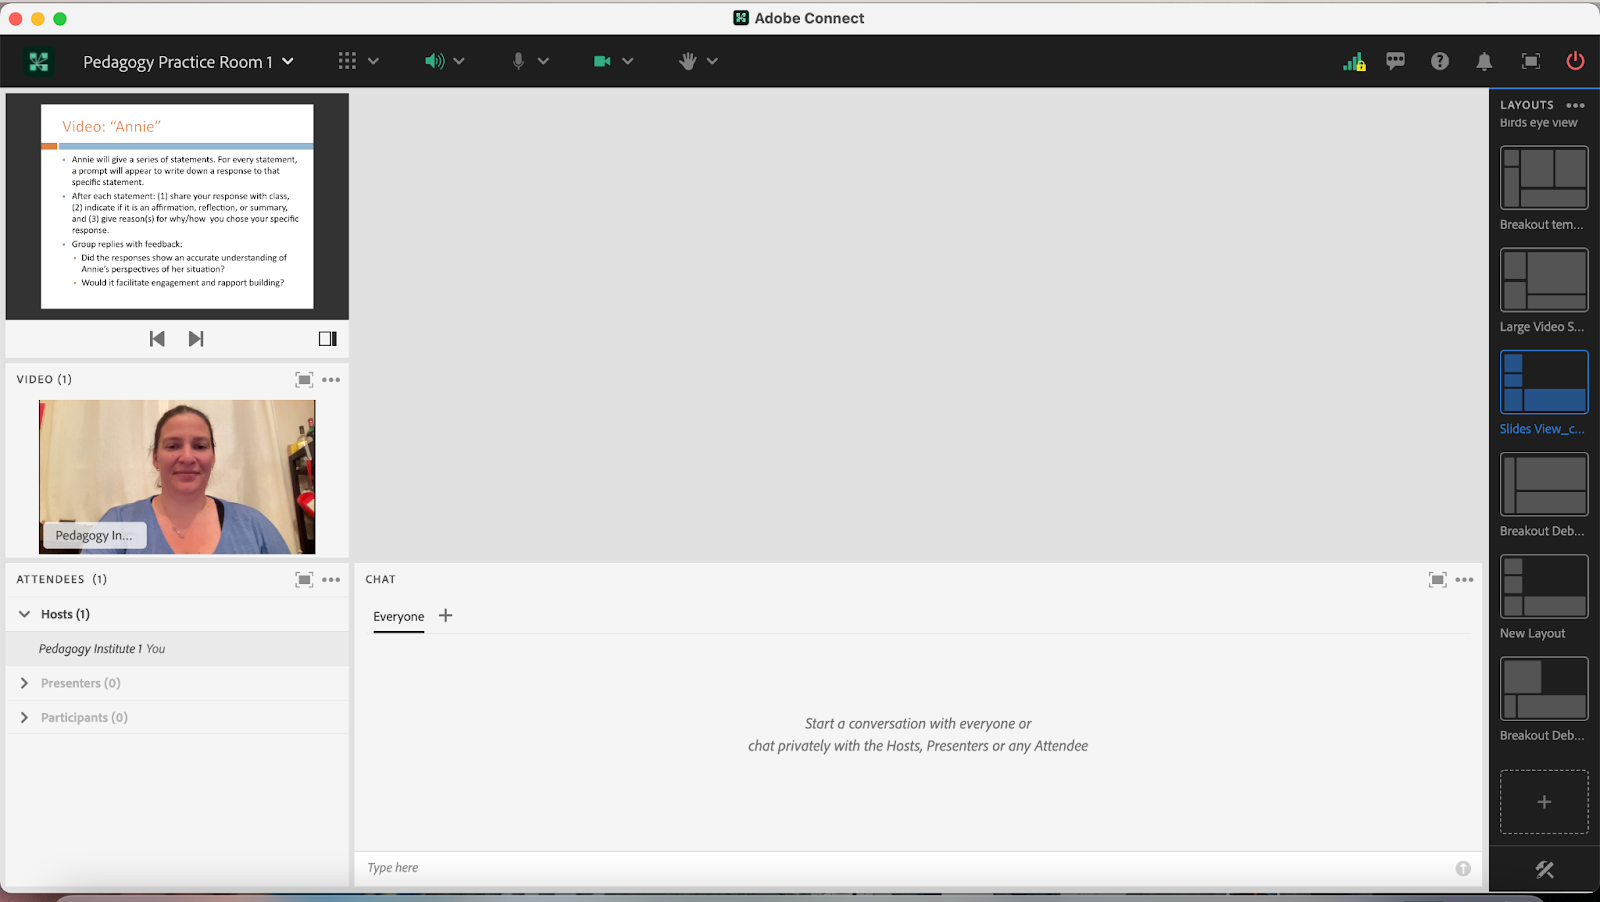
Image 3: Adobe Connect classroom layout with additional share pod and additional chat pod. Adobe Connect classroom layout contains share pod (with slides which are property of MI Training Program at CSSW), video pod and attendee pod on the right side as well as a chat pod located on the bottom of the layout. Adobe product screenshot(s) reprinted with permission from Adobe.
Image 3 Alt-Text: This is a screengrab of the same Adobe Connect classroom as in Image 2. The difference is that two new pods have been added to the room, in the area that was previously blank. The first new pod is a Share pod labeled Share 29, which has a menu across the top with icons for the following options: Share screen, Share document, and Share whiteboard. In the middle of the share pod, it states “Nothing is being shared, Drag and drop file here to start sharing.” To the right of this share pod is the other new pod – a blank chat pod labeled “Chat 19.”
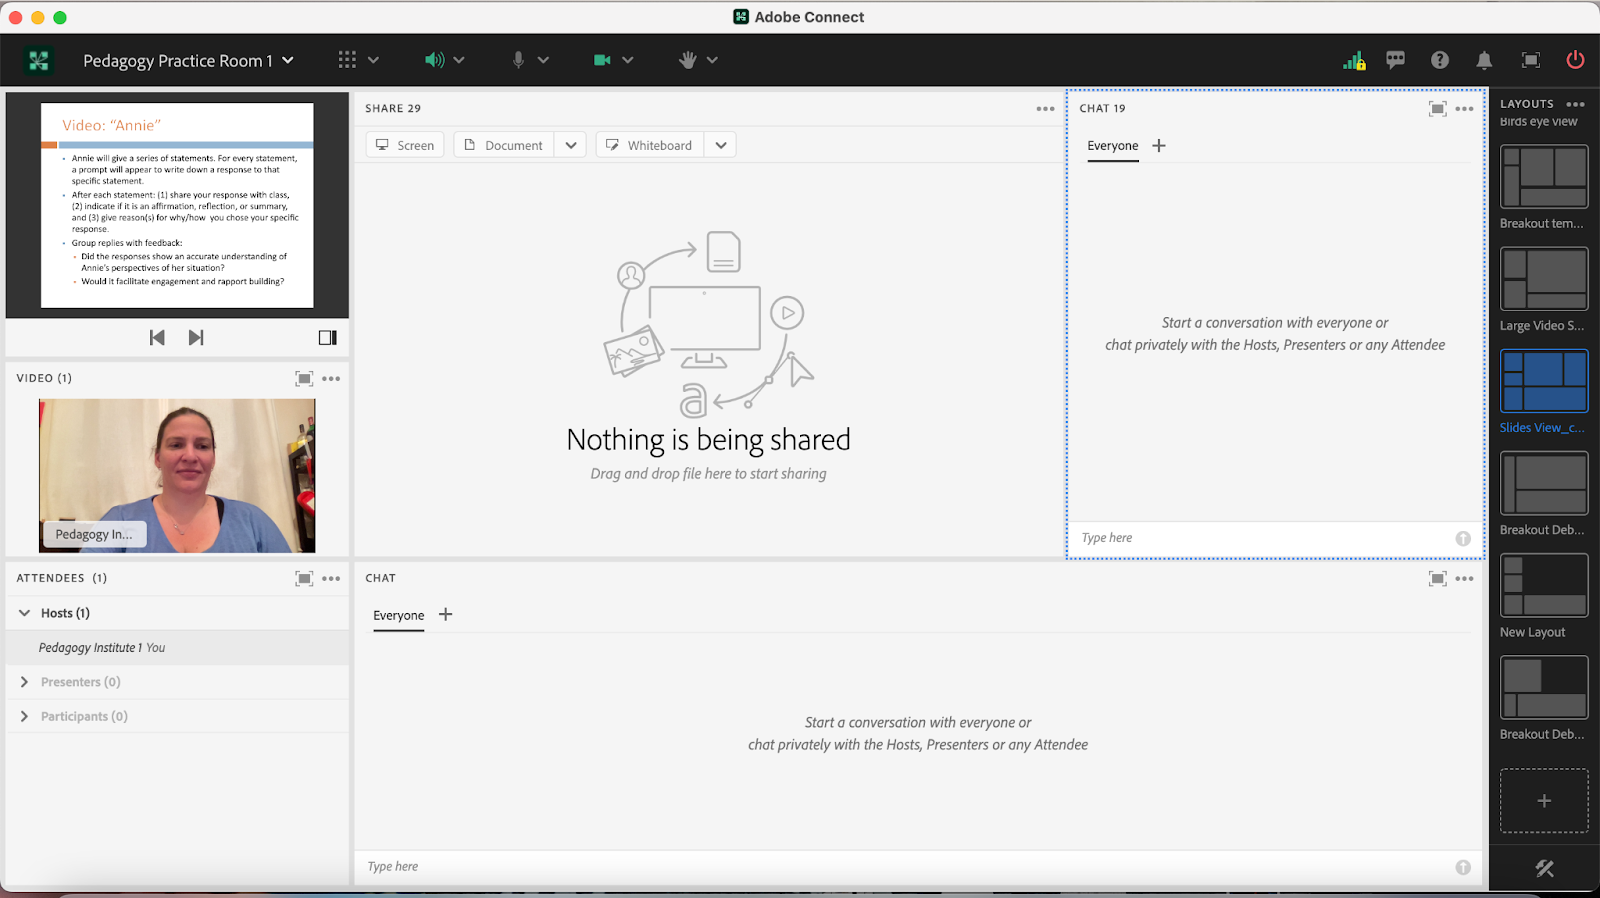
Image 4: Adobe Connect classroom layout with two share pods, video pod, attendee pod and two chat pods. This layout contains slides and video that are property of MI Training Program at CSSW. Adobe product screenshot(s) reprinted with permission from Adobe.
Image 4 Alt-Text: This is a screengrab of the same Adobe Connect classroom as in Image 3. The difference is that two new blank pods added in Image 3 have been updated. The share pod now contains a video, and the pod is labeled “Annie Vase Exercise.MP4.” The video is black with the word “ANNIE” in white text in the center, and at the bottom of the pod are a small video play icon, video time (00:00:41/00:03:49), and volume icon. To the right of this video, the chat pod’s label has been changed to “Video Exercise Response.”
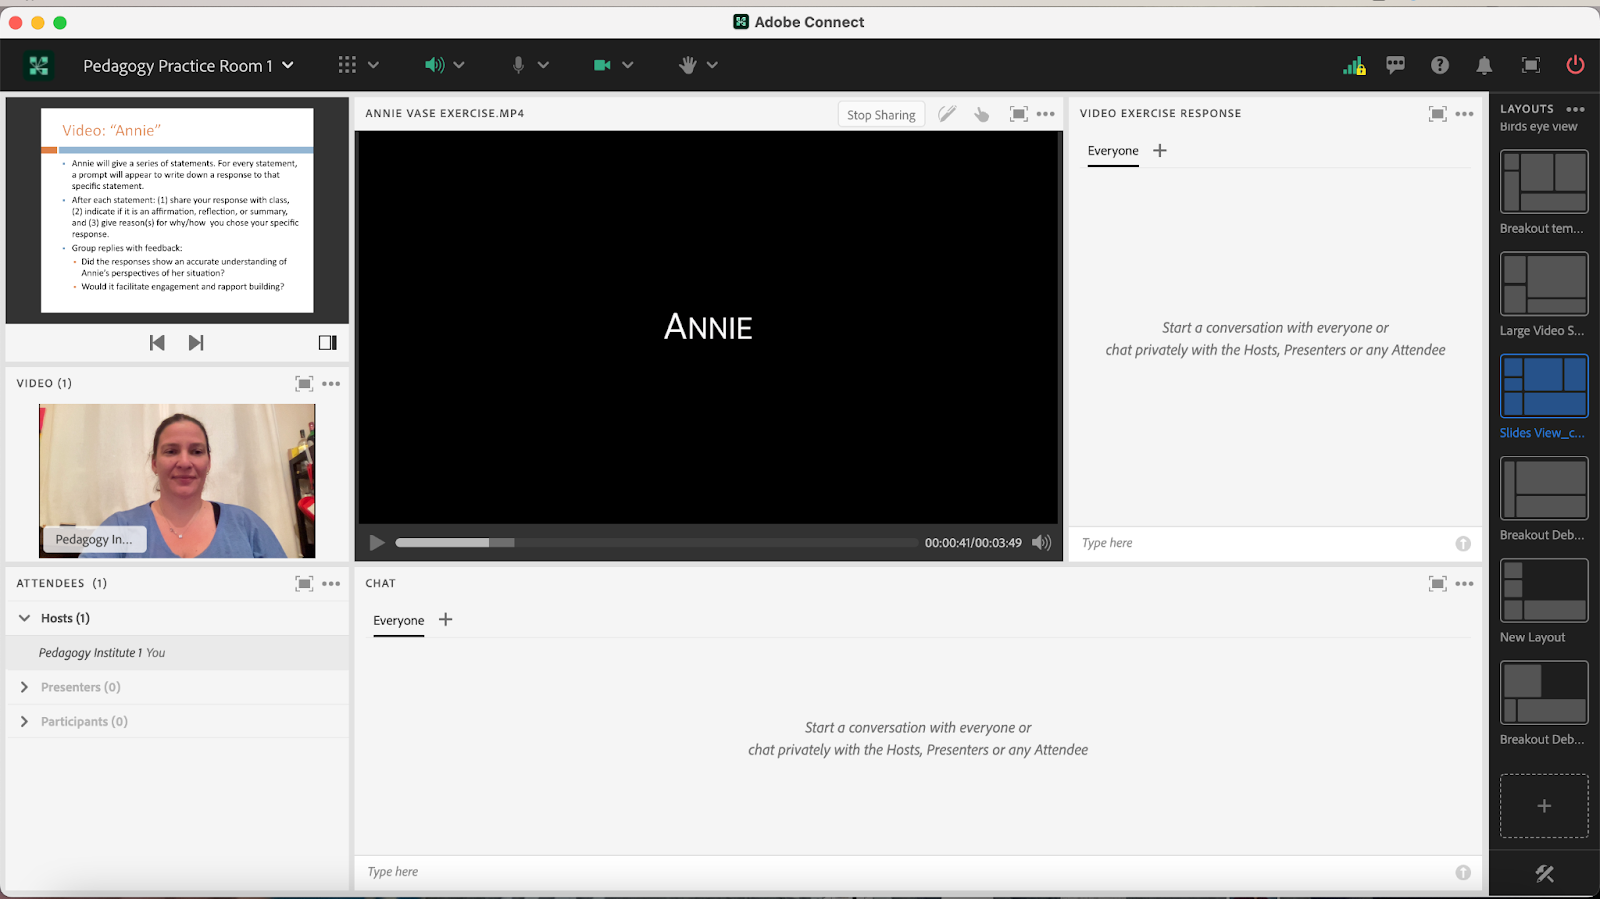
Image 5: Adobe Connect classroom layout with a share pod, video pod and attendee pod on the left side. Adobe product screenshot(s) reprinted with permission from Adobe.
Image 5 Alt-Text: This is a screengrab of an Adobe Connect classroom with a narrow column of pods stacked on the left, and most of the room blank. The top pod on the left is a share pod that is labeled “Share 34.” Beneath the share pod is a video pod that contains a button labeled “Start My Webcam.” There is no webcam showing, so the pod says “No video feed available.” Below the video pod is an attendees pod.
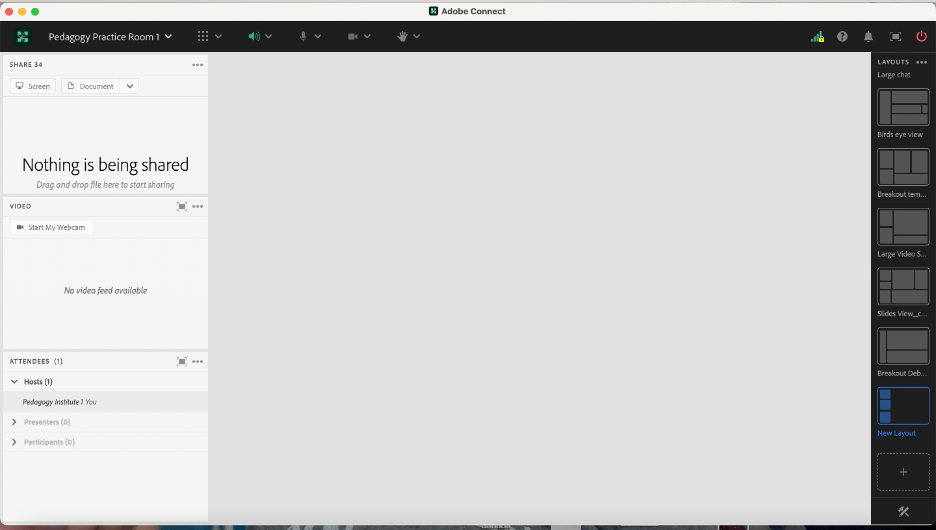
Image 6: Adobe Connect classroom layout with newly added chat pod. Adobe product screenshot(s) reprinted with permission from Adobe.
Image 6 Alt-Text: This is a screengrab of the same Adobe Connect classroom as in Image 5. The difference is that in the bottom part of the area that was previously blank, there is now a blank chat pod labeled “Chat Everyone.” The rest of the classroom is still blank.
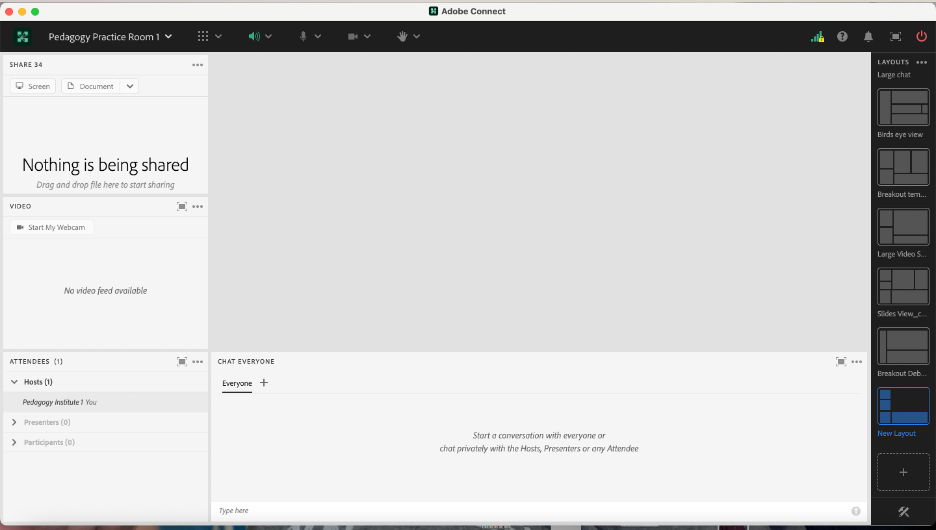
Image 7: Adobe Connect Classroom Layout with newly added chat and share pod. The newly added share pod has also been renamed to “Video Exercise Response.” Adobe product screenshot(s) reprinted with permission from Adobe.
Image 7 Alt-Text: This is a screengrab of the same Adobe Connect classroom as in Image 6. The difference is that the share pod in the upper left corner previously called “Share 34” has been renamed “Class Slides,” the “Chat Everyone” pod has been renamed “Chat,” and two new pods have been added to the layout in the space that was previously blank. The first new pod is a blank share pod labeled “Share 29,” and the second new pod is a blank chat pod labeled “Video Exercise Response.”
Acknowledgements
We would like to thank Matthea Marquart, Assistant Dean, Online Education and the entire CSSW Online Campus Team, Allen Zweben, Director of the MI Training Program at CSSW, and all the MI skills-based lab instructors.
References
Bogo, M. (2015). Field education for clinical social work practice: Best practices and contemporary challenges. Clinical Social Work Journal, 43(3), 317-324. https://edtechbooks.org/-ppdc
Cheung, M., & Delavega, E. (2014). Five-way experiential learning model for social work education. Social Work Education, 33(8), 1070-1087. https://edtechbooks.org/-ZJxG
Huerta-Wong, J. E., & Schoech, R. (2010). Experiential learning and learning environments: The case of active listening skills. Journal of Social Work Education, 46(1), 85-101. https://edtechbooks.org/-pLZT
Kolb, D. (1984). Experiential learning: Experience as the source of learning and development. Englewood Cliffs, NJ: Prentice Hall.
Madson, M. B., Loignon, A. C., & Lane, C. (2009). Training in motivational interviewing: A systematic review. Journal of substance abuse treatment, 36(1), 101-109. https://edtechbooks.org/-SNEq
Martino, S., Canning-Ball, M., Carroll, K. M., & Rounsaville, B. J. (2011). A criterion-based stepwise approach for training counselors in motivational interviewing. Journal of substance abuse treatment, 40(4), 357-365. https://edtechbooks.org/-SRue
Piepmeier, M. & Marquart, M. (2020, February 18). Converting an experiential clinical skills-based lab from an on-campus to a live online version: A pilot. Poster for the Columbia University Center for Teaching and Learning’s Celebration of Teaching and Learning Symposium, New York, NY. https://edtechbooks.org/-tfuu
Schwalbe, C. S., Oh, H. Y., & Zweben, A. (2014). Sustaining motivational interviewing: A meta‐analysis of training studies. Addiction, 109(8), 1287-1294.https://edtechbooks.org/-XLCQ
Whitfield, A., Piepmeier, M., and Marquart, M. (2021, April 15). Online Skills-Based Motivational Interviewing Lab: Tools to Prepare Students for Field Education. Workshop for the Social Work Distance Education Conference, San Antonio, TX. Online via Zoom. https://edtechbooks.org/-kYM
Zweben, A., Piepmeier, M., & Leak, K. (2022). Training Incoming Social Work Students in Motivational Interviewing Skills: An Experiential Lab Model for Advancing Social Work Education. Advances in Social Work, 22(1), 178-196.https://doi.org/10.18060/25478