This chapter is a brief overview of Microsoft Excel. Excel is one of the top-used business applications across virtually any industry. It’s much more than graphed paper; the programing in this application streamlines and solves complicated business problems. It has data management abilities, meaning you can store a database of customer information and perform analysis to gather important data about your business like sales data, popular items, etc.
Understanding how to properly use Excel is a highly employable skill and can lead to opportunities for promotion. It helps you lead in resolving challenging issues and share the most important information.
This textbook provides practice instructions to understand how to use Excel. Take your time to use this text to practice and rework skills in Excel to quickly learn how to use the program. It will take practice and effort, but as you learn Excel, you will see benefits throughout your life. Speak with your instructor, tutors, and group chats to better understand this content.
Let’s get started by learning some of the Excel basics:
Download Excel
To install Excel on your computer, follow the steps located in the class syllabus. It’s important to note that you cannot use the online version of Excel for this class. You need the full version of Excel not the mobile app or browser version.
Opening Excel
After downloading Excel on your computer, open it by accessing the Start Menu and searching Excel. Open the application.
The first menu available to you will show you template workbooks and recent workbooks. A workbook is a collection of one or more spreadsheets, or worksheets, in a single file.
Open a blank workbook. It should look like Figure 38.1.
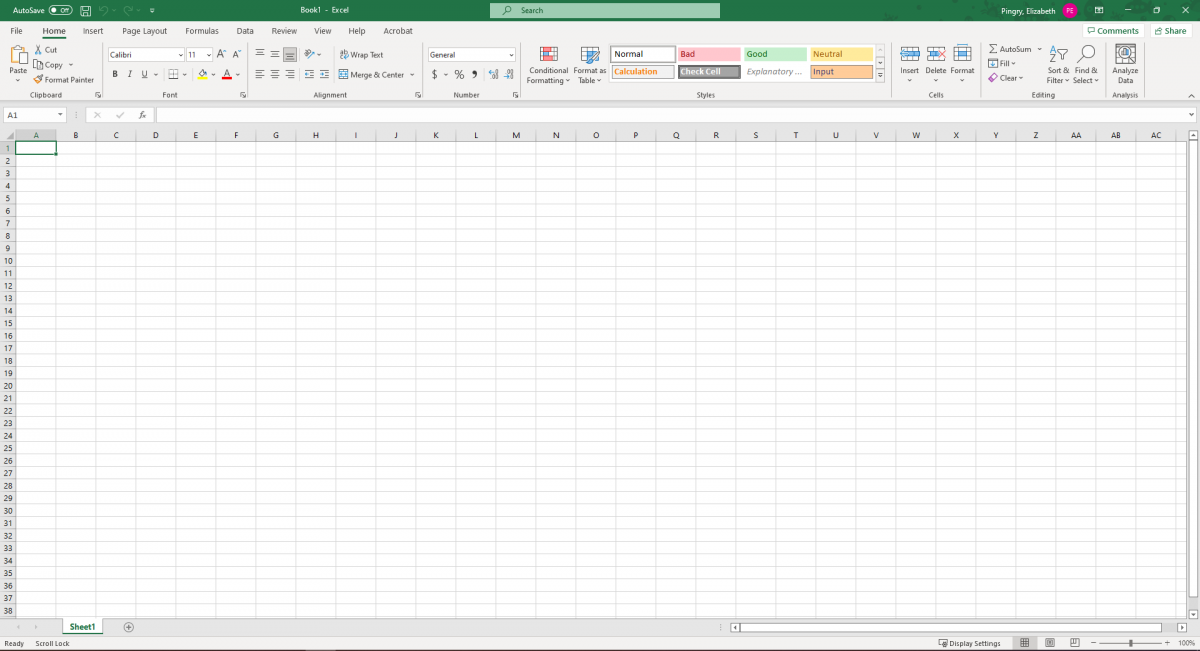 Figure 38.1
Let’s take a look at different elements of a workbook.
Ribbon & Tabs
The Ribbon has a selection of Tabs that offer different tools available in Excel. (See Figure 38.2)
 Figure 38.2
- In the File tab, you’ll be directed to a menu where you can get more information, save, print, share, etc. your workbook.
 Figure 38.3
- The Home tab has basic document tools, such as access to your clipboard, formatting fonts, text alignment, number formatting, styles, cell structure, editing tools, and analysis.
 Figure 38.4
- The Insert Tab has tools you can use to insert tables, illustrations, add-ins, charts, tours, sparklines, filters, links, comments, text boxes, and symbols.
 Figure 38.5
- The Page Layout tab has tools regarding page themes, setup, scale, sheet options, and arrangements.
 Figure 38.6
- The Formulas tab has tools like the function library, defined names, formula auditing, and calculation.
 Figure 38.7
- The Data tab has tools for getting and receiving data, queries, data types, sorting and filtering data, data tools, forecasting, and outlining tools.
 Figure 38.8
- The Review tab has tools for proofing, accessibility checks, insights, languages, comments, notes, protections, and ink.
 Figure 38.9
- The View tab has options for how to view your workbook, what to show in your worksheet, zooming options, and window arrangement.
 Figure 38.10
- The Help tab has basic support options.
 Figure 38.11
- The Acrobat tab has tools for creating, sharing, reviewing, and running actions in your workbook as a PDF.
 Figure 38.12
Name Box
The Name Box indicates what cell is selected.
 Figure 38.13
Formula Box
The Formula Box is where you can see or type in the information for selected cell(s).
 Figure 38.14
Rows
A row is the horizontal selection of cells, indicated by numbers on the left side of the worksheet.
Columns
A column is the vertical selection of cells, indicated by letters at the top of the worksheet.
Cells
Cells are the individual boxes within the grids. A single cell is indicated by the column letter and row number (for example, A1 or F26).
Objects
Objects are images, illustrations, charts etc. that float above the cells rather than rest inside of a specific cell.
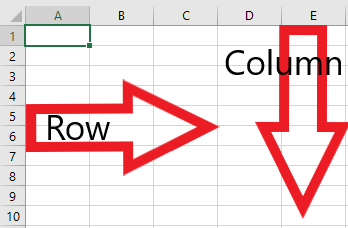 Figure 38.15
Worksheets
A worksheet is a spreadsheet within a workbook. Multiple worksheets can exist in a workbook. They can be added by selecting the Plus sign ( + ) next to the most recent worksheet. Worksheets can be renamed by double-clicking the current title.
 Figure 38.16
Navigating Your Workbook
There are three essential data types in Excel: Text, Numbers, and Functions.
Text
Text is just letters or words. If you type a word into a cell and it’s recognized as text, Excel defaults to align the text to the left of the cell. You can use text to organize elements of your worksheet by labeling rows or columns according to the data you add.
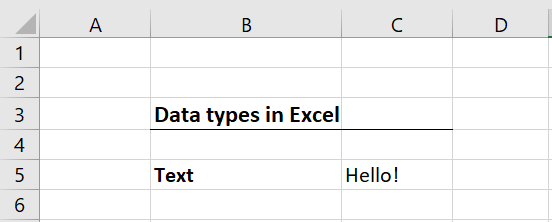 Figure 38.17
Numbers
Numbers come in multiple formats, including general data. Numbers are automatically aligned to the right of a cell. The special type of numbers you’ll encounter frequently are Date or Time.
Date
You can format dates in Excel. You can use long-form dates (January 1, 2000) or short-form dates (1/1/2000). You can also represent a date as a serial number by using the General format.
If you type in a serial number and then change the format from General to Date, it will change the serial number to its respective date. For example, if you type in the number 1 in a General format and change the format to Date, the date will show you 1/1/1900, which is the first date available in Excel.
You can change the format of the date by going to the Home tab and selecting the drop-down menu in Number. (See Figure 38.18)
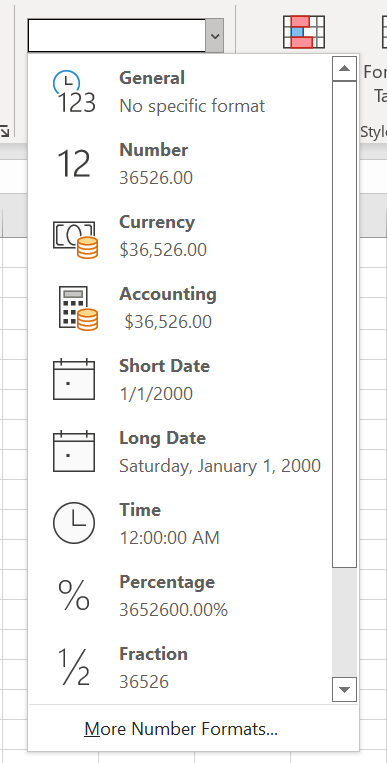 Figure 38.18
Time
Times are similar to dates in the fact that they use serial numbers as well. For example, if we type 1.8 into a cell and change the format to Time, it will show us 7:12:00 PM in the cell. In the formula bar, it will read, 1/1/1900 7:12:00 PM because the serial number is attributed to that day, at that time. (See Figures 38.19 and 38.20)
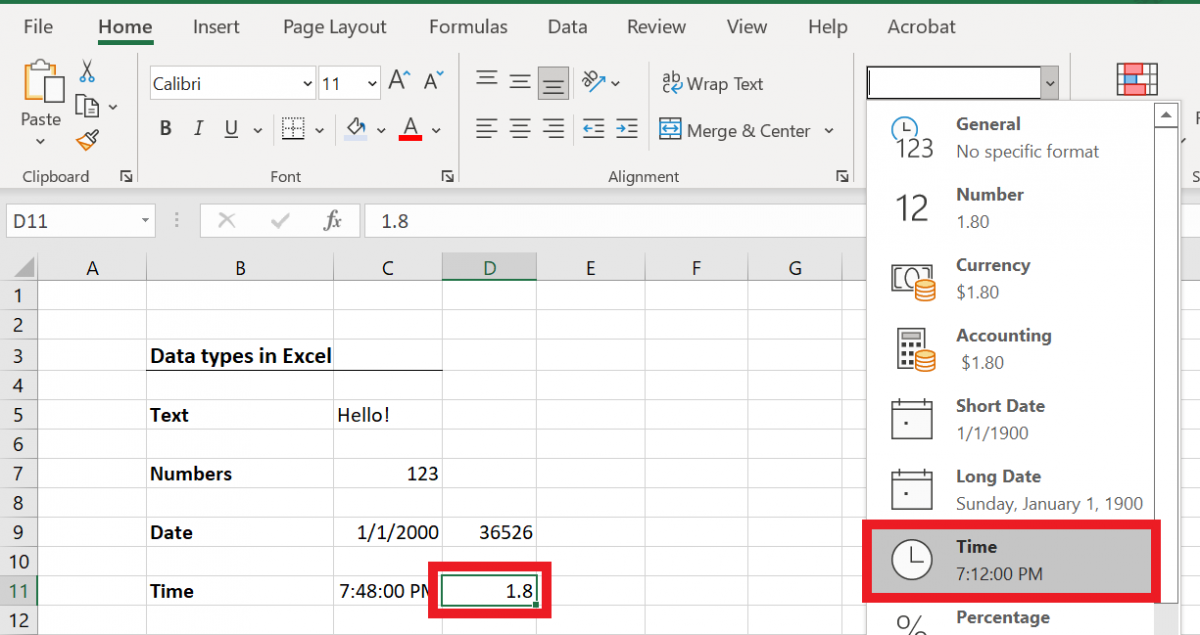 Figure 38.19
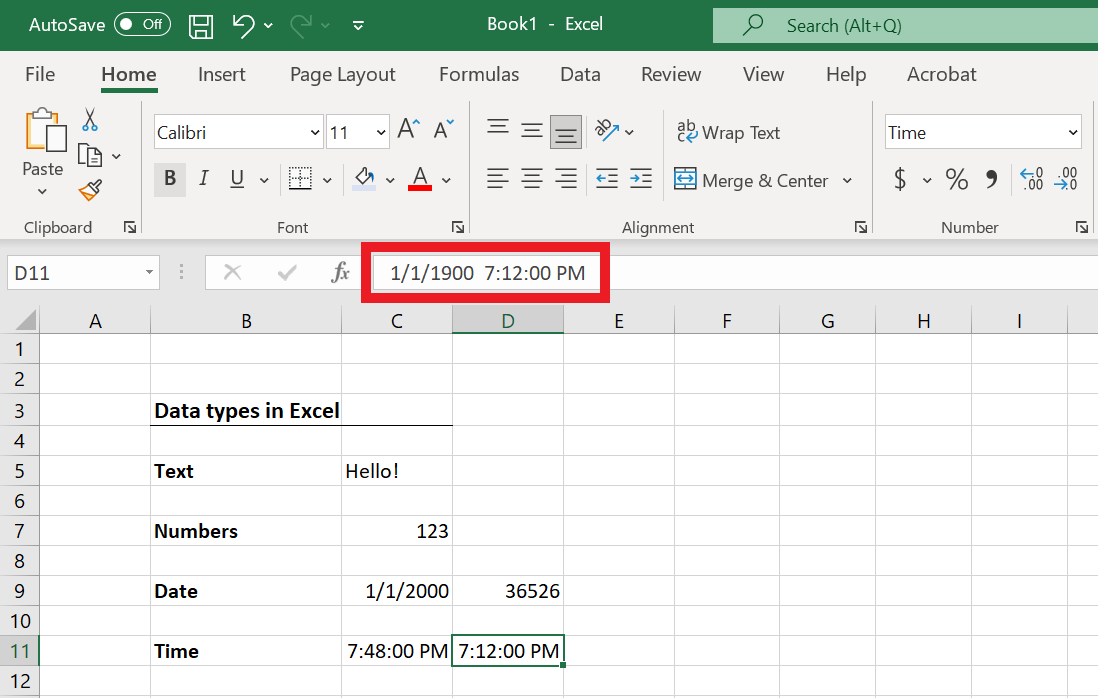 Figure 38.20
You won’t need to memorize serial numbers of dates or times; this is only important to know because it makes it easier to add or subtract days or time. Let’s test out how you can add days to a date in Excel:
- In E9, type the number 1.
- Change the formatting to Short Date.
- The date should change to 1/1/1900. (See Figure 38.21)
 Figure 38.21
- In F9, type in an equation to add 50 days to the date.
- Your equation should be =E9+50. (See Figure 38.22)
 Figure 38.22
- Press the Enter key.
- F9 should now be a date: 2/20/1900, or 50 days past 1/1/1900. (See Figure 38.23)
 Figure 38.23
Functions
Functions are predefined formulas that perform calculations using specific values in a particular order. Excel has dozens of functions available for your use. Functions are viewable in the formula bar, and vary from adding, multiplying, subtracting, and sorting data. This section will teach you how to insert a basic function:
In Figure 38.25, you can see there are numbers in cells C13, C14, and C15. Use a SUM function in C16 to add them all together.
- In C16, use the equal sign ( = ) to start the function.
- Type SUM after the equal sign to indicate you want to add numbers together.
- Open the equation with a parenthesis ( ( ).
- Select C13 and drag down to C15 and then close the parenthesis ( ) ).
- The equation should read =SUM(C13:C15). (See Figure 38.24)
 Figure 38.24
- Press the Enter key.
- C16 should have the sum of the three numbers: 6. (See Figure 38.25)
 Figure 38.25
Functions are helpful because if you change one of the numbers from the selection, it will change the answer in the cell with the function. For example, if you change the number 1 in C13 to 5, the number in C16 will change to 10. (See Figure 38.26)
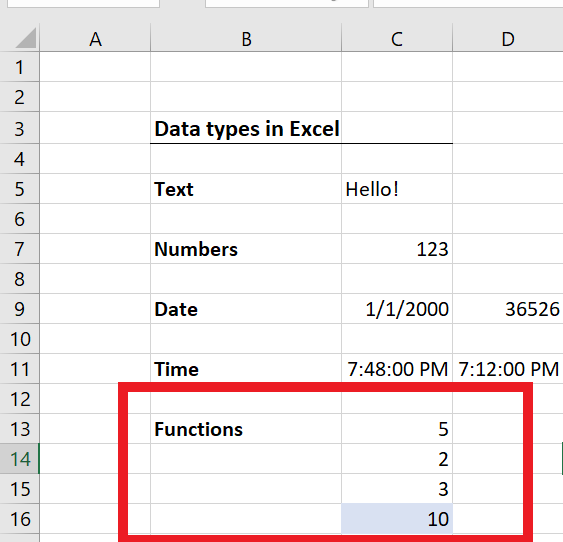 Figure 38.26
Note: If you have text and numbers in a cell together, Excel will recognize the cell as text-based as shown in Figure 38.27. If you ever need to label a row or column, separate it from the data to ensure you can use the appropriate functions.
 Figure 38.27
Change Text Format
You can change how the text or numbers in a cell appears. You can change it to bold, italic, or underline.
For example, you can change the text in a cell to bold:
- Click on the cell with the text you want to change.
- Go to the Home tab.
- Click on B for Bold. (See Figure 38.28)
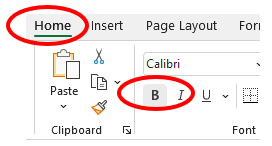 Figure 38.28
Change Text Alignment
Changing the position of the text within a cell is text alignment. The text can be centered, and aligned right or left. (See Figure 38.29)
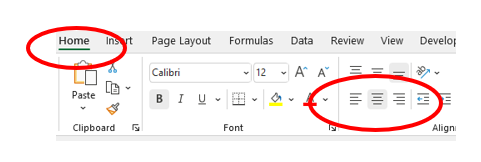 Figure 38.29
You can use the Wrap Text if the text is too long.
To use Wrap Text:
- Click on the cell you want to use Wrap Text.
- Go to the Home tab then under the Alignment section.
- Click on Wrap Text. (See Figure 38.30)
 Figure 38.30
Applying Borders
You can add borders to a cell or multiple cells. There is a variety of types of borders you can select.
For example, you can apply All Borders to a particular range like B2:D5.
- Highlight the range of cells B2:D5. (See Figure 38.31)
 Figure 38.31
- Go to the Home tab.
- Click on the Borders icon.
- Select All Borders. (See Figure 38.32)
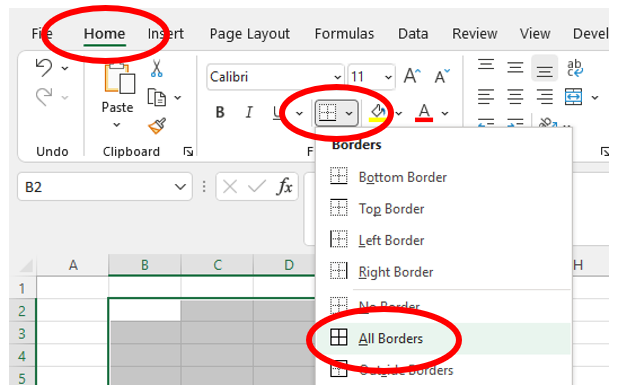 Figure 38.32
Applying Printing Setup
Many times, you want to make sure your spreadsheet prints properly. You can adjust how many pages a spreadsheet prints on.
- Go to the Page Layout tab then under the Scale to Fit section (See Figure 38.33).
- Adjust the Width to 1 page (or your desired width)
- Adjust the Height to 1 page (or your desired length)
 Figure 38.33
Saving Your Workbook
Saving an Excel workbook is easy.
- Go to the Ribbon.
- Select the File tab.
- Select the Save option if it’s a new workbook. If it’s a workbook that you’ve downloaded from the files in this class, you will use the Save As option instead. (See Figure 38.34)
 Figure 38.34
- Select where you would like to save it on your computer (for example, OneDrive, as shown in Figure 38.35).
 Figure 38.35
- A secondary window will open showing the path of where you can save your workbook on your device, as well as the kind of file you’ll save it as.
- The first textbox is where you put the title of the workbook.
- In this class, save the workbook with a title and your last name. (See Figure 38.36)
 Figure 38.36
- The second textbox is the file type. (See Figure 38.37)
- It defaults to be an Excel workbook; we recommend you leave it on its default.
 Figure 38.37