Taking ownership of one’s learning process can be an empowering activity for graduate students. Utilizing a KWL chart (Know, Want to know, Learned) assists students in this reflective process from start to finish. KWL charts work well with contained lessons, guest speakers, or for an entire semester’s reflection.
Teaching and Learning Goal
My goals for using KWL charts are to:
- Understand students’ baseline knowledge on a topic,
- Effectively tailor lectures to fill knowledge gaps and address students’ learning desires.
- Determine what students found as their biggest takeaways.
My goals for students completing KWL charts are to:
- Describe prior knowledge of a given topic.
- Identify learning goals for the given topic.
- Evaluate individual learning through a written reflection.
- Take ownership of the learning process.
Activity and Results
Informally, when chatting with students before and after class I noticed that while many would comment they were “learning a lot,” they could not articulate well what they actually learned. Additionally, I wanted a way for students to take ownership of their learning processes. I also needed a better understanding of the baseline knowledge of the class on new topics, what students desired to learn about from the given topic, and a way that I could easily reference this information to tailor my live session lesson. Thus, I turned to the KWL chart (Ogle, 1986).
There are three main steps to a KWL chart. The first two steps are completed before the lesson begins. Step one is to find out the baseline knowledge of the students by asking them to respond to ‘What do you know about topic x?” Step two is for students to answer the prompt, “What do you want to know about topic x?” The final step occurs after the lesson (or semester) is complete when you ask students to write a written reflection to the prompt, “What did you learn about topic x?”
There are several ways to utilize KWL charts in the online classroom. I recommend using them as a reflection over a semester, for a contained lecture on a new or unfamiliar topic, and for guest speakers.
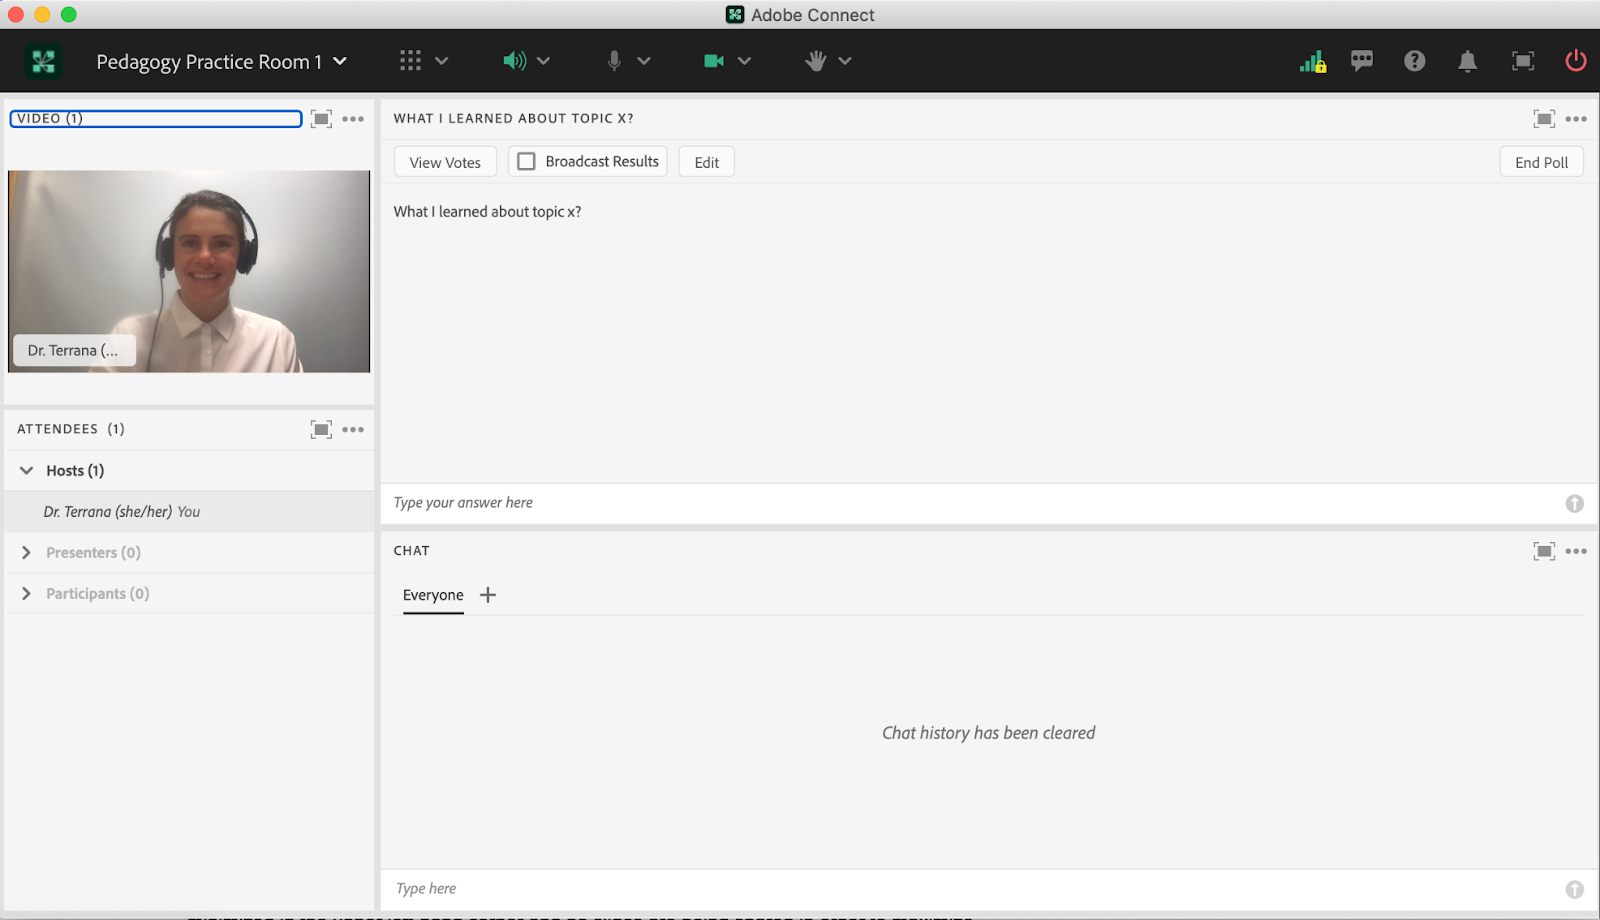
It is important to note that when doing a full course reflection, on the first day of class, complete steps one and two. For example, I take the main topic of the course (e.g., the name of the course) and have students spend a few minutes typing into chat what they already know (Image 1). After that, students spend several minutes in small breakout groups detailing what they want to know (Image 2). Please note that this could be done individually but I have found breakout groups to elicit more responses. After I ask one volunteer from each group, for example, ‘reporters’ to report back to the main group on camera while the groups’ notes are displayed and a different volunteer, the ‘recorder’ (note-taker), shares any of their group’s additional findings in chat (Image 4). As a class, we can see if there are commonalities among the groups for what the class desires to learn about on that topic. Additionally, I hold on to the notes from the chat and note pods to be sure that at some point throughout the semester I cover what everyone wants to know. On the last day of class, as part of our ‘termination,’ we reflect on the semester. I bring us full circle, reflecting on the main course objectives and bringing up the overarching themes of what the students wanted to know on the first day of class to see if we covered them. Towards the end of the final class, I provide five or so minutes where students then respond to the prompt about what they have learned throughout the semester. This could be done as a short answer poll (Image 5), in the group chat, or submitted on Canvas as a final course reflection.
Results and recommendations
Barriers to completing this activity have been minimal. Personally speaking, the biggest barrier is allowing enough time for students to respond to each of the prompts. I like to set a timer (on the host/presenter side, hidden from students) for me to be quiet as silence can sometimes be uncomfortable for the instructor in a live online class.
Using KWL charts has been beneficial for me as an instructor, particularly at the beginning of a semester when I may not have much baseline knowledge of what students already know on a given topic. Additionally, if there are big misconceptions about a certain topic, I can address these up front once students are writing about what they think they know about the topic. Finally, it is always interesting to find out what students regard as their biggest takeaways. Regardless of when I utilize a KWL chart, this exercise assists students in taking ownership of their learning journey and helps me better understand my students.
Technical Details and Steps
There are numerous ways these three Know, Want to know, Learned steps can be done but below is the way that I have found to garner the most information and result in the best learning outcomes.
Step 1: In Adobe Connect, I begin the KWL exercise with a large format chat pod layout (Image 1). I ask students to individually brainstorm and then write out all the things that they know about topic x. After I have verbally asked the question, I type into chat “what are all the things you already know about topic x? Please type into the chat!” Then, I stay quiet for a minute as students are typing in their responses. If needed, I verbally ask probing questions (what about …, how does …, why…) to elicit more responses. I take another minute or so to read aloud some of the responses from the chat box, which allows time for others to keep posting responses.
Another way of doing this is the ‘waterfall effect’ where I ask students to type their replies into chat but to wait to hit enter. After a minute or so, I ask students to put an agree/green thumbs up if they have something typed up (but no one has hit enter yet) or a disagree/red thumbs down if they need more time. Once I see there are a majority of green thumbs up, then I tell the class to all hit enter at the same time. This creates a waterfall effect of replies that makes for a lively chat.
Step 2: I provide the prompt verbally of ‘What do you want to know about topic x?’ Then I put students into breakout groups of three to four. It is important to keep the groups small so that each student has an opportunity to contribute as this also provides an accountability measure to the group work component. Before students go into their breakout groups, I verbally discuss group roles and assign students to the roles (e.g., alphabetically by the first name) of reporter (report back to the main group), recorder (note-taker for the breakout group), timekeeper (ensures group stays on task), and contrarian (comfort zone expander, discourages group-think). I set the timer for at least three but no more than five minutes. I also have these same directions in each breakout group’s chat box (Image 2). As multiple group recorders are simultaneously jotting down notes, I utilize a birds-eye view to monitor their progress (Image 3) and send out broadcast messages as needed.
When students come back to the main group, I call on the reporters to all come on camera in a panel view (Image 4) to briefly share what their group discussed regarding what they want to learn about the given topic. After each reporter has spoken, I ask the class for any volunteers who would like to come on camera or if not, to type into chat any ongoing themes about the class's desires for learning goals for the lesson. As an instructor, I keep a running tab regarding overarching themes to remind myself to address these topics in the lecture.
Step 3: After the lecture concludes or at the end of the semester, I use the poll function for students to fill in the prompt “What I learned about topic x” (Image 5). It is important to provide at least three to five minutes of quiet time for students to reflect. As answers start to come in, I often ask probing questions to push students into a deeper level of reflection (e.g., why is that important).
What this looked like in Adobe Connect
Image 1: This screengrab shows a large chat format layout. The instructor’s video (showing the author) is set as a small size in the upper left-hand corner and no slides are being shared in order to maximize space for viewing the chat. Adobe product screenshot(s) reprinted with permission from Adobe.
Image 1 Alt-Text: This screengrab shows an Adobe Connect classroom with a large chat format layout, prioritizing space for the chat box. There are three pods in this image. On the left-hand side of the screen is a narrow column, about 20% of the screen, containing two pods. In the upper left-hand corner, the instructor is shown in a small video pod. Below the video pod is the attendees’ pod. The majority of the screen, approximately 80%, is taken up by the large format chat box. There is one comment from the instructor in the chat box that says “What are all the things you know about topic x? Please type them into the chat!”
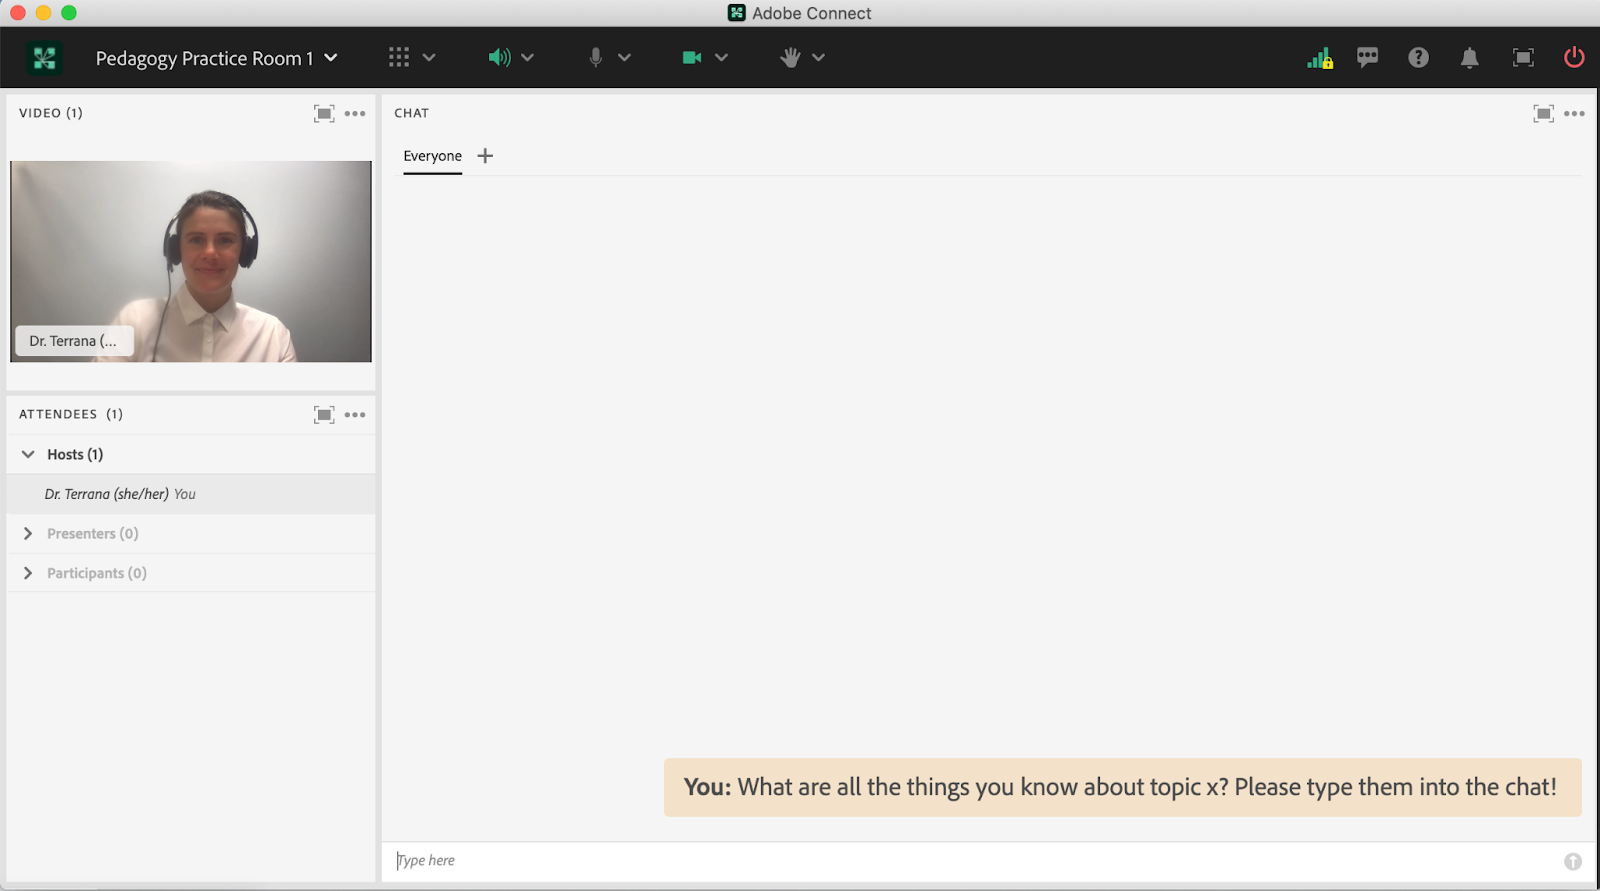
Image 2: This screengrab shows what one breakout group would look like. I set the timer for anywhere between three and five minutes, and set up the layouts with the same timer displayed in all of the breakout rooms so that everyone sees the same countdown. It is a helpful feature of Adobe Connect that the same pods can be shown and synchronized across multiple layouts and breakout rooms. In the notes section of the breakout room, I include the prompt “What do you want to know about topic x?” and role assignments of reporter, recorder, time keeper, and contrarian. In the screengrab, the name Lia Marshall is visible; this is not a student name, but rather a colleague helping with the screengrab. Adobe product screenshot(s) reprinted with permission from Adobe.
Image 2 Alt-Text: This image shows the breakout room layout. The screen is divided into four main sections. The top section includes a video pod on the left that takes up about three-fourths of the width of the layout that’s visible to students and a countdown timer on the right that indicates how much time is remaining in the breakout room. The bottom two-thirds of the screen includes three sections. On the left-hand side is a narrow pod with a list of the attendees’ names. Next to that is the breakout group’s notepad, which states: “Group 1, In breakout, you will have three minutes to answer the question: What do you want to know more about? Reporter: Recorder: Time Keeper: Contrarian:.” Directly below that is the breakout 1 chat pod. Hidden from student view but shown in this screengrab on the right-hand side is an area for the host and presenter to share private notes.
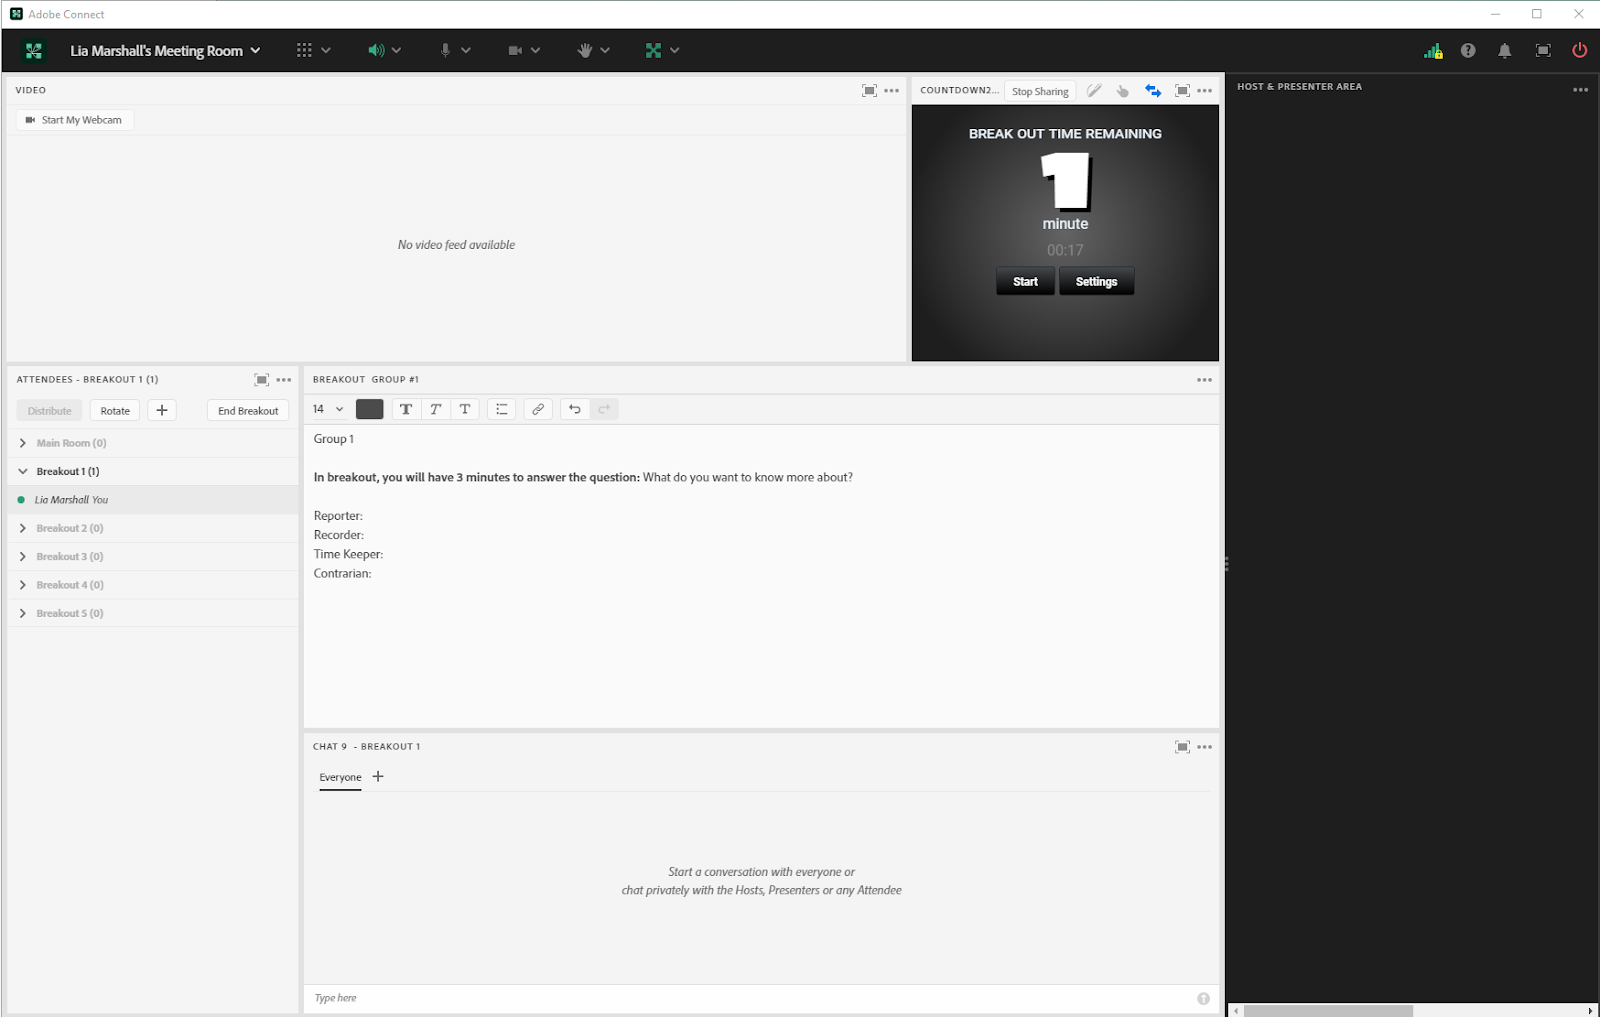
Image 3: This screengrab shows a birds-eye view of each breakout group, which allows the instructor to monitor the groups’ progress on their notes. There is a countdown timer along with the ability to simultaneously see each group’s notepad. In the screengrab, the name Lia Marshall is visible; this is not a student name, but rather a colleague helping with the screengrab. Adobe product screenshot(s) reprinted with permission from Adobe.
Image 3 Alt-Text: This screengrab shows the instructor’s birds-eye view of all the breakout groups’ notepads. The top third of the screen includes a video pod and a countdown timer. On the far left-hand side of the screen, below the video pod, is the attendees’ pod, which shows the names of students in the five breakout groups along with a button to ‘End Breakout.’ Next to the attendees’ pod are each of the five breakout groups’ notepads. For each group, the notepad reads: “Group [1, 2, 3, 4, or 5], In breakout, you will have 3 minutes to answer the question: What do you want to know more about? Reporter: Recorder: Time Keeper: Contrarian:.” Directly below is the chat pod, which is empty in this screengrab. Hidden from student view is the empty presenter-only area on the right-hand side of the screen.
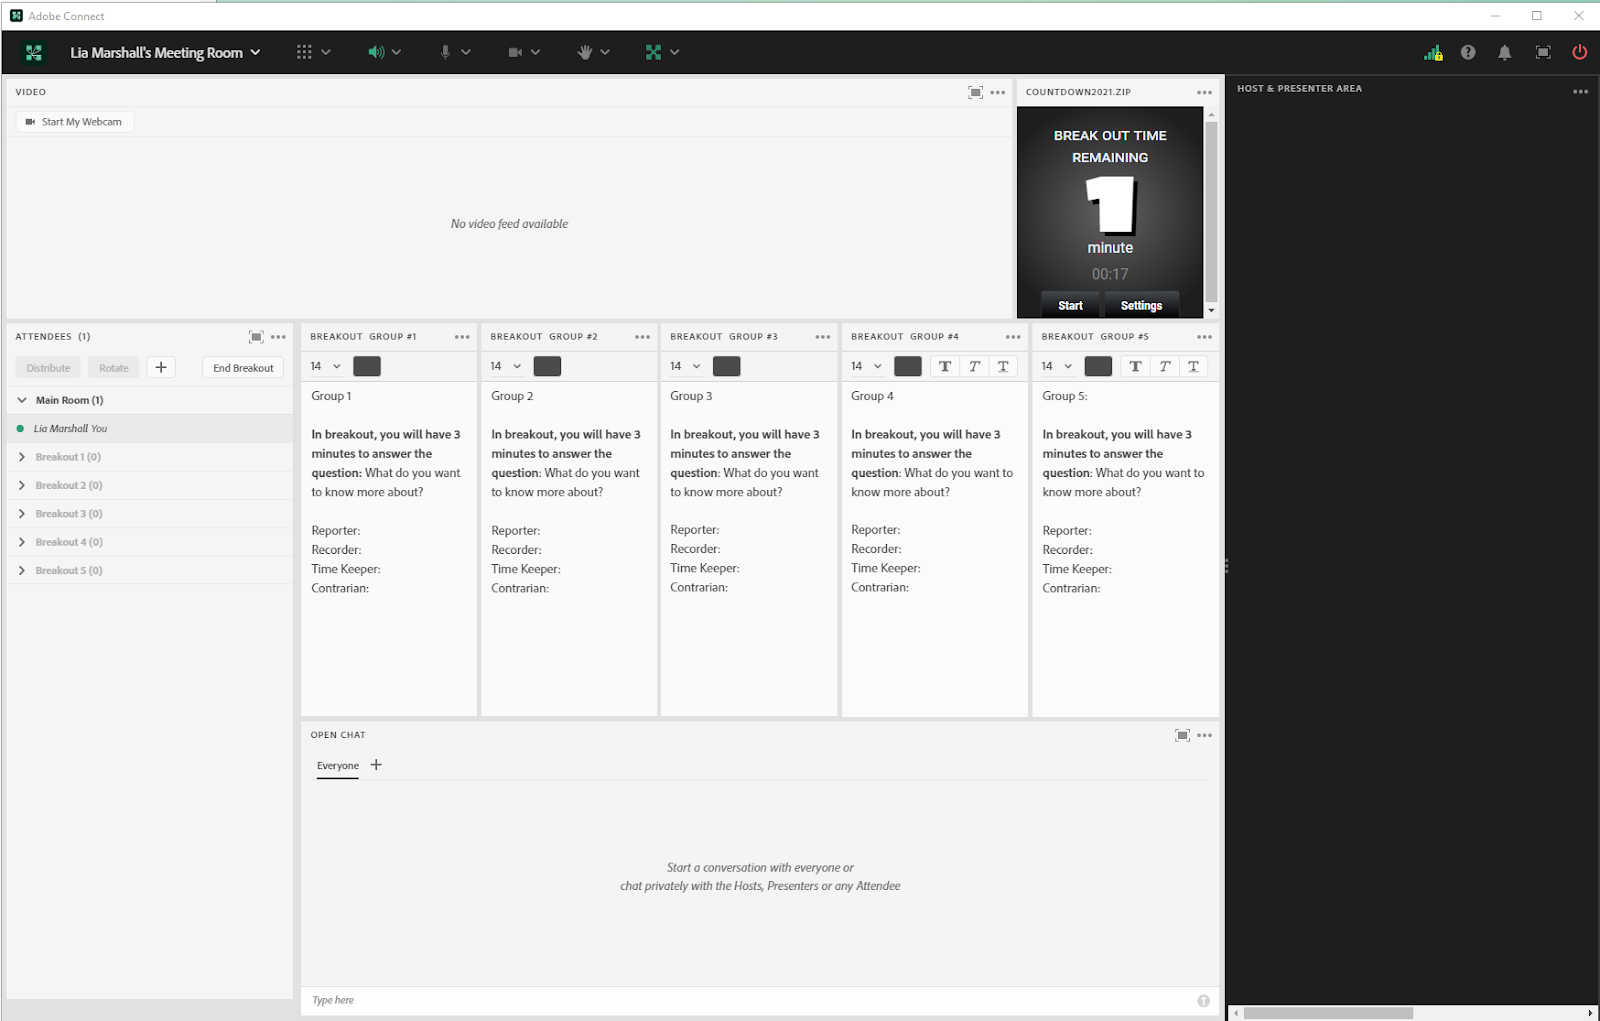
Image 4: When students come back to the main group, I call on the reporters to all come on camera in a panel view to briefly share what their group discussed regarding what they want to learn about the given topic. In the screengrab, the name Lia Marshall is visible; this is not a student name, but rather a colleague helping with the screengrab. Adobe product screenshot(s) reprinted with permission from Adobe.
Image 4 Alt-Text: This screengrab shows the same layout as in Image 3. The difference is that the countdown timer has been removed, and the video pod is therefore larger.
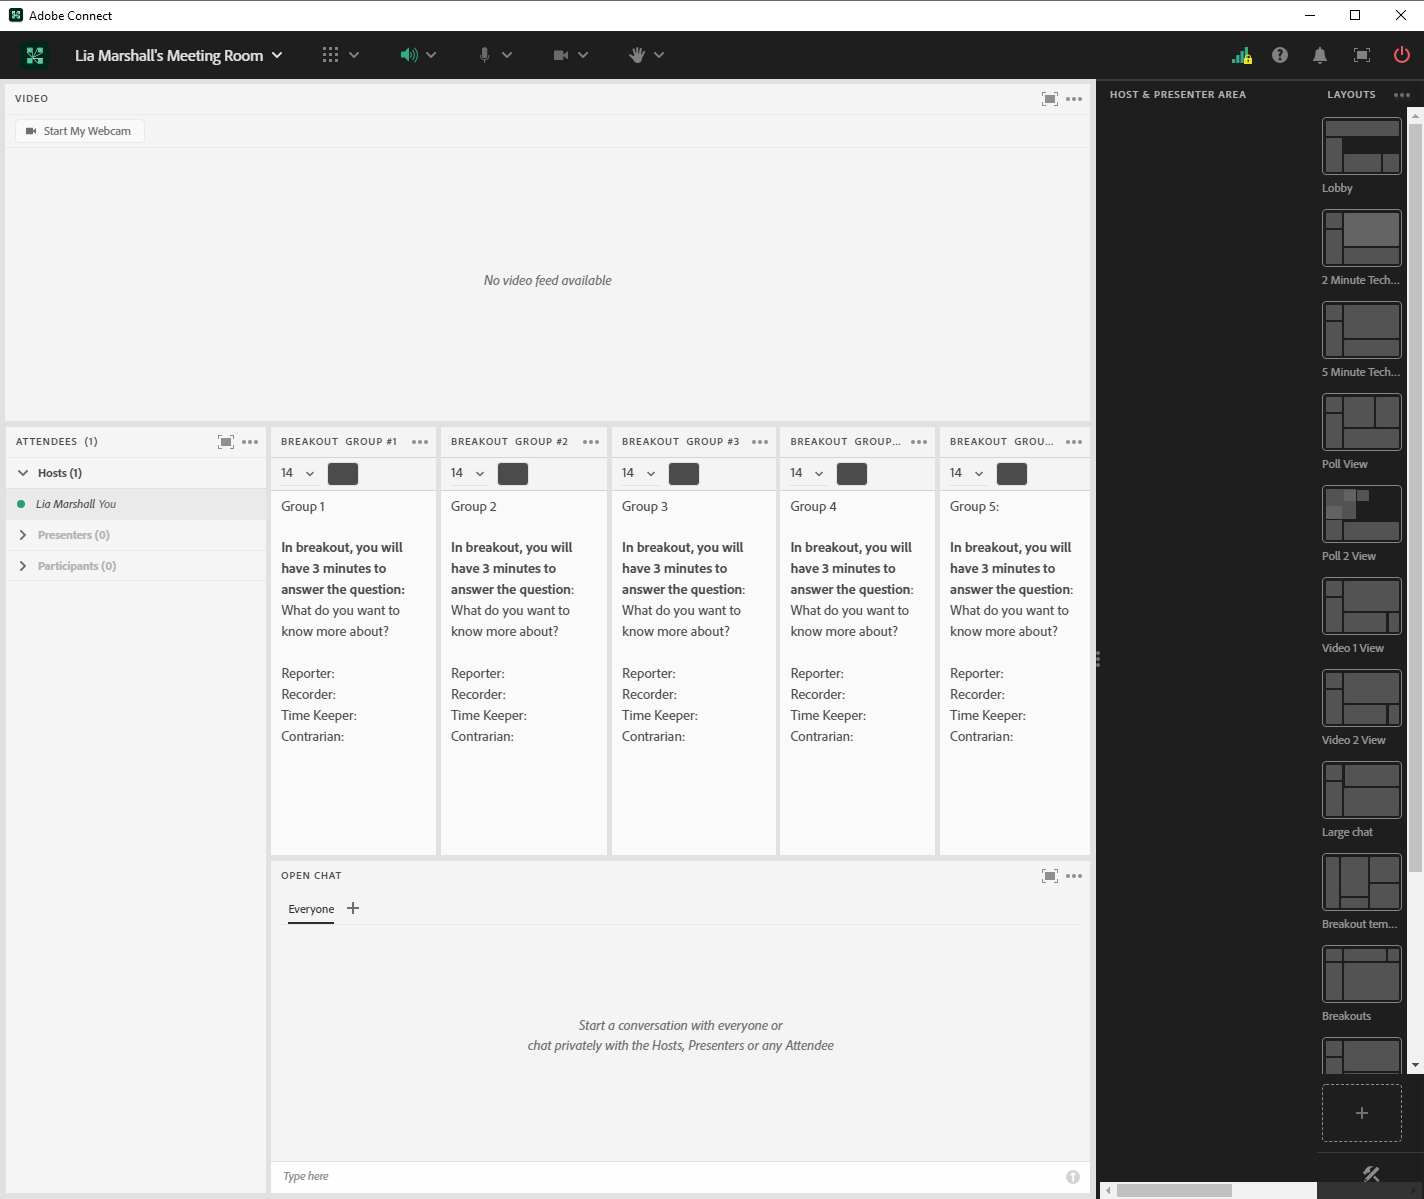
Image 5: This screengrab is the layout I use for the ‘short answer’ poll function for students to fill in the prompt “What I learned about topic x.” It is important to provide at least three to five minutes of quiet time for students to reflect. Adobe product screenshot(s) reprinted with permission from Adobe.
Image 5 Alt-Text: This screengrab shows the same Adobe Connect room as Image 1, showing a video pod with the instructor on webcam, attendees pod, and chat pod. The difference is that the chat is smaller in order to make space for a short-answer poll that asks: “What I learned about topic x?”
Acknowledgments
I would like to thank Dr. Lia Marshall for her assistance in the screen grabs and Matthea Marquart for her continued support and mentorship in my online teaching journey.
References
Ogle, D. M. (1986). KWL: A teaching model that develops active reading of expository text. The reading teacher, 39(6), 564-570.