Creative usage of technology allows us to translate the traditional in-person lesson into engaging and easy-to-follow online sessions. In this chapter, we discuss a strategy to demonstrate graphs, annotations, and other visual materials using a second webcam. The approach is to set up another webcam option to broadcast hand-drawn illustrations on paper in real time. A key contribution of supplementing prepared materials with live drawing by webcam is the flexibility to connect concepts or address questions with a more personal interaction with students
Teaching and Learning Goal
The second-camera drawing strategy was developed to diversify how we teach, make content more relatable, and respond to learning opportunities in real time. Notably, incorporating a second webcam promotes Instructor immediacy by breaking up the online lecture format to connect and co-create content through a more human medium. This strategy also allows for more improvisation in responding to student ideas as well as more insights when innovating course content in students’ own terms.
Activity and Results
Students can benefit greatly from class materials that are well-designed and prepared in advance, yet there may be trade-offs in terms of responding to students in real time. How can we better adapt difficult concepts, such as graphical models in economics, to meet students where they are in the classroom? There are drawing tools for commonly used online classroom environments, yet drawing by hand on paper changes the pace, slows things down, and models the thought process behind a problem. Live drawing for an online class could happen a couple of different ways. Initially, Rob began looking into a tablet-and-stylus approach; however, in consulting with colleagues Matthea Marquart, Ed Cardona, and Ann McCann Oakley, we landed on a plan that was simpler, cheaper, and ultimately more human. A second webcam would enable the instructor to demonstrate ideas by hand and connect with students at a different level. Importantly, slowing down and uncapping a marker signals to the student that the instructor is about to model the thought process behind an illustration.
There are several potential benefits from live drawing by webcam, but first, we note a few alternatives by way of comparison. One approach would be to stick with prepared materials that are clear and precise. However, in the classroom, there may be trade-offs between precision and relatability. Students raise questions that sometimes require reframing information, or contrasting different approaches to the same problem. Also, a perfectly drawn graph may obscure the takeaway goal that students, too, can reproduce the concept. When drawing a graph out in steps, the student observes the process and hears the instructor talk through choices of how to draw the parts and how to know what comes next. Some of this can be achieved with common drawing tools available in online classrooms, either on top of a current slide or using a whiteboard application. An advanced version of digital drawing that preserves that hand-drawn illustration style would be to integrate a drawing tablet into the classroom, as mentioned above. Quick digital sketches may be useful at times, and a drawing tablet may offer a more human touch. Ultimately, drawing on paper with a webcam broadcasting the live hand-drawing achieves the improvisational responsiveness to students while also increasing instructor immediacy and presence, which further supports students’ learning.
Baker (2010) discusses instructor immediacy and presence and finds benefits for online student learning outcomes. Live drawing by webcam promotes immediacy by making the instructor more accessible–responsively co-creating content based on student ideas–and also more vulnerable while drawing concepts imperfectly working through an idea from scratch. Likewise, the live video of drawing by hand promotes presence in that the psychological distance of learning online is reduced. In these moments, slowing down to respond to a student is part of the pedagogical process: “that is an important question, let’s work through an example together.” When improvising upon the prepared content in this way, students can better hear concepts in their own words and may gain new insights for more durable learning.
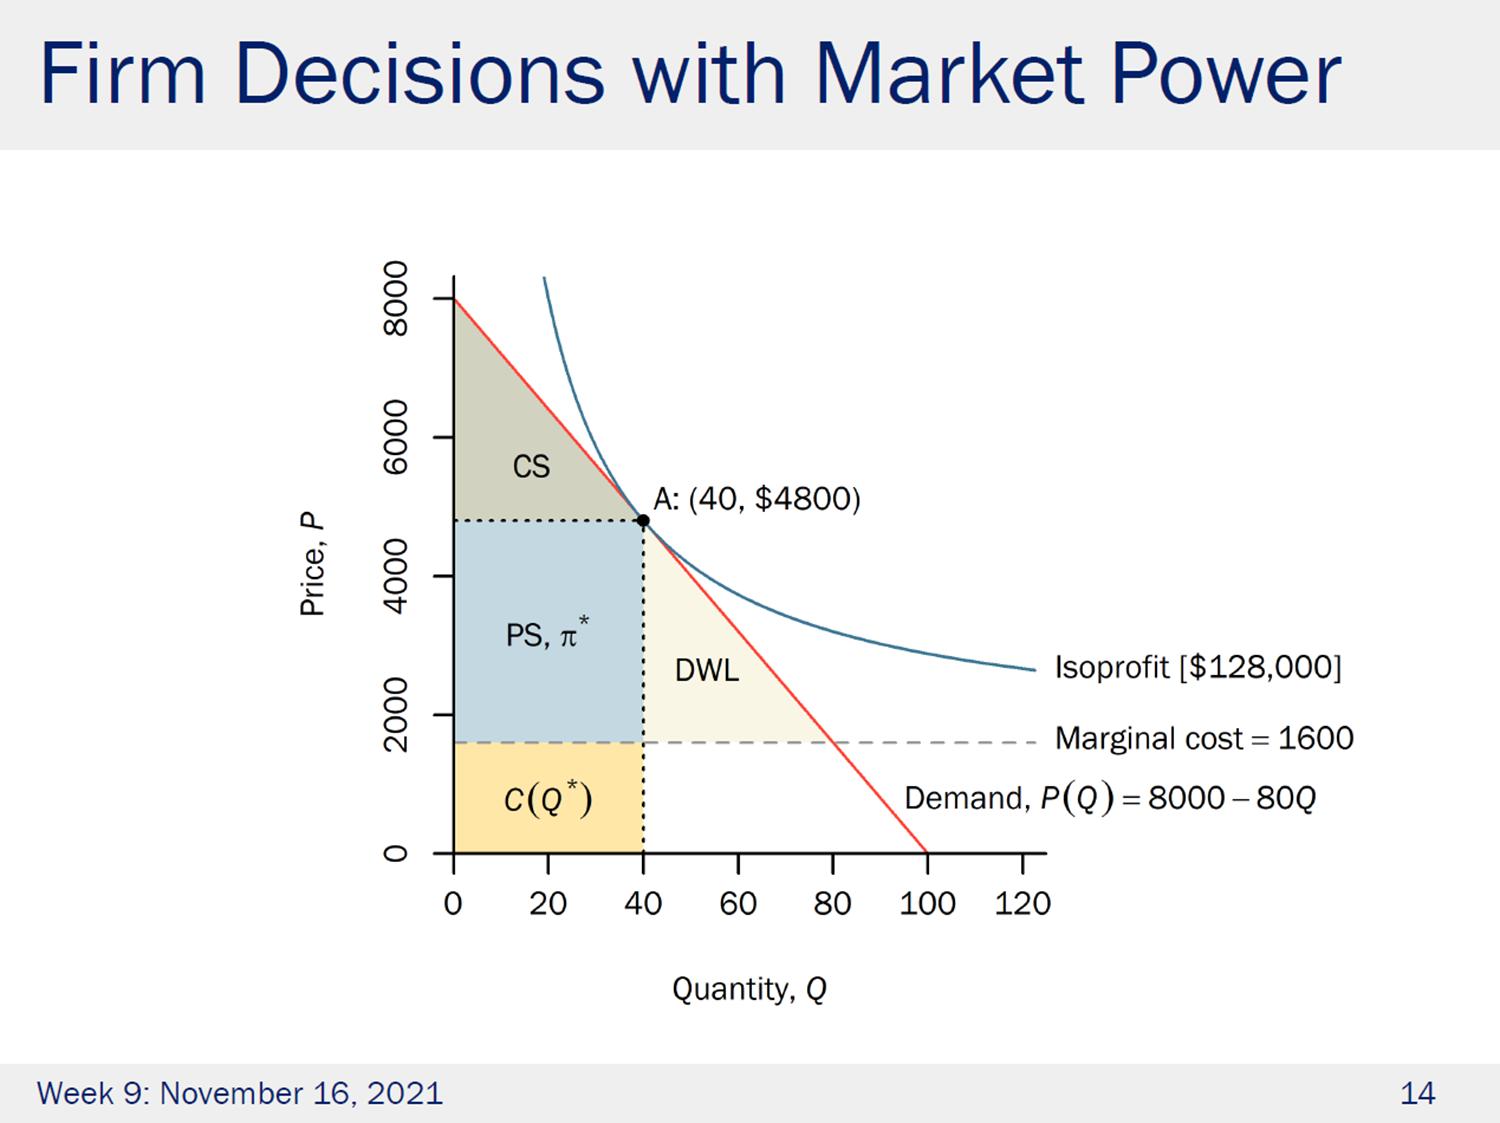
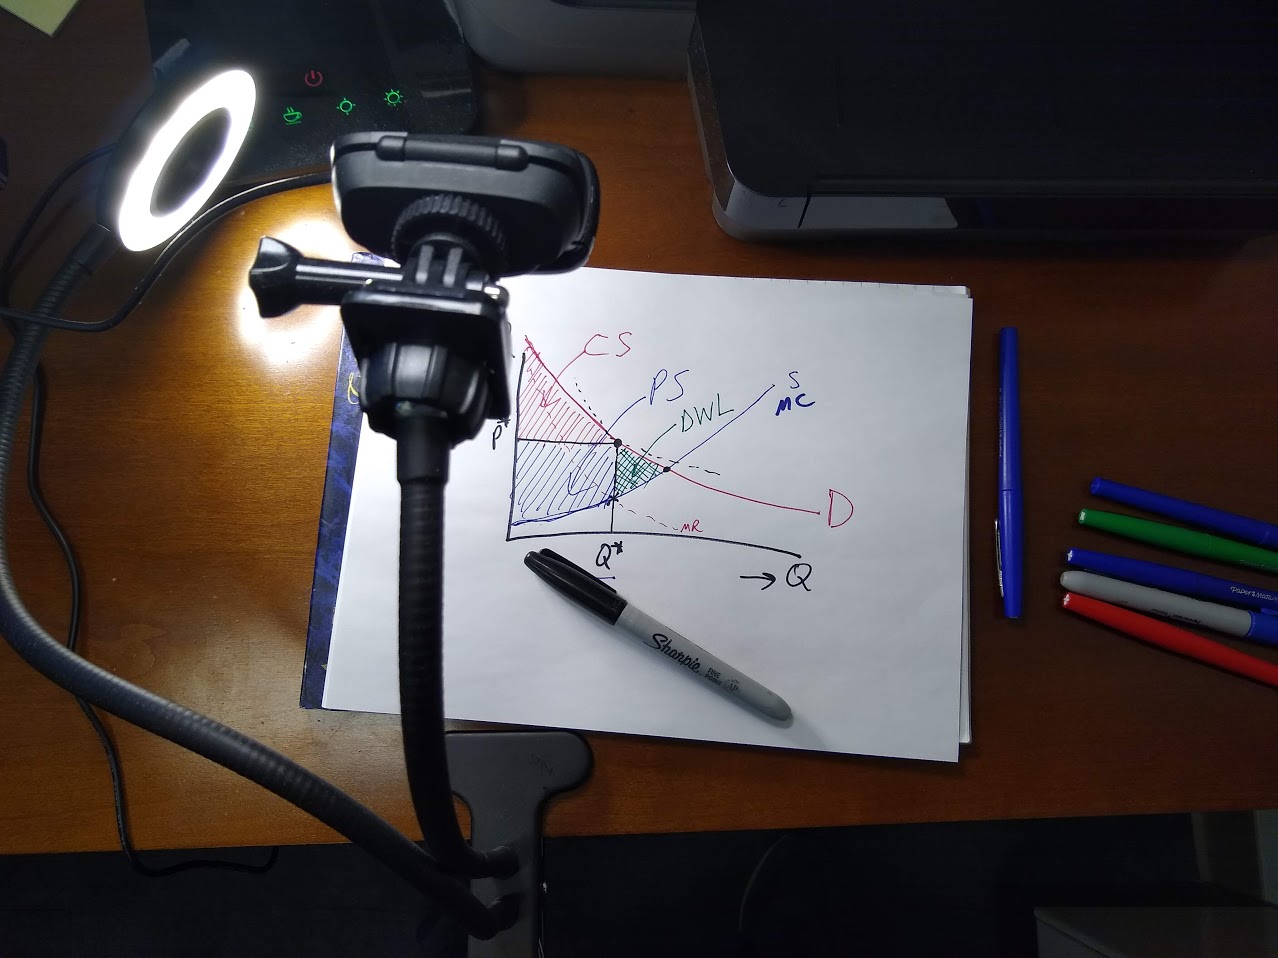
As an example from an economics classroom application, students frequently get overwhelmed with seeing graphs and not knowing which parts are drawn a certain way because of theoretical rule or practical choice. Figure 1 shows two illustrations of the same concept: one prepared in advance and the other drawn live during class. The prepared slide is geometrically precise, including mathematical equations and perfectly intersecting lines. Yet, this is where students often ask: is the demand always a straight line, or is marginal cost always constant, or how do you decide what is deadweight loss (triangle DWL)? The first two questions are easily addressed by sketching an alternate version of the graph, and the third question (all three may arise at once, not uncommonly) is best discovered after the consumer and producer surplus areas have been drawn. Drawing by hand is a great opportunity to repeat important information and make sure everyone is following along.
|
Figure 1: Illustrating economic surplus, by presentation mode.
Figure 1 Alt-Text: Side-by-side panels compare illustrating economic surplus by (A) prepared lecture slide and (B) drawing via secondary webcam. Panel (A) demonstrates an example of firm decisions with market power, which includes a linear inverse-demand function with constant marginal cost, along with shaded regions representing consumer surplus (CS), producer surplus (PS), cost (C(Q*)), deadweight loss (DWL), and an isoprofit curve. Panel (B) shows a photo of the secondary webcam clamped to a desk with the ring-light positioned to illuminate a hand-drawn version of the graph in the lecture slide in panel (A). In contrast to the precise lines and shading in panel (A), panel (B) shows demand and marginal cost functions that are curved instead of straight lines, though the general labels and shaded areas correspond to those in panel (A).
|
|
A) Prepared lecture slide
|
B) Drawing via secondary webcam
|
|
|
|
Student Feedback
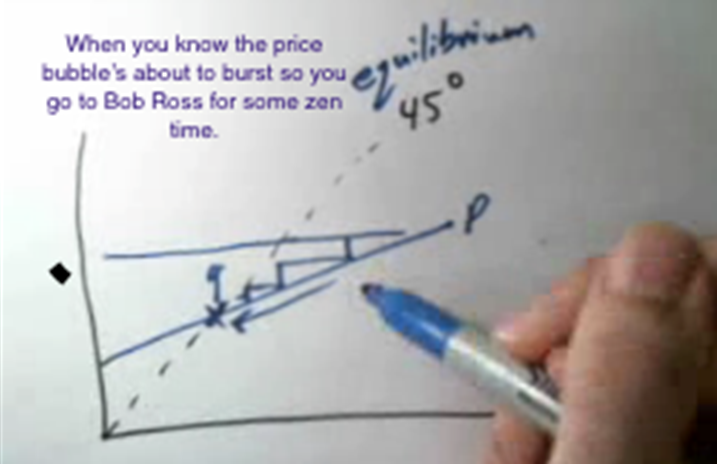
We introduced a second webcam for periodic breakaways to live drawing as an experimental approach without certainty about how easy or effective it might be in the online classroom. The course was a master’s level course on microeconomics and policy analysis, and at the end of the first semester, we asked students for their thoughts. Here are some responses and a meme that a student shared with the class (Image 1):
- seeing graphs drawn in real time can definitely be more helpful than a pre-made graph and it seemed to flow well with the class/work logistically
- it was helpful as i am a visual learner
- … when there is too much drawing the slide became difficult to read
- very helpful to see the Professor draw in real time and it is better visually than drawing on a whiteboard electronically with a cursor.. this camera was helpful in a class with a lot of graphs, charts, …
- It's really helpful! I wish this was done for my previous classes!
- It would def be helpful and make the online sessions seem more like in class sessions
- Yes, when you change your camera to see you drawing a graph makes it way easier to understand.
Image 1: Student meme based on a secondary webcam illustration from class. Student-created meme shared with permission from the student, El Corkery, over a year after the course ended and grades could not be impacted whether permission was granted or not. The graph represents a dynamic process of price adjustments after a price bubble ends and the market moves back to a stable equilibrium. Note that this quick sketch is not well labeled because it was an impromptu supplement to the precisely labeled lecture slide showing a price bubble growing; an answer to “how do bubbles end?”
Image 1 Alt-Text: A student shared their reaction with the class by way of a meme based on a screenshot from class with the added text “When you know the price buble’s about to burst so you go to Bob Ross for some zen time.” The screenshot shows a 45-degree line with a drawing representing the dynamics of a price bubble returning to a stable equilibrium, as well as a hand with a marker.
Technical Details and Steps
Step 1: Prior to the live class, a secondary webcam must be installed to ensure it is recognizable by your device. In our case, we used a plug-and-play webcam that only needed a USB connection.
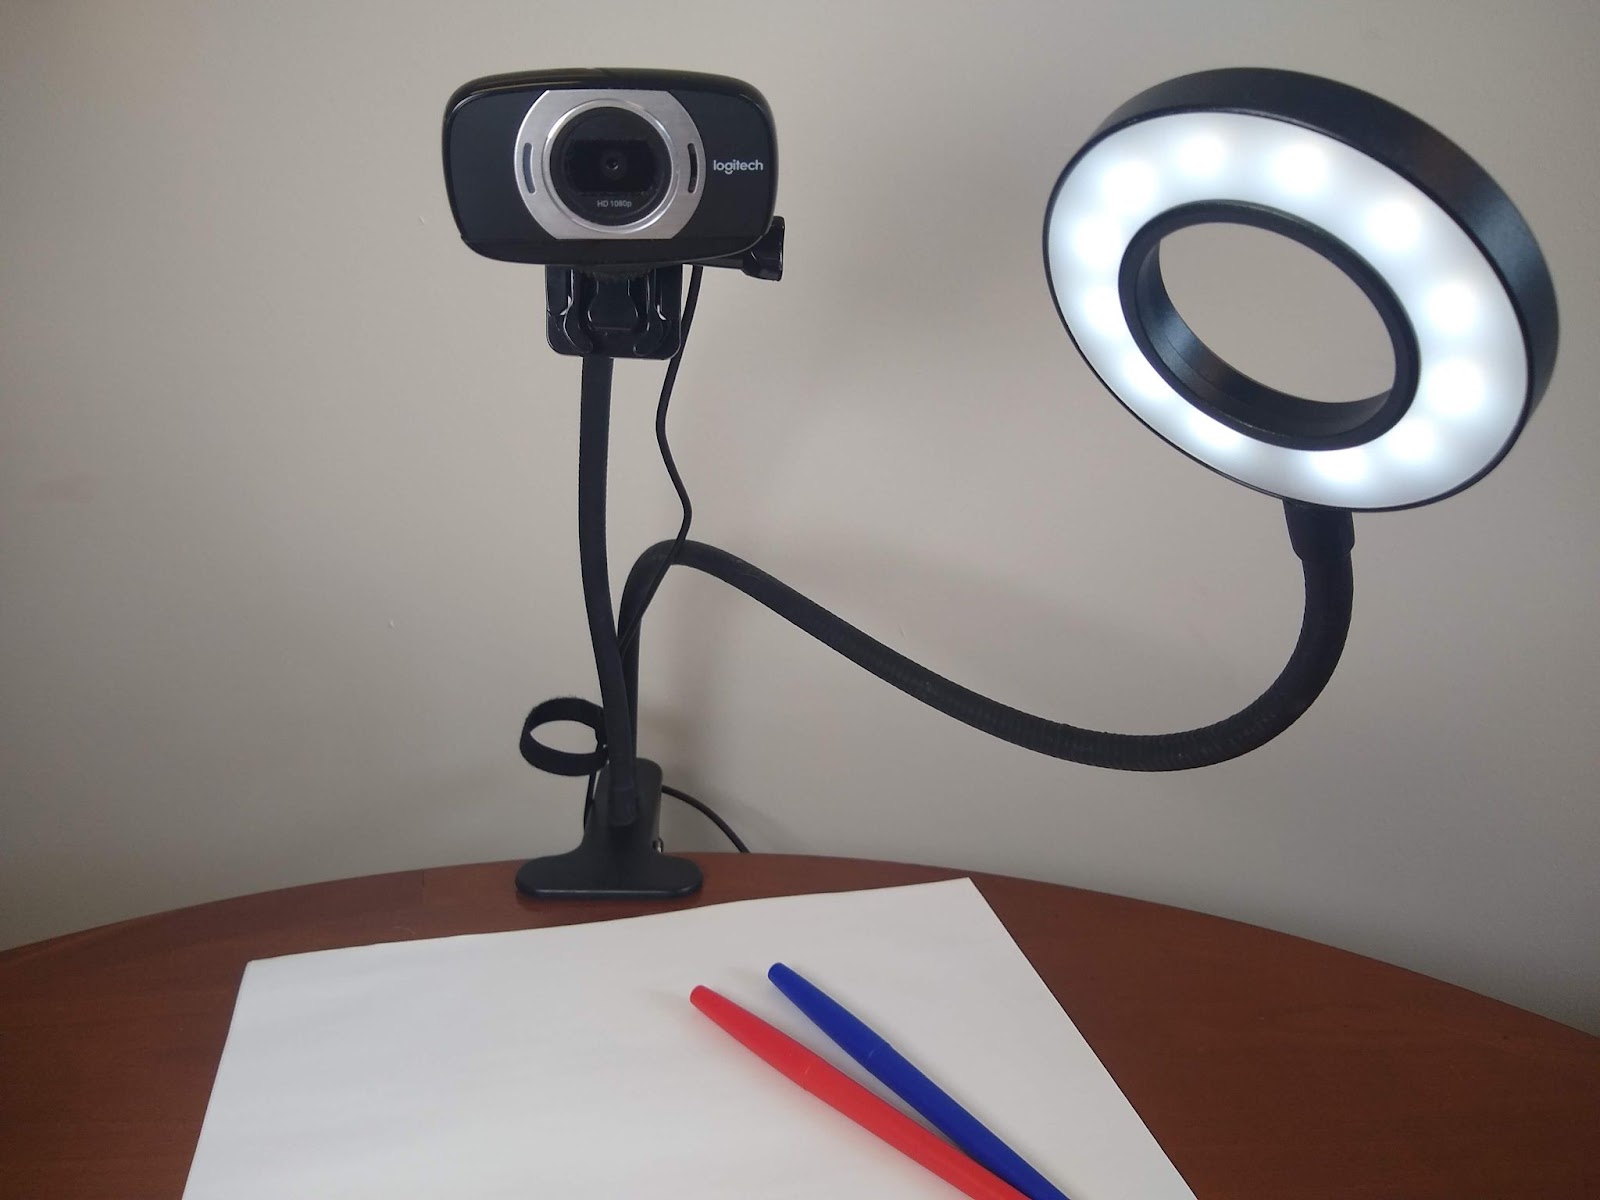
Step 2: The webcam should be mounted to your desk and pointed at a paper or drawing board you wish to draw/write on (Image 2). We highly recommend using the Ring-Light Flexible Gooseneck Mounted Webcam because it is easy to position and also includes a light source to nicely illuminate any materials we wish to show via the second webcam.
Image 2: Secondary webcam and ring-light setup.
Image 2 Alt-Text: The image shows a secondary webcam and ring-light clamped to a table. The flexible gooseneck style arms allow the camera and ring-light to each be positioned conveniently relative to a blank paper with markers nearby on the table.
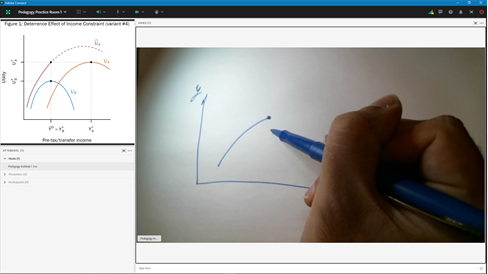
Step 3: Once the second webcam is installed and placed in the correct spot, log into an Adobe Connect classroom to practice transitioning between the main webcam showing your head and shoulders (Image 3) and the second webcam to demonstrate writing graphs (Image 5).
Step 4: While in Adobe Connect, you will have a panel of icons located in the upper center-left area of the screen (Image 4). One of the icons will include a video camera which can activate your camera. With the secondary webcam installed, we now have two choices under ‘Select Camera’ within the drop-down arrow menu, yet clicking the camera icon from the toolbar directly without going through the menu should activate your primary webcam.
Step 5: Once you are ready to change webcams, simply click the drop-down arrow menu by the camera icon, click ‘Select Camera’, and quickly switch back and forth as needed. (See screenshots in the following section.)
Step 6: Using the secondary webcam, illustrate any concepts by hand while talking through the process, and when ready to return to the main webcam, simply repeat Step 5.
What this looked like in Adobe Connect
Below are a series of screenshots in an Adobe Connect classroom, which demonstrates the transition from primary to secondary webcam.
Image 3: Primary Webcam. Although switching a webcam can be done from any layout, to best demonstrate the transition between the main and the secondary webcam, we are using a large video pod layout. This layout includes three main pods: the share pod displaying our powerpoint presentation, the attendee pod, and the video pod. Additionally, to perform the webcam transition, we use the camera icon located in the panel of icons at the top of the screen. Adobe product screenshot reprinted with permission from Adobe.
Image 3 Alt-Text: In this Large Webcam pod, the powerpoint presentation (share pod) is located in the upper left corner of the room stretching about one-half of the layout’s total height and one-third of the total width. Directly under the powerpoint presentation (share pod), the Attendee Pod stretches to the bottom of the screen matching the width of the share pod above. The rest of the layout consists of a large Video pod. The video pod is the largest pod on the screen measuring about 65 percent of the total screen space, and displays the Instructor’s main webcam, which is broadcasting his head and shoulders, with his office behind him. Lastly, as part of the standard Adobe Connect room structure, a narrow panel of icons is located above each layout stretching from the left edge of the screen to the right edge of the screen.
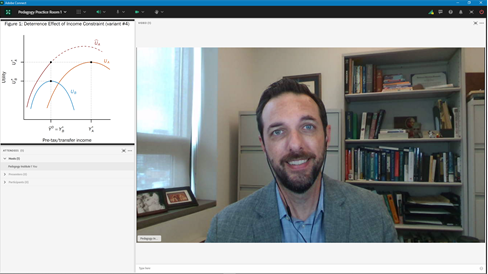
Image 4: Changing Webcams. In order to select our secondary webcam, the Instructor is clicking on the drop-down menu arrow located next to the camera icon in the upper panel. Doing so expands a small drop-down menu including the option to ‘Select Camera’. Clicking on ‘Select Camera’ displays an additional drop down menu listing all of the pre-installed webcams available on the Instructor’s device. Adobe product screenshot reprinted with permission from Adobe.
Image 4 Alt-Text: This screengrab shows the same Adobe Connect layout as in Image 3. The difference is that this image focuses on the menu that enables the Instructor to switch webcams. In this image, the instructor has clicked on the small arrow button directly to the right of the camera icon, which has expanded a drop down menu where the second option from the top is “Select Camera”. The instructor has clicked on this option, which has opened another small drop down menu listing all of the available webcams; the names of the webcams are not legible in the image. Selecting the desired webcam will automatically change the video source between the primary and secondary webcams.
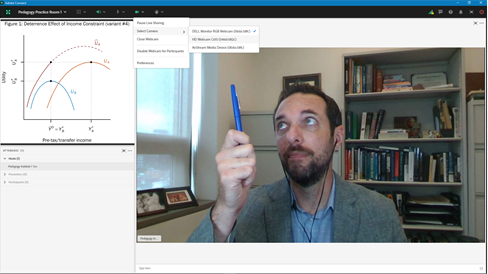
Image 5: Secondary Webcam. After the Instructor selects the name of his secondary webcam in the dropdown menu, the webcam feed (video pod) will no longer display his primary camera. At this time, students will be able to view the live drawing demonstration. To change back to the primary webcam, the Instructor will follow the same process but select the main webcam instead. Adobe product screenshot reprinted with permission from Adobe.
Image 5 Alt-Text: This screengrab shows the same Adobe Connect layout as in Images 3 and 4. The difference is that this image displays the Instructor’s secondary webcam being shared through the video pod, demonstrating a live in-class drawing of a graph. The secondary webcam is broadcasting video of a hand holding a blue marker, and the beginning of a drawing of a graph.
Acknowledgements
The authors are grateful to the advice and support from Matthea Marquart, Ed Cardona, and Ann McCann Oakley, as well as our teaching teammate Kameron Mims-Jones along with our wonderful students. We would also like to acknowledge the intellectual foundation behind this experiment, which we owe to the Columbia University School of Social Work’s Institute on Pedagogy and Technology for Online Courses.
References
Baker, C. (2010). The impact of instructor immediacy and presence for online student affective learning, cognition, and motivation. Journal of Educators Online, 7(1), 1–30.