In this example, I will share how and why I use PowerPoint slides set to the “portrait” orientation when I need to share a lot of text on a slide.
Teaching and Learning Goal
My goal with using this strategy is to:
- Improve the readability of slides when a large amount of text needs to be displayed.
Arriving at the portrait-oriented slide came about after trial and feedback on several other options. This technique has become especially useful in my Adult Psychopathology course. Within this course, as we discuss each diagnostic chapter of the Diagnostic and Statistical Manual of Mental Disorders students are provided a case study to review prior to class. Then, during the live Adobe Connect class, we review the case content together, identify the diagnostic criteria presented, and arrive at the supported diagnosis.
The first strategy I used, was a landscape-oriented slide within the lecture slide deck that named the individual in the case study and listed their symptoms (Image 3). I animated the slide so that the symptoms would not appear without additional prompting. That way as the students named the symptoms I could make them appear on the screen. There were two main downsides of this strategy. The first was that the class was not viewing the original text of the case study, we only saw the interpretation of the text via the named symptoms which I had identified. Secondly, the symptoms on the slide could only appear in a certain order. So if a student named a symptom further down in my list, I needed to wait for someone to name the symptoms I had listed earlier in the list before advancing the slide that far.
As being able to view the full text of the case study on the screen was important so the students could link actual descriptions of behaviors to the symptoms, I started thinking of ways to display the text in a readable manner. This led me to strategy 2, simply adding the full text to a slide (Image 4). The length of each of the case studies varied, so for the most part, if I wanted to have the full text displayed at the same time I would need to reduce the font size so that the text was too small to read, or separate the text onto multiple slides. Neither of these strategies really worked well for the in-class activity.
I also knew that Adobe Connect allowed the use of pdf documents. Without changing the room set-up, I used the share pod to display a pdf document with the full text of the case study. This resulted in a lot of wasted gray space on either side of the pdf (Image 5) as well as needing to scroll up and down the document as the full text could not be seen at the same time. Next, I updated the room set-up to allow for the share pod to take up more space, approximately the top two-thirds of the viewing area (Image 6). While the text was easier to view, there was still wasted gray space and the need for scrolling through the document. Sticking with this same pdf, I changed the room again. This time, to increase the size of the share pod I stretched it from the top of the screen to the bottom of it, moving the chat pod from its usual position at the bottom of the screen to the side, also running from the top to the button of the screen (Image 7). This resulted in less wasted space and I liked the larger chat pod, but I still needed to scroll down as the full text was not able to be displayed at the same time.
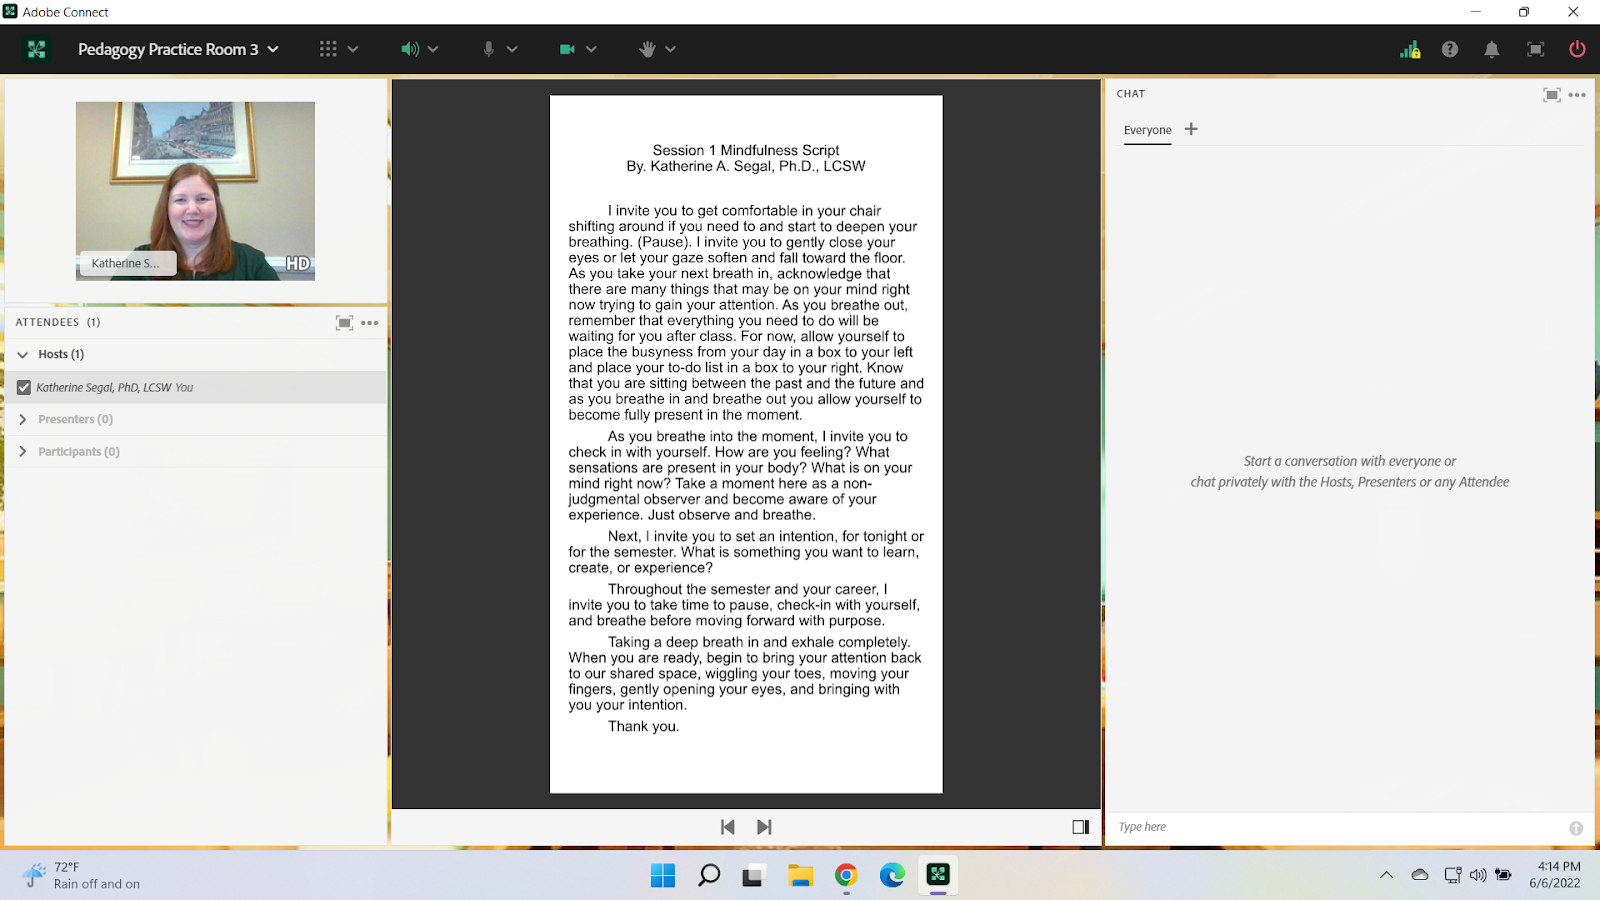
Finally, at the suggestion of my Live Support Specialist at the time, Natasha Burton, we continued to use the tall share pod but moved the text to a portrait-oriented PowerPoint slide (Image 8). This further reduced wasted space on the screen, allowed for the full text of the case studies to be displayed on one slide, and was more user-friendly when engaging the “drawing” tool to highlight the text during the discussion. I have continued to use this approach every time I need to display a lot of text on the screen during class. I have also found that even when the case study, or other text, is rather lengthy, separating the text across multiple portrait-oriented slides is still easier and cleaner to navigate between compared to multiple landscape-oriented slides and multiple pages within a pdf document.
Technical Details and Steps
Step 1: Create a new PowerPoint deck.
If you need landscape and portrait slides during the same class session create two separate files. To know when in the main lecture deck to switch the layout, I include a slide that reads: “See other layout for the case study text”. This is not only a reminder to you of the upcoming activity, but also visually prompts your tech assistant to switch the layouts and alerts the students to expect a change on the screen.
Step 2: Set the deck to portrait orientation.
Once you’ve created a new file, select “Design” at the top of the screen. Then select “Slide Size” near the right-hand side of the screen, near the top. A dropdown box will appear with the options “Standard”, “Widescreen”, and “Custom Slide Size” (Image 1).
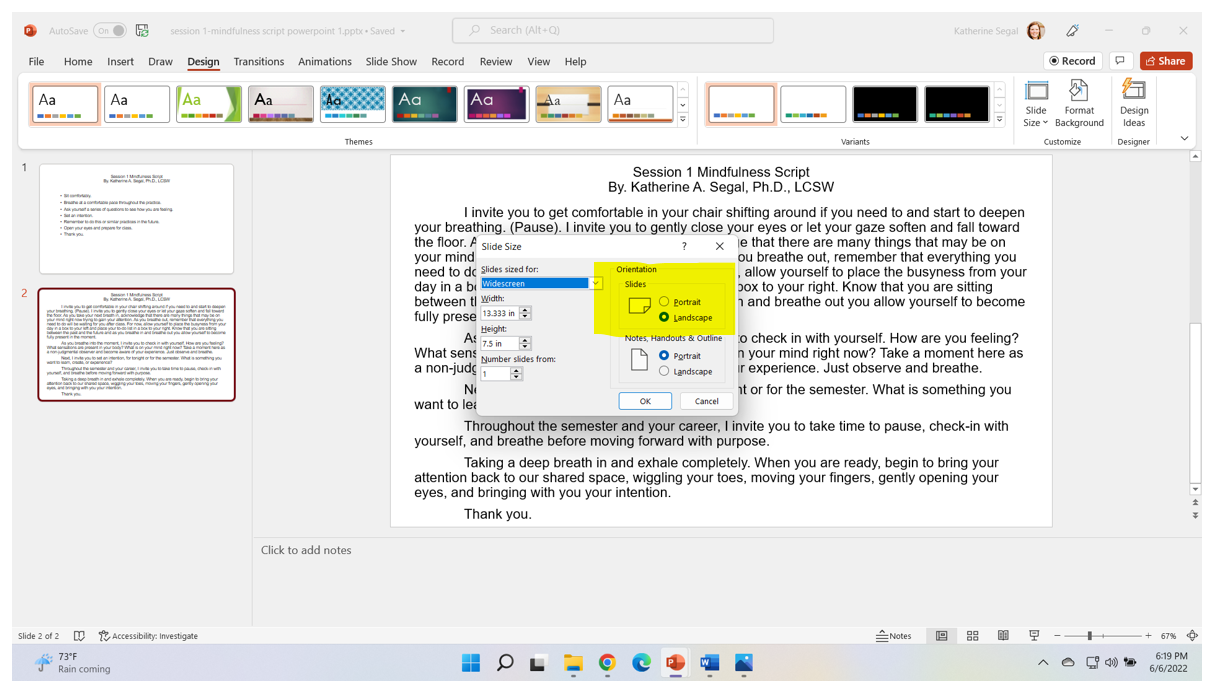
Select, “Custom Slide Size” from the dropdown box, and locate the “Slide Size” pop-up box. Within the pop-up box look for “Orientation”, “Slides”, and the buttons next to the options for “Portrait” and “Landscape” (Image 2).
Select “Portrait”, then click “OK”. When the pop-up box closes the orientation of the slides will change. If you had content on the slides before making this change (as I do in the pictured examples), you may need to resize some of the items to ensure a good fit.
Step 3: Create an Adobe Connect room layout to use the portrait-orientated slides.
As shown in Image 8, I prefer to use a layout that allows the portrait-oriented slide to be shown from the top of the screen to the bottom of the screen. However, as you have probably noticed, the Adobe Connect pods can be resized and moved around the room to create your ideal layout. This is best accomplished prior to class.
Step 4: Navigate between layouts (if you are using multiple room layouts during a class).
If you are using multiple layouts throughout a class session, preload each of the selected layouts with the relevant content. For example, in a layout named “Lecture”, I include a share pod that is optimized for my landscape-oriented slides, while the layout with my portrait-oriented slides with the case study text is named “Case Study”. During class, you or someone supporting you, can click on a layout to display the pre-loaded content.
Image 1. Screengrab of PowerPoint, highlighting the location of the “Design” and “Slide Size” options.
Image 1 Alt-Text: This is a screengrab of a PowerPoint slide within the PowerPoint program. The words “Design” and “Slide Size” have been highlighted with a yellow highlighter. The “Slide Size” button has been selected and the dropdown box containing “Standard”, “Widescreen”, and “Custom Slide Size” is viewable. Also viewable in the screengrab are two slides in the landscape orientation. Slide 1, described in Image 3, displays the bullet-pointed version of the mindfulness script, and slide 2, described in Image 4, displays the full text of the script however their content is not the focus of this image.
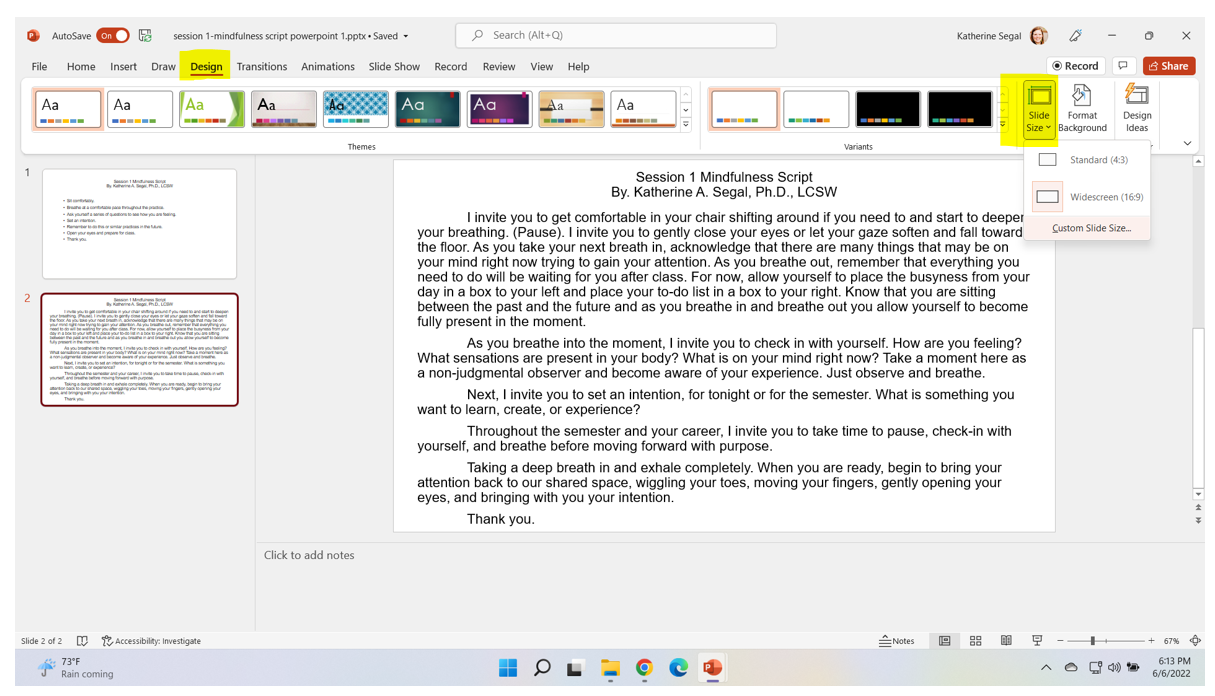
Image 2. Screengrab of PowerPoint, highlighting the location of the “Portrait” and “Landscape” options.
Image 2 Alt-Text: This is a screengrab of a PowerPoint slide within the PowerPoint program. The “Slide Size” pop-up box is viewable in the center of the screen. The words “Orientation”, “Slides”, “Portrait” and “Landscape” have been highlighted with a yellow highlighter. The “Landscape” button is currently selected which is represented with a small blue circle next to the word. The two slides described in the previous image continue to be viewable in the background.
What this looked like in Adobe Connect
To not display the copyrighted content of the case studies used in class, I have written a one-page mindfulness script to use as the text in the following screengrabs.
Image 3. Adobe Connect classroom, displaying the mindfulness script via a bullet-pointed summary, similar to how I would list out the symptoms seen in the case study. Font Arial, size 20. Adobe product screenshot(s) reprinted with permission from Adobe.
Image 3 Alt-Text: This is a screengrab of an Adobe Connect classroom. The Attendees pod is on the far left side of the screen and stretches from top to bottom. To the right of the Attendees pod, the screen is split between a Video pod taking up the top third of the viewing area, below that is a Share pod and then a Chat pod each taking up approximately a third of the viewing area. The Video pod shows chapter author, Katherine Segal, and the Share pod is displaying a landscape-oriented PowerPoint Slide titled “Session 1 Mindfulness Script” (images 3-8 will use the same slide title) with the following bullet-pointed text: “Sit comfortably, Breath at a comfortable pace throughout the practice, Ask yourself a series of questions to see how you are feeling, Set an intention, Remember to do this or similar practices in the future, open your eyes and prepare for class, Thank you”.
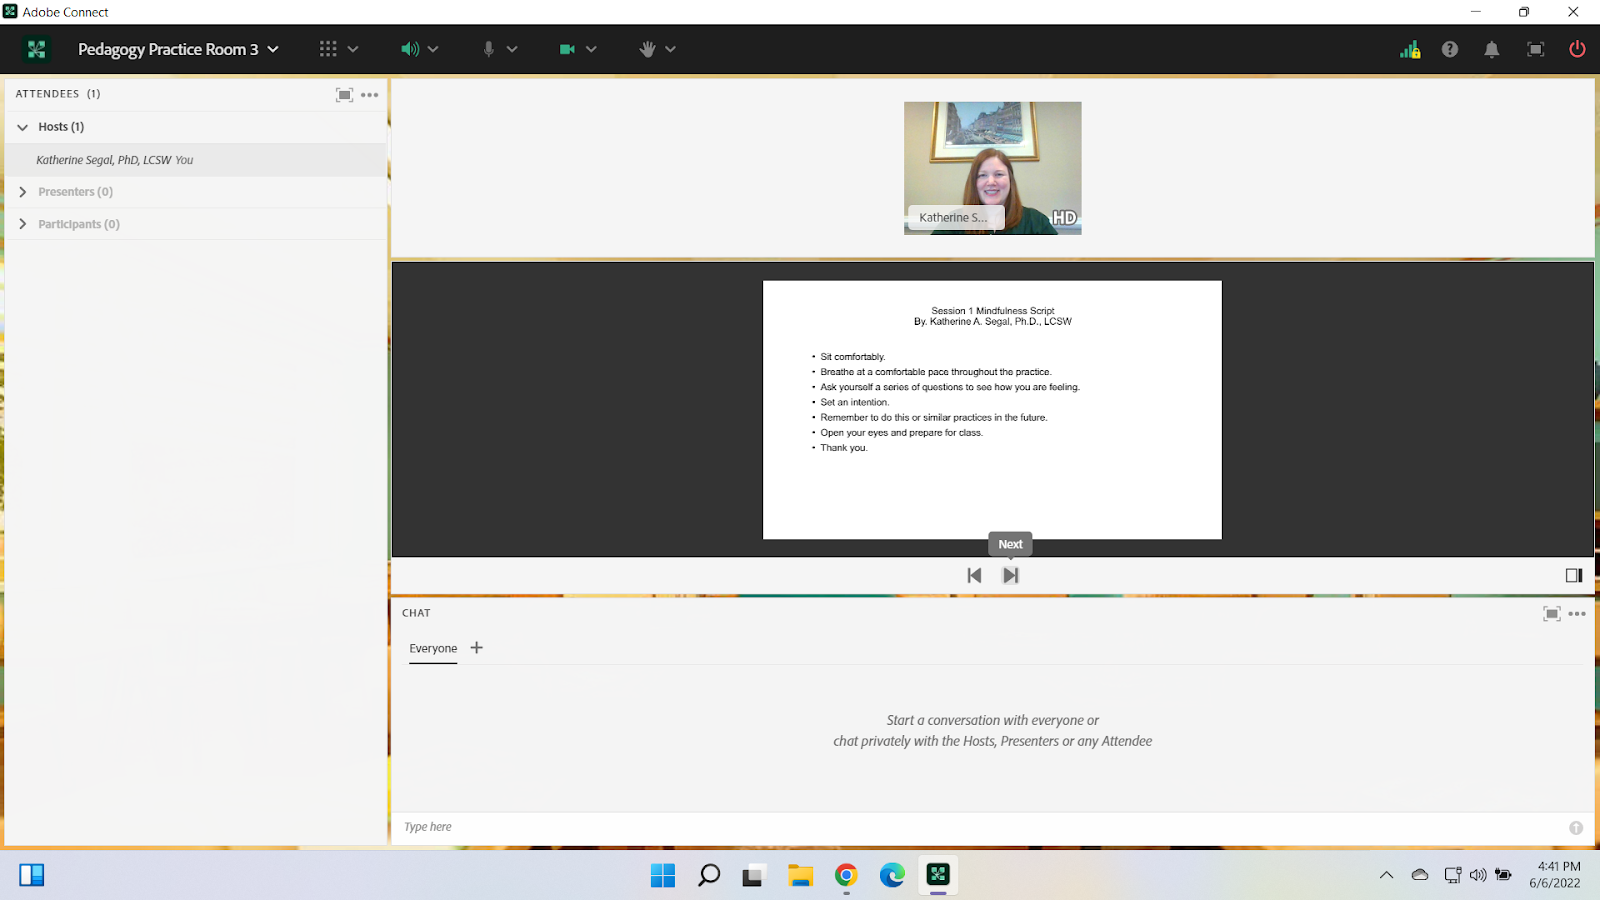
Image 4. Adobe Connect classroom, displaying the full mindfulness script text on a landscape-oriented slide. Font Arial, size 20. Adobe product screenshot(s) reprinted with permission from Adobe.
Image 4 Alt-Text: This is a screengrab of an Adobe Connect classroom. The set-up of the room has remained the same from Image 3. The only change is what is displayed on the slide. The slide titled “Session 1 Mindfulness Script” is displaying the full text of the mindfulness script: “I invite you to get comfortable in your chair shifting around if you need to and start to deepen your breathing. (Pause). I invite you to gently close your eyes or let your gaze soften and fall toward the floor. As you take your next breath in, acknowledge that there are many things that may be on your mind right now trying to gain your attention. As you breathe out, remember that everything you need to do will be waiting for you after class. For now, allow yourself to place the busyness from your day in a box to your left and place your to-do list in a box to your right. Know that you are sitting between the past and the future and as you breathe in and breathe out you allow yourself to become fully present in the moment. As you breathe into the moment, I invite you to check in with yourself. How are you feeling? What sensations are present in your body? What is on your mind right now? Take a moment here as a non-judgmental observer and become aware of your experience. Just observe and breathe. Next, I invite you to set an intention, for tonight or for the semester. What is something you want to learn, create, or experience? Throughout the semester and your career, I invite you to take time to pause, check-in with yourself, and breathe before moving forward with purpose. Take a deep breath in and exhale completely. When you are ready, begin to bring your attention back to our shared space, wiggling your toes, moving your fingers, gently opening your eyes, and bringing with you your intention. Thank you.”
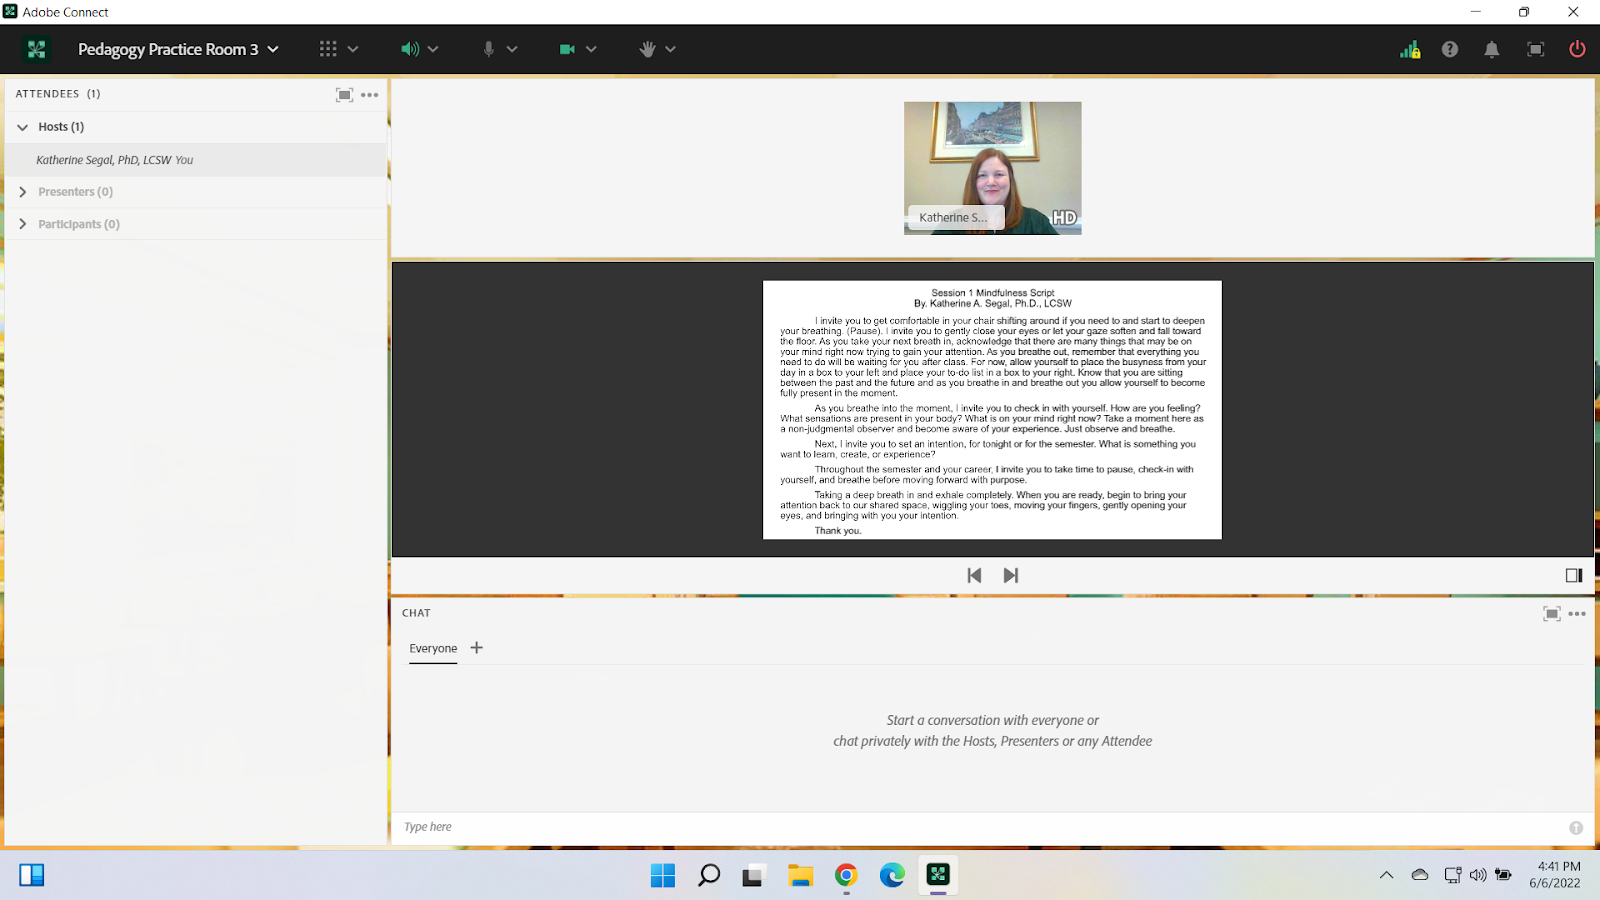
Image 5. Adobe Connect classroom, displaying the mindfulness script text as a pdf, using the same room set-up used for the landscape-oriented slides. Font Arial, size 20, margins set to 0.5 on all four sides. Adobe product screenshot(s) reprinted with permission from Adobe.
Image 5 Alt-Text: This is a screengrab of an Adobe Connect classroom. The set-up of the room has remained the same from images 3 and 4. The only change is what is displayed in the Share pod. The share pod now displays a pdf version of the same script mentioned in the previous description. A scrolling bar is also seen on the right-hand side of the document as the full text of the script is not viewable.
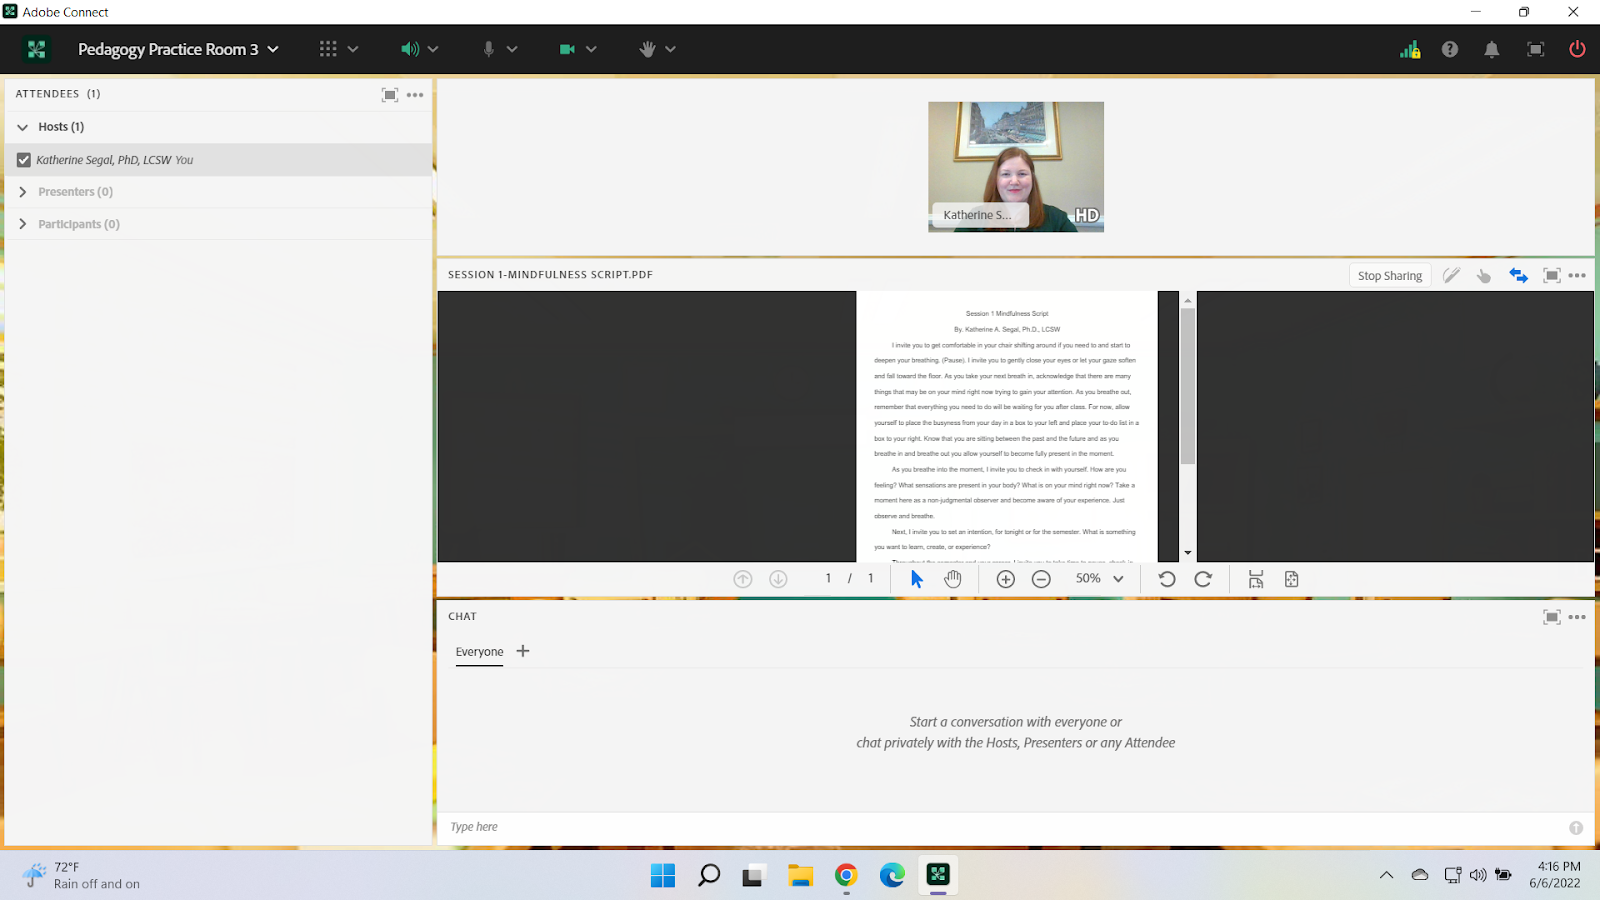
Image 6. Adobe Connect classroom, displaying the mindfulness script text as a pdf, changing the orientation of the room to allow for more area for the Share pod and a smaller Video pod area. Font Arial, size 20, margins set to 0.5 on all four sides. Adobe product screenshot(s) reprinted with permission from Adobe.
Image 6 Alt-Text: This is a screengrab of an Adobe Connect classroom. The Video pod, showing the chapter author, Katherine Segal, is in the top left corner. Below the Video pod stretching the bottom of the screen is the Attendees pod. To the right of the Video and Attendees pods, the screen is split between the Share pod and then a Chat pod. The Share pod begins at the top of the screen and takes up approximately two-thirds of the viewing area and is above the Chat pod. The Share pod is displaying the same pdf version of the script mentioned in the previous description. The text appears larger, however, a scrolling bar continues to be present on the right-hand side of the document as the full text of the script is not viewable.
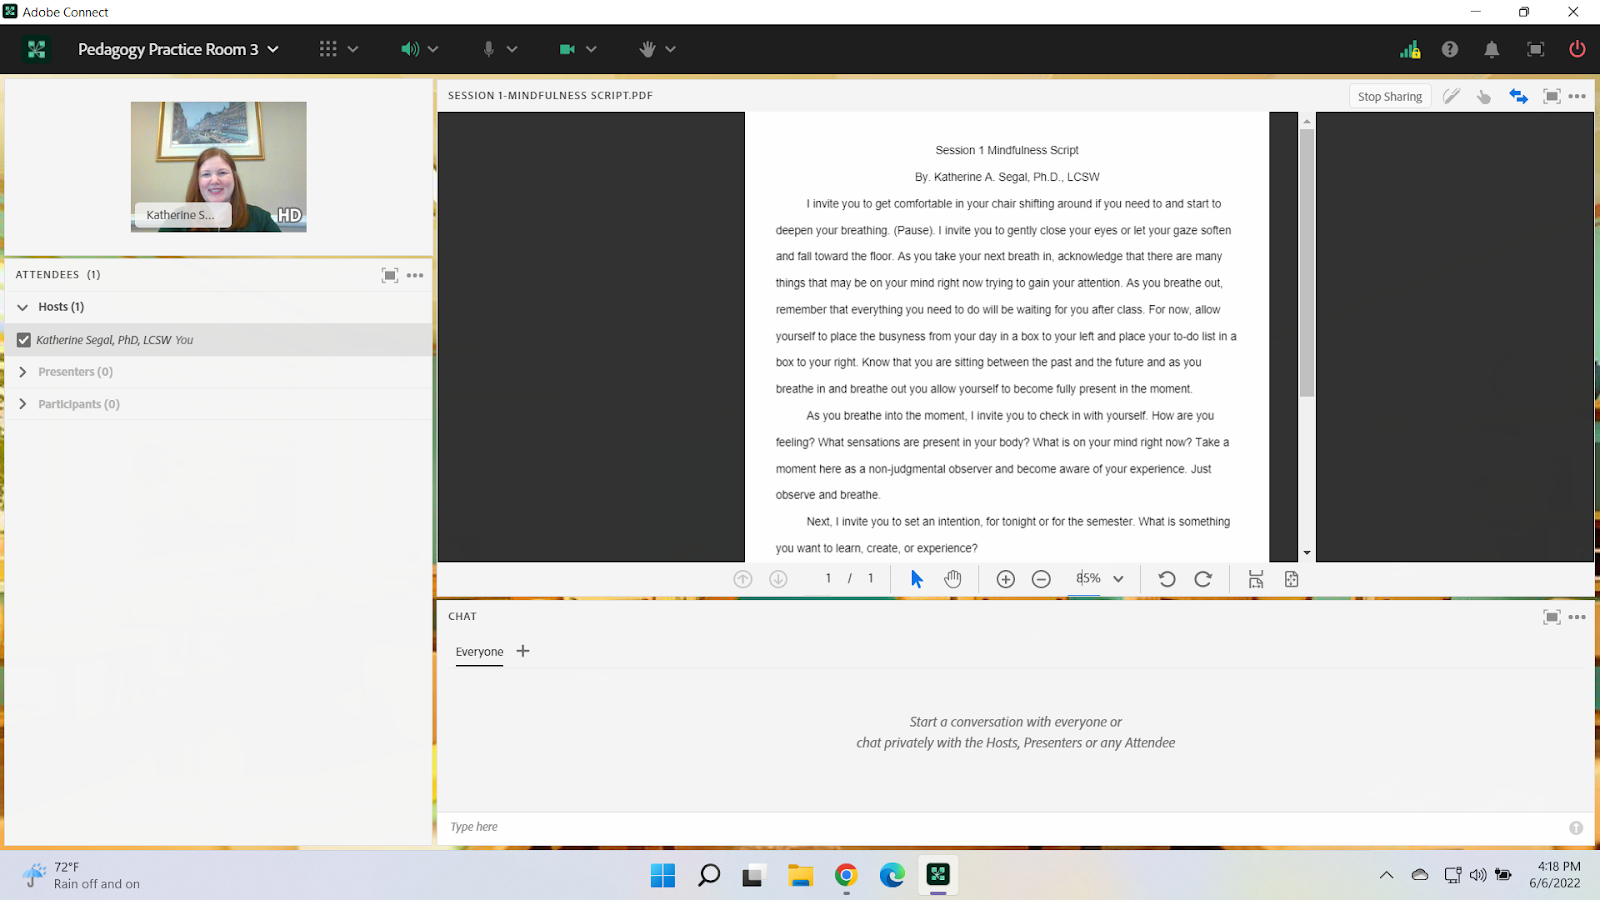
Image 7. Adobe Connect classroom, displaying the case study text as a pdf. The Adobe room set-up has been changed to allow for a larger display area for the text. Font Arial, size 20, margins set to 0.5 on all four sides. Adobe product screenshot(s) reprinted with permission from Adobe.
Image 7 Alt-Text: This is a screengrab of an Adobe Connect classroom. The Video pod, showing the chapter author, Katherine Segal, and the Attendees pod continues to be on the left-hand side of the screen. To the right of the Video and Attendees pods, is the Share pod stretching from the top of the screen to the bottom of the screen and taking up approximately half of the viewing area. Right of the Share pod is the Chat pod, also stretching from the top of the screen to the bottom and taking up the remaining width of the viewing area. The Share pod is displaying the same pdf version of the script mentioned in the previous descriptions. The text appears larger, however, a scrolling bar continues to be present on the right-hand side of the document as the full text of the script is not viewable.
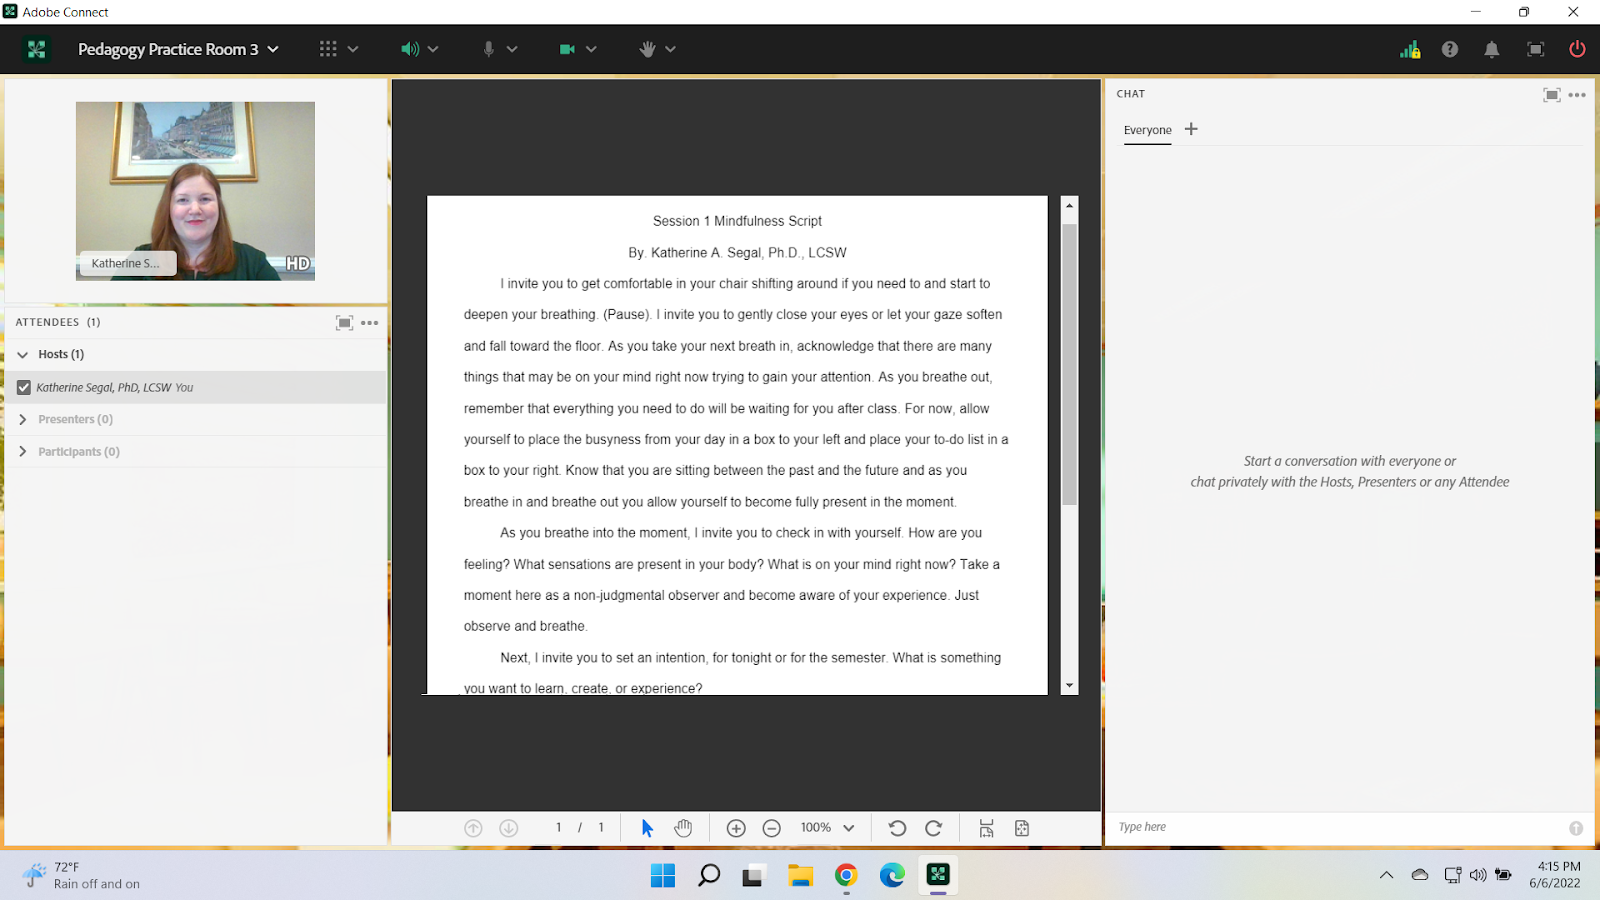
Image 8. Adobe Connect classroom, using the same room set-up as the previous image, displaying the case study text on a portrait-oriented slide. Font Arial, size 20. Adobe product screenshot(s) reprinted with permission from Adobe.
Image 8 Alt-Text: This is a screengrab of an Adobe Connect classroom. The set-up of the room has remained the same from image 7. The only change is what is displayed in the Share pod. The Share pod now displays the full text of the mindfulness script on a portrait-oriented slide. The full text is viewable on the slide.
Acknowledgments
Natasha A. M. Burton, LMSW, for supporting me and my Fall 2021 Adult Psychopathology course and for figuring out and teaching me how to create portrait-oriented slides. Without this important spark of creativity, this piece could not have been written.