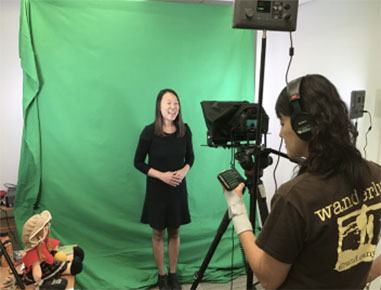
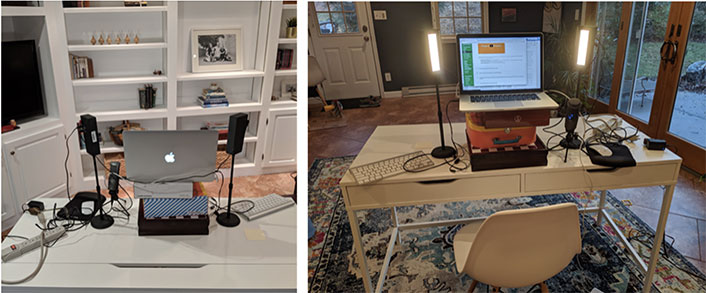
People tend to get nervous when they are new to recording themselves. They seem to believe that to look and sound professional, they need professional equipment. Having worked in studio environments such as the one in figure 1 with Joan Shin, I know that professional-grade equipment can result in more professional videos. However, I also know that the cameras on webcams and smartphones have become quite good, and you can make great looking and sounding videos with the technology you already own, as shown in figure 2. While technology is important, it's much more important to know how to use the technology well.
 Figure 1. Joan Shin's video environment
 Figure 2. Jered Borup's video products
What Not to Do
Before we talk about best practices, let's cover what not to do. The GIFs in table 1 are exaggerated for effect, but not by much. I think it's safe to say that we have all been guilty of at least some of the following what-not-to-dos.

The Silhouette: People commonly record videos while sitting in front of a window or a lamp. When you do that, others may only see your silhouette.

The Zebra: If natural light is available, it is best to sit facing that light—so long as the window blinds do not cast shadows on your face. Stripes look better on tigers and zebras.

The Haunting: At times we may want to record a video at night. However, be careful because the light from your screen can make it look like you're telling scary stories by the campfire.

The Hostage: Video can be a great opportunity for others to get a glimpse into where you live or work. Too often we don't take advantage of that opportunity and record videos in front of a blank wall. As Room Rater frequently points out, these recordings can feel like a hostage video, as if at any time the person is going to look if the coast is clear and then whisper, "Help me!"

The Nosey Professor: It's convenient to work with our laptops on…well, our laps. However, looking down at your laptop is a less-than-flattering angle, and you can even give students an unforgettable look up your nostrils.

The Toddler: Just as looking down on the webcam is less than flattering, looking up at the webcam looks like you need a booster seat.

The Close Talker: Some people are just close talkers. An entire episode of Seinfeld covered the topic. Just like in-person close talkers invade people's personal space, online close talkers can get too close for comfort.

The Social Distancer: If The Close Talker is on one end of the spectrum, The Social Distancer is on the other. Social distancing is important during a pandemic, but is unnecessary online.

The Reader: When we create a video we may feel tempted to watch ourselves or read a script on the screen rather than looking into the camera. This prevents us from creating eye contact and can make us look uninterested or inauthentic.

The Profiler: First-world problems, I know…but if you have two monitors you may find that you spend too much of your video looking at the monitor that is not recording the video. This will leave people staring at your profile. This is more common in live video calls but can still happen when recording videos.

The Needs a Trim: Once we've finished talking, our smiles often vanish as we look for the stop button. Some tools will allow you to trim the ends of the video, but if not, keep smiling until you actually stop the recording. Niccole Thurman perfectly highlighted this in her tweet.
What to Do
I went back to my YouTube channel and found my first webcam video (Aug. 31, 2010) and then compared it to a more recent video (June 20, 2020). It's not by accident that the newer video looks better than the older one (see figure 3). In the first video, I failed to consider (or care) how I was going to appear to my students. I was backlit by the lamp behind me. I was looking down on the laptop. In fact, I didn't even bother holding my laptop level, which made the picture in the background appear tilted. I wasn't even really looking into the webcam, although there was so much glare on my glasses it's hard to tell.
 Figure 3. Then and now: How small changes can make big difference in video
In the newer video I took just five minutes to prepare. You can see in figure 4 that I put my laptop on a stack of my daughters' games, which raised the webcam to my eye level. I also used lamps specifically designed for recording webcam videos, though any lamp would work. Even better, you can sit facing a light-filled window. I also made sure that in the background there was a picture of my family, a small plant, and a few other little things.
 Figure 4. My home video setup
Keys to Quality Videos
The following simple keys can help you avoid these common pitfalls of amateur video production and create warm, engaging, effective footage that engages your students and communicates your interest them.
Key #1: Convey Your Voice
Looking good is important, but nothing is worse than bad audio. If the audio is distracting or unintelligible, your video will not be watched. If you are recording using your phone while outside, even a little breeze can be really distracting. If the built-in microphone is not great on your phone or computer, try using an external microphone. Most headphones now have pretty good microphones built in.
The audio doesn't need to be perfect, and most of the time, good audio is good enough. However, if you want to go the extra mile, relatively inexpensive high-quality external mics are available, such as the Blue Snowball. Furthermore, if you are hearing reverberations or echoes from where you are recording, you can improve the sound quality by placing pillows behind and to the sides of your computer, as shown in this NPR video.
Key #2: Find the Light
For lighting, the best arrangement is to sit facing the primary light source in your room rather than having the primary light source behind you. Often the best approach is to sit toward a sun-filled window (if the light isn't so bright it blinds you). If that isn't an option, then lamps will do. If a lamp's light is not strong enough, try removing the lamp shade. An additional lamp can also be helpful if you are sitting directly under a strong light that casts shadows on your face.
Key #3: Frame and Maintain Eye Contact
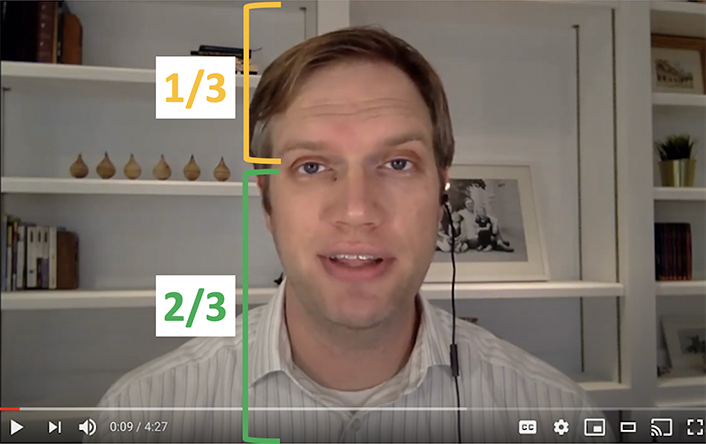
Sit a little less than arm's length from the camera. From there your eyes should be about one-third of the distance from the top of the screen, as seen in figure 5. You should also position the camera so that it is at eye level (or slightly below). That will likely mean placing your laptop on something like a box or a stack of books.
 Figure 5. Establishing an optimal vertical relationship of face and camera
Key #4: Stage
Before hitting the record button, take a few minutes to consider the surroundings that will be shown in your video. Personal items can be a good way for others to get to know you. Furthermore, plants, pictures, and bookshelves can add warmth to the video.
While working from home, it can be difficult to find a place to work and record videos. For instance, in this CNN article you can see people working everywhere from the closet to the bathtub. However, even Jessica Fleming, who was working in her walk-in closet, presented a professional background: "The best part? I've even hung a picture behind the desk so that my video conference calls don't look like I'm in my closet!" As a side note, a closet is a great place to record audio. Just don't get locked in.
Key #5: Be Prepared and Natural
Speak naturally, as if you were actually speaking to someone rather than a screen. If you are able to show that what you are saying is important and interesting to you, then others are more likely to feel the same way. You should know generally what you want to say before you start recording. However, in most cases it is not necessary or even recommended to write a script that you read. If you are reading from a script, it can be hard to sound natural and almost impossible to read while you are looking into the camera without a teleprompter. If you have ever taken a public speaking class, you know that a better approach is using notes to prompt you while speaking. If you are recording from a laptop or desktop, you can have the notes in a word processing document. However, even that will require you to look down frequently so try placing your notes as close to the top of the screen as possible. Another trick is to put your prompts on sticky notes that you then place right next to the webcam so you can glance over to them while still appearing to be looking into the webcam.
Key #6: Keep It Short
Unlike with in-person courses, online instructors do not have captive audiences. The entire internet is only a browser tab away, and there is very little stopping others from exploring. If you have mastered all five of the previous keys, you are more likely to keep others' attention, but even that attention will likely be limited to about six minutes for many of your students. This recommendation is based on Guo, Kim, and Rubin's research that examined nearly 7 million video views on 862 videos and found a steep drop in engagement after about six minutes.Footnote1 Obviously there will be important exceptions to this rule, but if you can keep it under six minutes—do it!
Conclusion
When creating a video, it is important to consider how you will look and sound to your students. Now that you've learned about the six keys to making quality videos, try making a video yourself or review a video that you've previously recorded. As you watch your video ask yourself these questions:
- Key #1: Convey Your Voice—Is the audio clear, or is there background noise or reverberations in the room that distract from your message?
- Key #2: Find the Light—Are you well lit with a light source in front of you, or are you backlit and/or have shadows on your face?
- Key #3: Frame and Maintain Eye Contact—Are you about at arm's length and eye level with the camera, or are you looking down or up at the camera?
- Key #4: Stage—Do you have personal and/or interesting things in the background, or are you recording in front of a blank wall?
- Key #5: Be Prepared and Natural—Are you speaking naturally in a way that conveys your interest in the topic, or do you sound somewhat robotic and/or scattered?
- Key #6: Keep it Short—Is the video under six minutes?
A little preparation can mean the difference between a video that students watch and one that students ignore.
Acknowledgment
This chapter was written with the support of EdConnect and previously published at https://edtechbooks.org/-RfL.
Note
- Philip J. Guo, Juho Kim, and Rob Rubin, "How Video Production Affects Student Engagement: An Empirical Study of MOOC Videos," Proceedings of the first ACM Conference on Learning @ Scale, March 2014.