This chapter describes how scripted role play activities were conducted in breakout rooms using the Adobe Connect platform and provides insights for educators interested in adopting similar activities in their classroom. Two courses (Introduction to Prolonged Grief Treatment and Foundations of Grief Therapy) taught by Katherine Shear used scripted role plays to practice clinical skills and engage and reflect on the emotional experience of engaging in grief therapy. The chapter is written from my perspective as a teaching associate: supporting the professor with the course material as well as occasionally participating in the role play when the number of students in the class required me to do so.
Teaching and Learning Goal
The purpose of the scripted role play activity is to provide students with the practical skills, experience, and exposure to the seven themes of Prolonged Grief Disorder Therapy (PGDT) so that they feel more confident engaging in the 16-session evidence-based treatment in their practice. Specifically, we wanted to give students the opportunity to respond to and reflect on the emotional experience of engaging in grief therapy. This activity also served to facilitate two of our course learning objectives:
- Demonstrate mindful self-awareness, thoughtful self-monitoring and effective self-care as a PGDT therapist.
- Demonstrate active listening and personalized intervention with cultural humility and respect for all forms of human diversity.
Activity and Results
This activity evolved over several semesters to target specific skills and elicit the emotional reactions one might expect when doing PGDT. In many social work classes, we focus on critiquing and critically analyzing social work techniques, but there is also great value in identifying and naming the emotions we experience in the therapeutic relationship, something that is not often practiced. For this reason, we used scripted role plays inspired by real conversations where each participant read directly from the script. We then asked students to reflect on specific questions related to the exchange (see Image 1 for reflection question examples). This gave students the opportunity to focus inward rather than on the dialogue or interaction between the therapist and client. The scripted role play documents include discussion question prompts, brief background information on the client and past interactions, and the verbal exchange between therapist and client.
In early iterations of this activity, we noticed that students tended to focus on critiquing the script and the dynamic between the therapist and client. This prompted us to include targeted reflection questions in future scripts which helped direct the conversations in the direction we would like. However, at the beginning of the semester I would still observe students focusing on the words being used and the specific choices of the therapist. For this reason, I would recommend that scripted role plays are best used over several class sessions to give students the opportunity to learn and grow with the activity. With further prompting and support from the teaching team, over the course of the semester and in each time completing the activity, students began tapping into the emotional response more and more.
One potential concern with engaging in a role play activity (or other clinical skills activities) online is that students may not have the experience of practicing using their body language in therapy. While we encourage students to turn their video on while in the breakout sessions, this is not something we monitor. Furthermore, monitoring body language is not the learning objective of this assignment. By assigning scripted role plays, we target discussion of the emotional reaction of hearing people talk about the death of a loved one. At times the script may describe the physical environment of the room: pauses in the conversation, body position of the client, etc. But mostly, we want students to focus on their overall emotional responses. The online platform allows us to very specifically target certain clinical skills, and I have observed powerful reactions and beautiful discussions emerge from narrowly focusing on this aspect of therapy.
The few times I participated in the activity I could see its value for students, as I recognized the value it had in my own work. During my own social work education, I participated in a number of unscripted, improvisational role play activities. These exchanges didn’t seem to mirror reality. When role playing the client, it can be difficult to think of something to talk about, knowing you will be sitting alongside the “therapist” for the rest of class. And role playing the therapist is not necessarily an accurate representation of the experience of sitting in a therapy room. Some schools bring in actors to engage in role plays to simulate a more realistic exchange. What both of these experiences have in common is the new therapist is often focusing almost exclusively on what to say in the interaction. It is easy to be critical of the words used and how the therapist engages with the other person rather than on the substance of the dialogue and the emotional response. Providing students with a script and question prompts that target the emotional experience can be empowering for students in recognizing their own emotions, and when leveraged can be a valuable learning tool.
Image 1: Sample discussion questions from a scripted role play.
Image 1 Alt-Text: The image is a screen grab of text from a scripted role play which says, “Read this role play with your partner and think about the following questions: 1. How did you react to this story? Was it comfortable to read or did it make you uncomfortable? Try to explain your answer to this – what might have made you uncomfortable – or comfortable? 2. Did you learn anything about yourself from this script? 3. Did you learn anything about grief from this script? 4. How would you manage your own emotional responses to this vignette? 5. How might you self monitor when doing grief therapy? How might you take care of yourself in doing grief therapy? 6. What questions do you have?”

Technical Details and Steps
The two-hour course session was divided into three parts: didactic presentation, skills work, and question and answer. The scripted role play activity was part of the skills work section of class where students went into breakout groups for approximately 20 minutes. Ten minutes were estimated to read the script (with each person having the chance to read both the therapist and client roles, swapping roles halfway through) and ten minutes were estimated for engaging in discussion with their partner. The class was divided into pairs to complete the activity. When there was an odd number of students in the class, we would either create one group of three where one student could observe (or rotate roles) or I, as the teaching associate, would participate in the activity with one of the students.
Step 1: Sharing the scripted role play document
Before class: Decide when you want to share the role play with students, either before class or during the session. Unless a student specifically requested the document ahead of time (or this was part of a student’s disability accommodations), we decided to share the document at the start of the activity. This way students could share their initial reactions to hearing the script for the first time with each other during the activity.
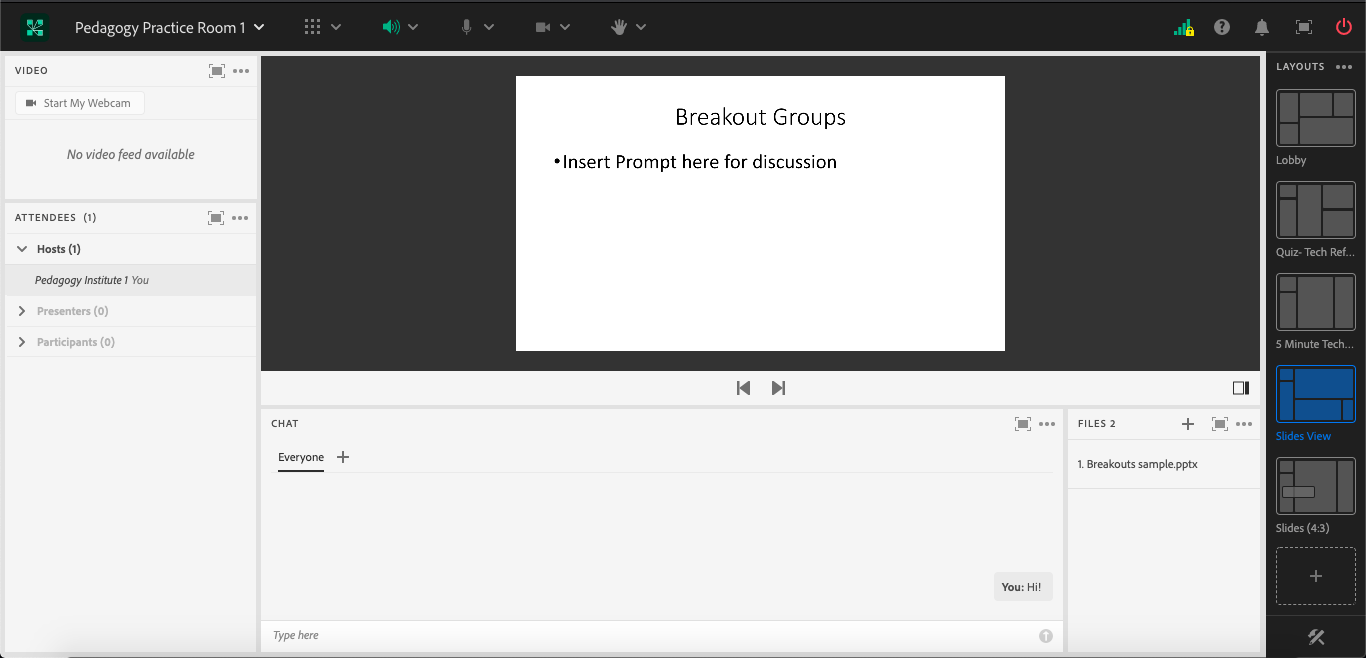
During class: When introducing the role play activity, you can share the downloadable file in a separate Adobe Connect pod (see Image 2) and/or include the document as part of a file sharing pod in the breakout group.
Additional considerations: If you decide to share the downloadable file in the main room and before going into breakout rooms, make sure you provide enough time for students to download the document, and be prepared to jump into breakout rooms and share it quickly with students that were not able to download it immediately because of technical challenges or other delays. In addition, you can include a screen sharing pod with the script pulled up in the breakout room for students to read from. However, I would also recommend having a downloadable file available for students, as the text may be small and difficult to read without making the document full screen, and by doing so, it may be challenging for students to use the other features in the breakout room such as the chat and video pods.
Step 2: Sending students into breakout groups
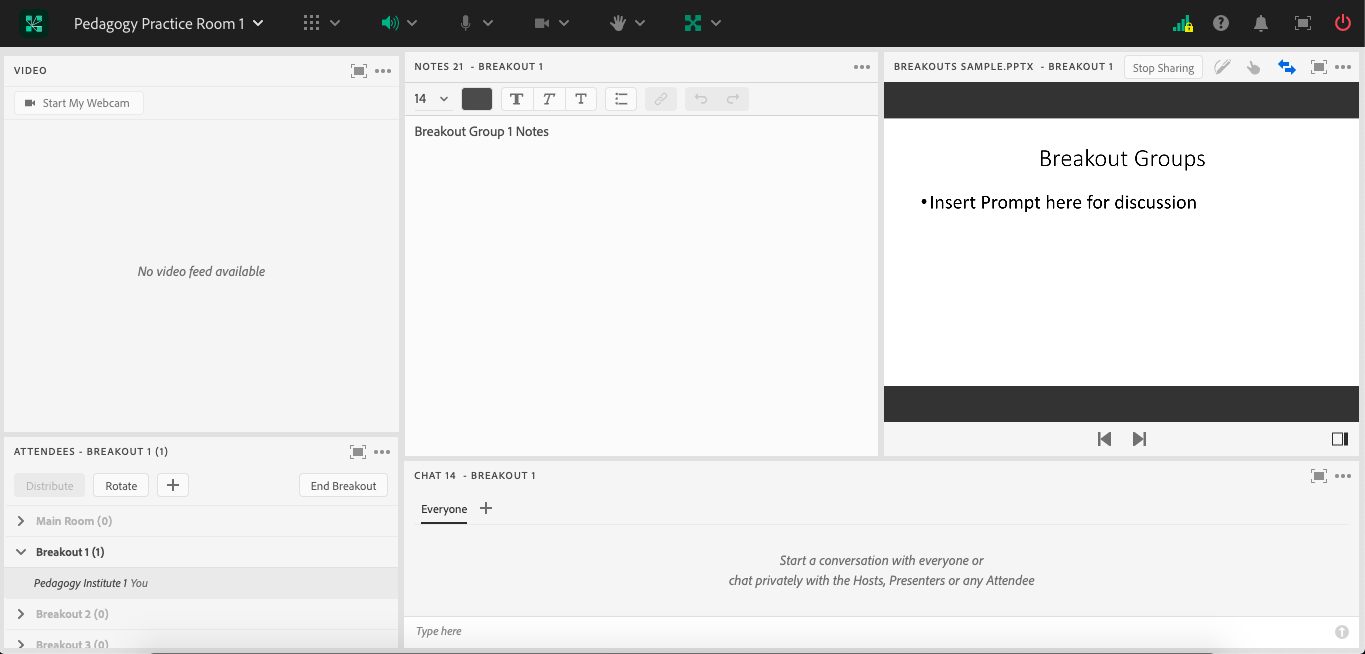
Before class: Create breakout group rooms based on the number of students enrolled in your course divided by two. That way it is easy to quickly move students into groups at the start of the activity. When preparing the breakout groups (see Image 3), you may want to include a video pod so students can turn on their cameras, a breakout group chat pod so that students can message with each other (you will need to create new chat pods for this so that the chat doesn’t broadcast to the entire group), a blank note pod so that students can take notes during the activity (if you expect to use the notes during group discussions, be sure to label the pods with the group number and/or ask students to include their name so that it can be easily identified), and/or a file sharing pod with the script uploaded.
During class: Notify students of the duration of the activity and consider sending timing reminders when students should switch roles, when they should transition to responding to the discussion questions, and when they have 2-3 minutes to wrap up their discussion.
Additional considerations: We were intentional about not entering the breakout groups to observe students unless explicitly called in by the group. In other classes, with less emotionally sensitive topics, I have gone from room to room to check on students and offer support, but I thought this might be disruptive to the interaction and discussion. Another thing to consider is the makeup of the breakout groups, whether you want random groups or predetermined groups. We opted for randomization; however, we had one group report that they were in the same matching two weeks in a row. In this instance, we briefly scanned the groups to make sure the two students were not matched for a third time. Depending on the size of the group, repeating partners may be inevitable, but it may be something to think about and be intentional about ahead of time. You may also consider manually creating breakout rooms to ensure students are matched with someone different for each activity; however, this may be time consuming if you don’t have a teaching assistant or technical support in the classroom to manage the process.
Step 3: Debriefing the activity
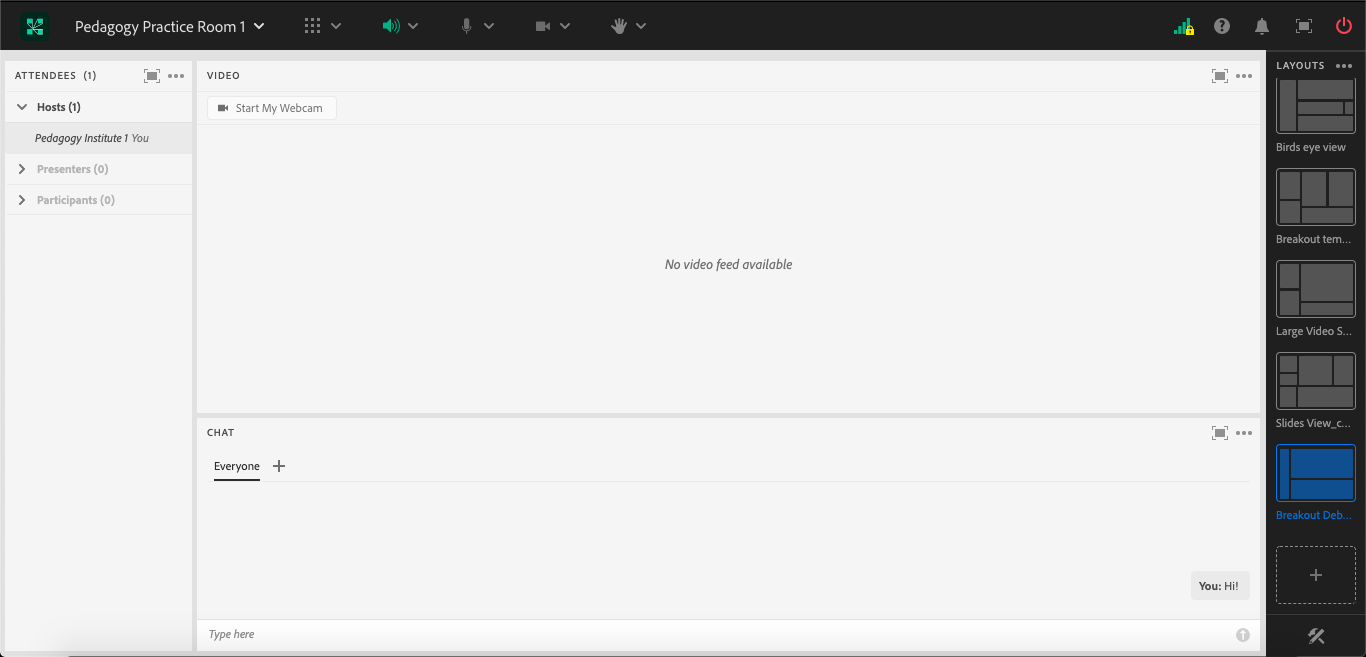
Before class: Create a layout in Adobe Connect to facilitate your debrief conversation or activity. In our case, we included a large video pod to create space for students to join us on camera (see Image 4). In previous iterations of the course, we also experimented with including the note pods in the main room for students to reference.
During class: We debriefed the activity by inviting everyone to join us on video, in an attempt to simulate a more traditional group conversation. As students are brought back into the main room, you can often hear remnants of spirited discussion – try to draw on this energy as you move into the debrief conversation!
Additional considerations: It was rare that we had everyone on camera the entire time, and I would recommend having a discussion as part of community agreements around how and when you expect folks to come on camera (if at all). I observed that we would often have the same few students sharing during the debrief conversation, and those were the ones that often joined us on camera. At the same time, I think it’s an important conversation to have with students rather than simply requiring everyone to be on camera. In future iterations of this activity, I’d recommend brainstorming other creative ways to facilitate equitable sharing during the debrief such as drawing or creative writing.
What this looked like in Adobe Connect
Image 2: Adobe Connect classroom displaying breakout group discussion instructions on a share pod and downloadable instructions in a file pod in the main room. Adobe product screenshot(s) reprinted with permission from Adobe.
Image 2 Alt-Text: This screengrab of the Adobe Connect classroom shows a large pod along the top of the screen for the slides presentation. The slide says “Breakout Groups” at the top and “Insert Prompt here for discussion” beneath. Below the slides, there is a chat box taking up most of the width of the slides and there is a smaller file sharing pod on the right where the breakout documents can be shared with students. There is an example file in the file sharing pod titled “Breakouts sample.pptx.” Along the left side of the screen is a narrow video pod and attendees pod.

Image 3: Example of an Adobe Connect breakout group room with a note pod, a share pod with slides uploaded, chat pod, and video pod. Adobe product screenshot(s) reprinted with permission from Adobe.
Image 3 Alt-Text: This screengrab of the Adobe Connect breakout group room shows five pods. Along the left side of the screen are a video pod and the attendees pod below that. The main part of the screen is divided between three pods. Along the bottom is a chat pod, and above this the space is divided between a notes pod that says “Breakout Group 1 Notes” and a presentation sharing pod with an example slide titled, “Breakout Groups,” with the text “Insert Prompt here for discussion.”

Image 4: Adobe Connect classroom displaying possible debrief layout with large video pod. Adobe product screenshot(s) reprinted with permission from Adobe.
Image 4 Alt-Text: This screengrab of the Adobe Connect classroom shows a large video pod covering most of the screen. Below the video pod is a chat pod running the width of the video pod, and along the left side of the screen is the attendees pod.

Acknowledgements
Kathy Shear, thank you for being a phenomenal collaborator in the classroom and for welcoming this chapter based on my experiences in your courses. Matthea Marquart, thank you for being an incredible mentor and collaborator inside and outside the classroom, for always supporting my personal and professional development, and for inviting me to write this chapter. Teis Jorgensen, thank you for your thoughtful edits and your never-ending love and support.