The status icons feature in Adobe Connect can be a useful tool to increase engagement, check in with students, get real-time feedback, and gauge student preferences.
Teaching and Learning Goal
I use the status icons feature for several reasons and under varied conditions. I found that it can be useful for the following activities.
- To gauge students’ perception of a video or other presented item.
- To determine students’ preferences.
- To keep students engaged throughout the class.
- To obtain feedback about lecture pace.
The Adobe Connect status icons feature is automatically available in the classroom. To ensure both the instructional team and students are familiar with how to use the tool, I recommend instructional teams complete a brief technology orientation during the first class session, including reviewing how to use the status icons feature. I also recommend instructors consider how to incorporate the status icons feature when planning the weekly lecture, and include prompts in slidesets; however, it can be utilized on an ad hoc basis whenever relevant.
The status icons feature can be used to help determine students’ status or level of engagement. For example, it can be used to decide when to take a break or how to structure class (e.g., give me a laughing symbol to do our breakout activity now or a thumbs up to take a break first). It can also inform preferred lecture pace (e.g., instructors can encourage students to use the “slow down” request icon as needed), or gauge students' prior knowledge about a topic (e.g. give me a thumbs up if you have experience working with clients on this, and an applause status icon if this is new to you). Following a presentation, video, etc., the instructor can use the status icon to gauge reactions (e.g., give me a thumbs up if you thought the video was informative and a thumbs down if you did not enjoy it, and please share more about your opinion in the chat). It can also simply be used to engage students and keep them on their toes (e.g., give me a round of applause status icon if you agree).
Technical Details and Steps
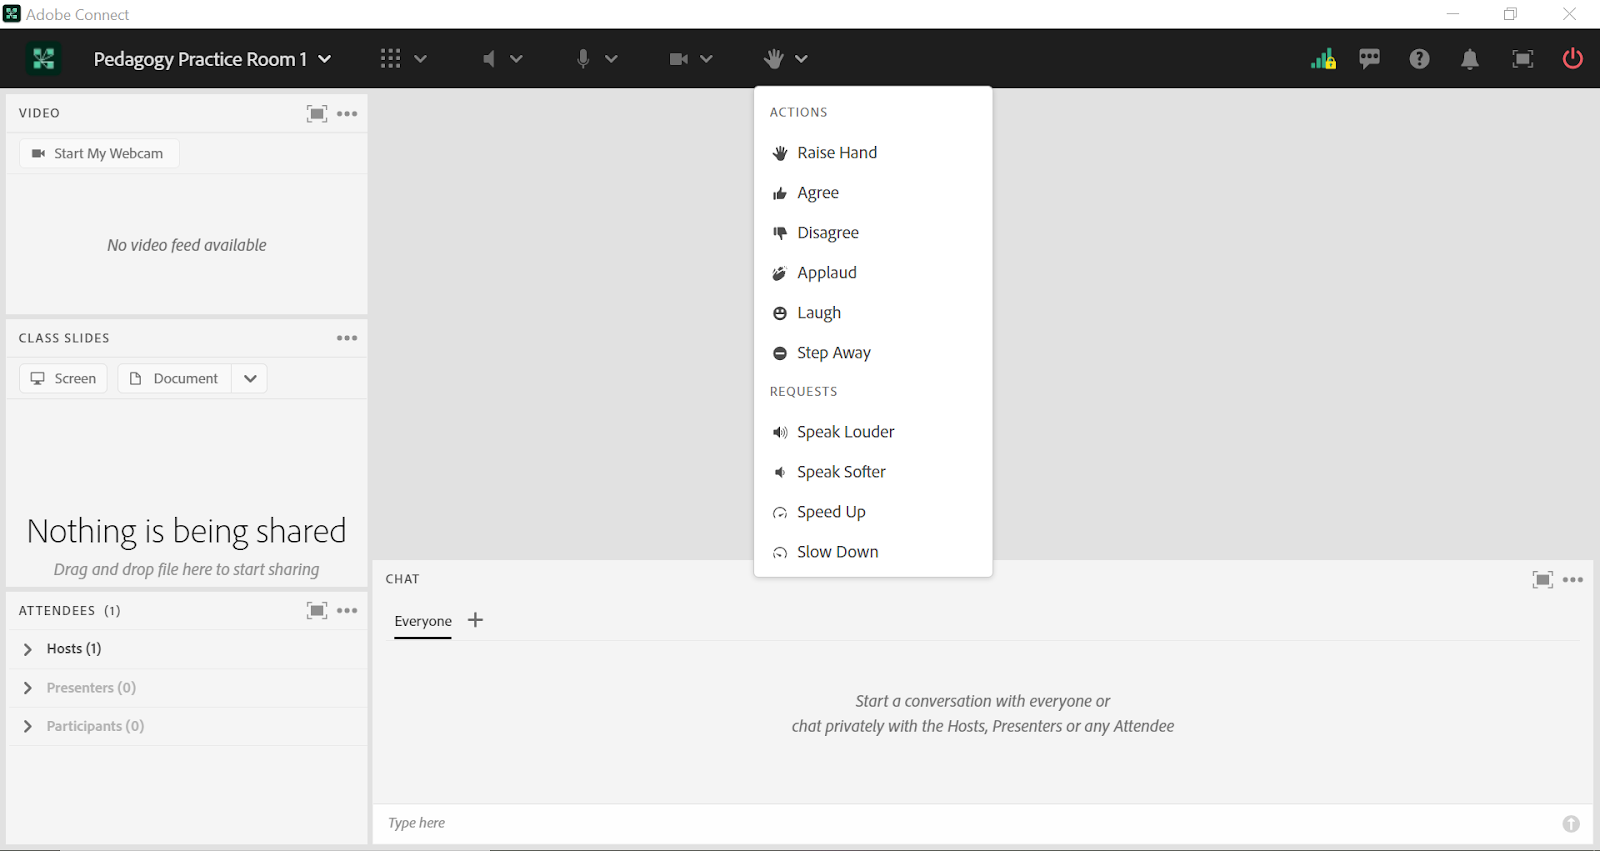
The Adobe Connect status icon feature is automatically available in the classroom. The feature can be accessed at the top of the Adobe Connect classroom to the right of the video icon. The status icon feature icon is an open hand. To use the feature, open the drop-down menu next to the icon by clicking on the downward-facing arrow. Select the status icon you would like to use. The current status icon options are listed below and can be seen in Image 1.
- Raise hand
- Agree
- Disagree
- Applaud
- Laugh
- Step away
- Speak louder
- Speak softer
- Speed up
- Slow down
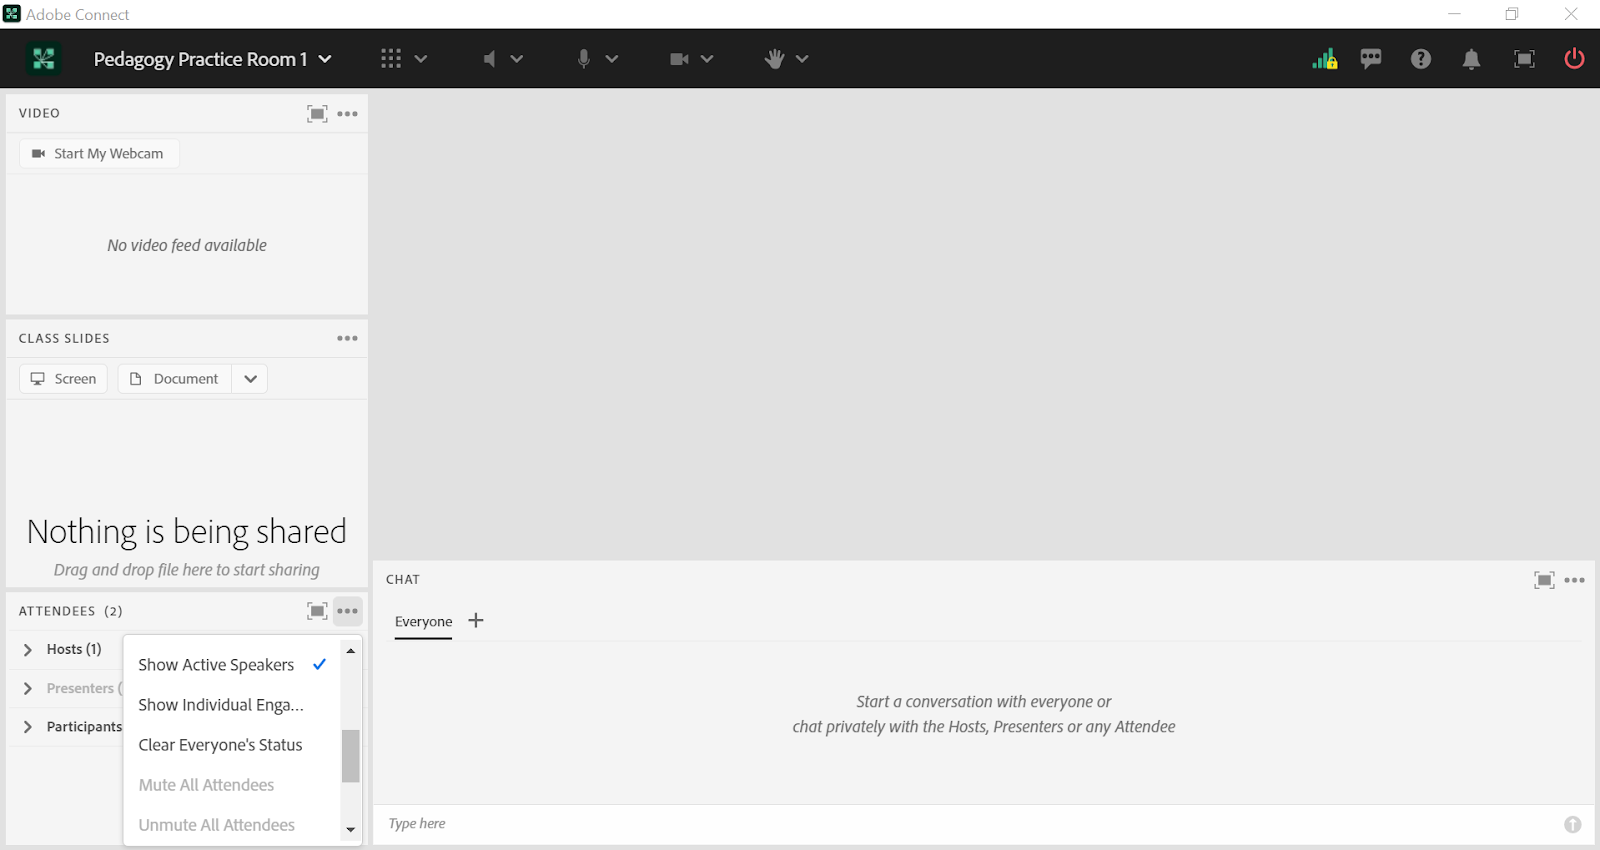
Some of the status icons automatically clear after a period of time and some are persistent (Raise Hand, Agree, and Disagree). I often clear the status icons after the activity goal has been completed to avoid confusion. You can clear everyone’s status by clicking the three dots next to the word ‘attendees’ in the attendees pod. A drop-down menu will open when you click the three dots (Image 2), and you can scroll down and click ‘clear everyone’s status’.
What this looked like in Adobe Connect
Image 1: An Adobe Connect classroom with the status icon feature drop-down menu open. Adobe product screenshot(s) reprinted with permission from Adobe.
Image 1 Alt-Text: This is a screengrab of an Adobe Connect classroom with the status icon drop-down menu open. The status icon is located in the top center of the Adobe Connect classroom and can be identified by the symbol of an open hand, and the menu can be opened by clicking on the down arrow to the right of the open hand symbol. With the drop-down menu open, the following status icon options are visible: raise hand (the icon is an open hand), agree (the icon is a thumbs up), disagree (the icon is a thumbs down), applaud (the icon is a hand clapping), laugh (the icon is a smiley face), step away (the icon is a circle with a line across the middle), speak louder (the icon is a loudspeaker with several sound lines getting larger), speak softer (the icon is a loudspeaker with sound lines getting smaller), speed up (the icon is a speed dial with the arrow pointing to the right), and slow down (the icon is a speed dial with the arrow pointing to the left). The rest of the classroom layout includes a video pod, share pod for the class slides, attendees pod, and chat pod.

Image 2: An Adobe Connect classroom with the attendees pod drop-down menu open and the option to clear everyone's status is visible in the drop-down menu. Adobe product screenshot(s) reprinted with permission from Adobe.
Image 2 Alt-Text: This is a screengrab of the same Adobe Connect classroom as in Image 1. The difference is that the status icon menu is closed and the attendees pod on the left side of the screen has its drop-down menu open. This menu can be opened by clicking on the three dots in the top right corner of the attendees pod, to the right of the word “attendees.” The following options are visible in the drop-down menu: “Show Active Speakers,” “Show Individual Engagement,” “Clear Everyone’s Status,” “Mute All Attendees,” and “Unmute All Attendees.” The option of relevance to this chapter is “Clear Everyone’s Status.”

Acknowledgements
I would like to thank Matthea Marquart for inviting me to contribute a chapter to this book and for her guidance over the years. I would also like to thank the leadership team at the Columbia School of Social Work’s online campus, especially Rebecca Chung, Kristin Garay, Marianna Stayer, and Josh Levine, who have always been supportive, helpful, and responsive colleagues.