Teaching and Learning Goal
The teaching and learning goals with this activity are to:
- Enhance student engagement by decreasing the anxiety associated with “public speaking”.
- Cultivate empathy among students, as it can be easy to create false assumptions in the online sphere where you may not be able to decipher the tone or intent of typed chat.
- Foster a sense of community with other students.
As an instructional team, we wanted students who do not feel comfortable speaking or coming on camera to be given an opportunity to engage with colleagues in a low pressure environment. Students are given a sense of control over which questions they choose to answer about themselves. Conducting this activity, particularly in the beginning of class, also encourages students to test that their technology is working properly.
As a student in the past, my experience with online seminars was that I took them simultaneously with in-person lectures. As someone who has struggled with finding my voice in a classroom environment, I found the Student Spotlight activity to be an exceptional tool for overcoming my anxiety and fear of speaking up during class. In anticipation of being selected by the randomizer, each week I would ensure that my microphone was working correctly, the web camera was clear and connected, and I had a stable hard wired internet connection. On the flip side, I thoroughly enjoyed asking my colleagues questions in the poll such as “Where are you from?”, “Do you have any pets?”, “If you were stranded on a deserted island, what three things would you want?”. When I was finally selected as the “student spotlight”, I already felt a sense of camaraderie with my classmates and was not as nervous. After the student spotlight, I felt even more comfortable engaging on microphone and camera providing insight on class material.
Students shared in chat and feedback polls how much they enjoyed getting to know one another on a more personal level and felt at ease knowing who was behind the screen. As a result, the sense of community and empathy I felt in that class was in many ways superior to other online classes and even many in-person classes!
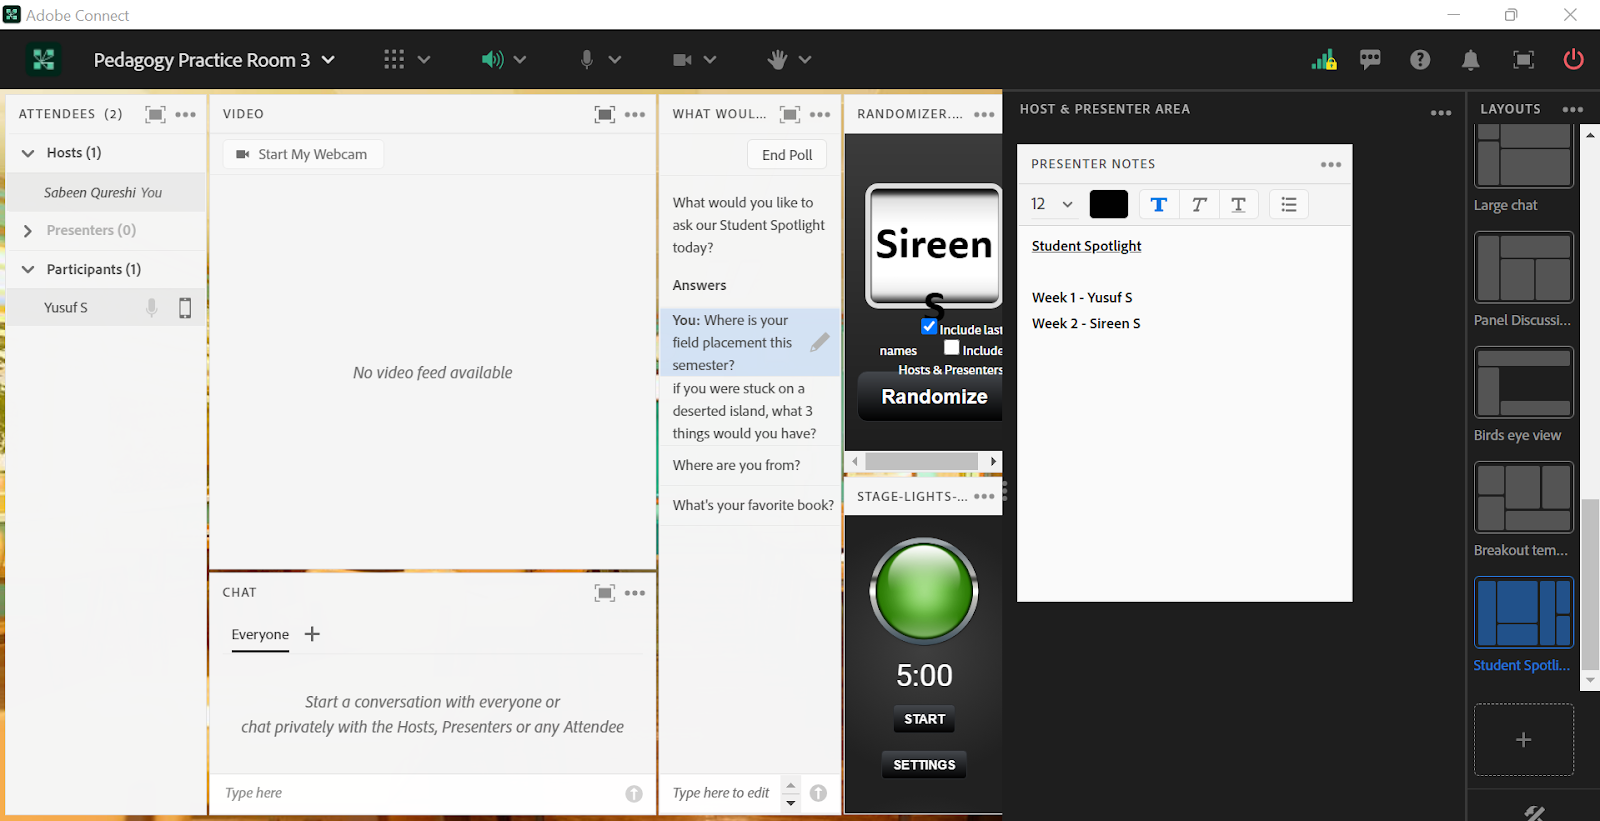
As a part of an instructional team, I would recommend sending an announcement prior to the first week of classes informing students about the spotlight activity and how students will participate. Additionally, it’s useful to keep a record of names in the Host & Presenter Area of who has already shared, to prevent repeated spotlights (Image 4). Depending on the length of the course and number of students, you may need to have multiple student spotlights in one class session to ensure that all get the opportunity to engage. Lastly, it is crucial to have a timer or stage lights visible as students can engage so enthusiastically that they go over the allotted time.
Technical Details and Steps
Step 1: Download the Randomizer tool and Stage Lights tool from Adobe’s website.
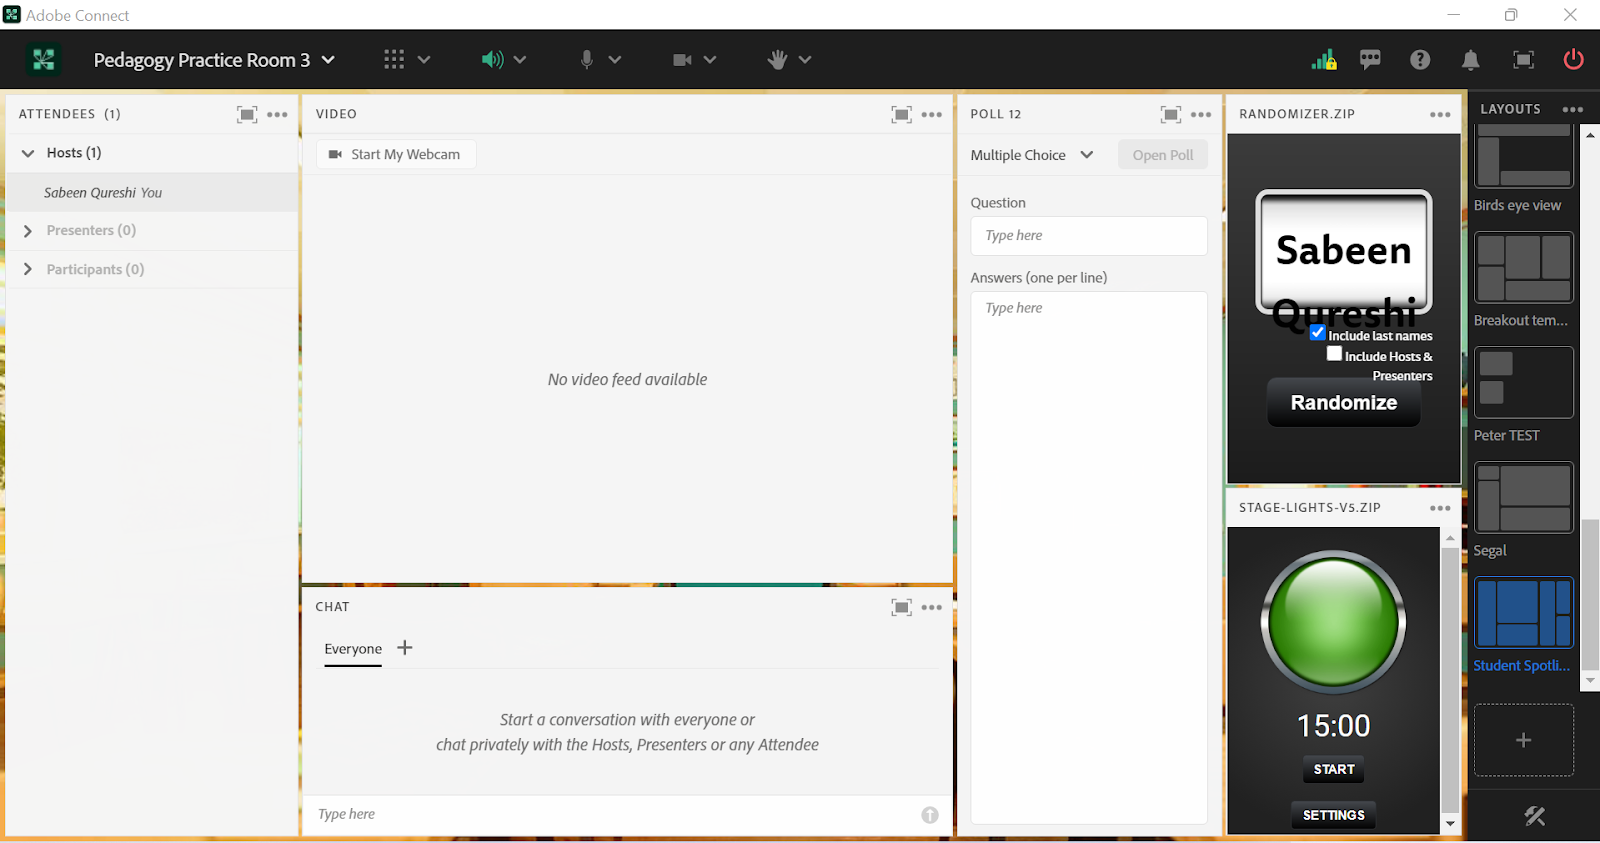
Step 2: Create a new layout and label it “Student Spotlight”. Include the attendees pod, chat pod, a share pod with the randomizer tool, another share pod with the stage lights tool, a video pod to be the main focus and a poll (Image 1).
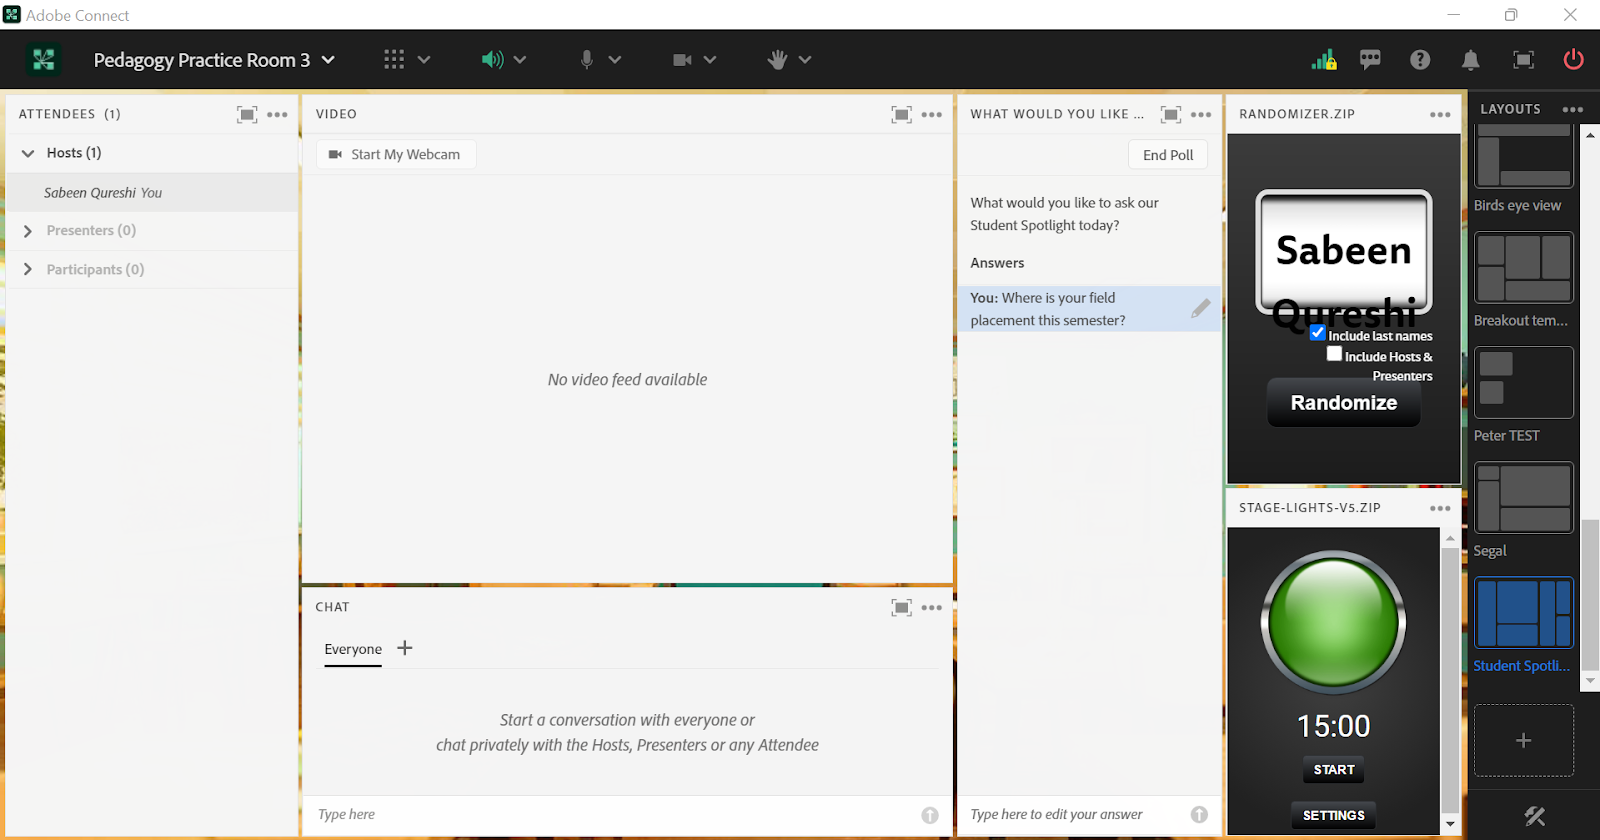
Step 3: Select “short answer question” for the poll and write “What would you like to ask our Student Spotlight today?” (Image 2). I like to select the “Broadcast results” option ahead of time so our Student Spotlight presenter is able to see the questions submitted by their classmates/instructional team in real time.
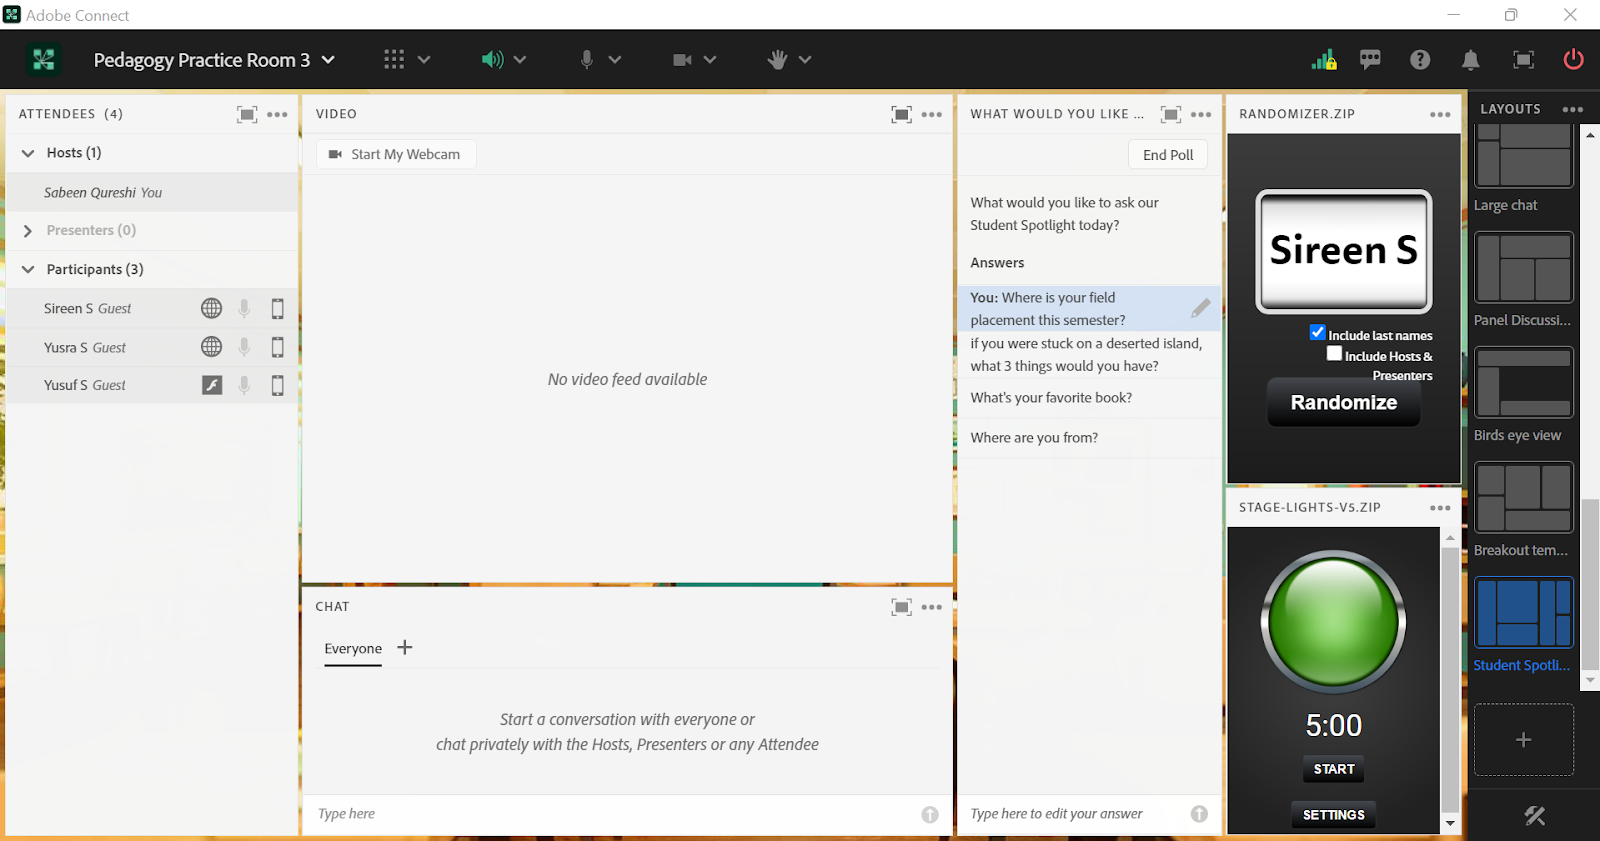
Step 4. During the live session, switch to the “Student Spotlight” layout and click the “randomize” button. After a student is selected and is on camera and/or microphone, open the poll to allow class questions (Image 3).
Step 5. Once the student starts answering their choice of questions, start the stage lights timer tool to count down the appropriate number of minutes allotted for this activity.
Step 6. Keep a list of students who have already been selected for the student spotlight in the Host & Presenter Area of the Adobe Connect room for easy reference (Image 4). If any students come up twice, simply press the “randomize” button again until a new student is selected .
What this looked like in Adobe Connect
To keep this chapter’s screengrabs simple while illustrating the Student Spotlight activity, I have created the images using 4 students. The only names visible throughout these images are the author and made-up student names. No actual student names are included.
Image 1: Student Spotlight Layout. Adobe product screenshots reprinted with permission from Adobe.
Image 1 Alt-Text: This is a screengrab of the Student Spotlight Layout with an attendees pod, video pod, chat pod, poll, randomizer tool and stage lights tool. The randomizer tool has a white box with the text “Sabeen Qureshi” currently selected since no one else is present in the Adobe Connect classroom; under the box are two checkboxes with the following options: “Include last names” (checked) and “Include Hosts & Presenters” (not checked). On the right is a list of layouts, which is only visible to hosts. The Student Spotlight layout is selected from this list. The Stage Lights tool has a green button and is set to its 15 minute default timer. The buttons underneath are “start” and “settings”.

Image 2: Setting up the poll in the Student Spotlight Layout. Adobe product screenshots reprinted with permission from Adobe.
Image 2 Alt-Text: This is a screengrab of the same layout as Image 1. The difference from Image 2 is the poll now has a short answer question with the text “What would you like to ask our Student Spotlight today?” and there is a sample question submitted that reads “Where is your field placement this semester?”
Image 3: Using the Student Spotlight Layout. Adobe product screenshots reprinted with permission from Adobe.
Image 3 Alt-text: This is a screengrab of the same layout as Image 2. The difference is there are more example student names in the attendees pod for the purposes of illustrating this activity. More questions/text have been entered into the poll by the example students, and the list of questions now includes “Where is your field placement this semester?” “If you were stuck on a deserted island, what 3 things would you have?” “What’s your favorite book?” and “Where are you from?” The randomizer now has the name “Sireen S” as the selected student spotlight. The Stage Lights timer tool is set to five minutes. 
Image 4: Student Spotlight Layout with Host & Presenter Area. Adobe product screenshots reprinted with permission from Adobe.
Image 4 Alt-Text: This is a screengrab of the same room layout as Image 3 but shows the Host & Presenter area open to the right. This area is not visible to students. It has a Presenter Notes pod with text consisting of “Student Spotlight, Week 1 - Yusuf S, Week 2 - Sireen S” (example student names). This demonstrates how the instructional team can keep an ongoing record of who has already been in the spotlight.
References
Adobe Connect Apps Randomizer. Adobe. (n.d.). Retrieved June 14, 2022, from https://edtechbooks.org/-kIIE
Adobe Connect Apps Stage Lights. Adobe. (n.d.). Retrieved June 14, 2022, from https://edtechbooks.org/-ETMo
Báez, J. C., Marquart, M., Chung, R. Y., Garay, K., & Ryan, D. (2019, April 11). Increasing faculty satisfaction and student access to online education via dedicated technical support specialists. Columbia: Academic Commons. Retrieved June 13, 2022, from https://edtechbooks.org/-jPhG
Acknowledgements
The first person I would like to thank is Professor Amelia Ortega for introducing me to the Student Spotlight activity and being the inspiration for this article! A big thanks to Matthea Marquart for being an amazing mentor and always encouraging me. Plus a huge thanks to my dear friend Nelly Cubahiro for proofreading and helping my ideas come to life!