In this example, I will share how to use the whiteboard for small breakout groups in Adobe Connect. I will also share an example of a whiteboard activity I found meaningful for social work students learning in an online environment.
This submission is written from my perspective as a Live Support Specialist. I was responsible for taking the instructor’s ideas and agenda items and producing them on the Adobe Connect virtual platform with engaging and user friendly solutions. I utilized a variety of virtual tools, provided technical support, and facilitated an organized communication system for seamless “behind the scenes” collaboration during class. I also occasionally participated in the discussion or presentation of course concepts when my experience in the field of social work was solicited.
Teaching and Learning Goal
Breakout groups in the online learning environment allow for enhanced collaboration, connection, and teamwork skills building. The goals for using the whiteboard in the breakout rooms were to facilitate a creative way to discuss complex topics and to include differing engagement preferences in the virtual learning environment. The use of the whiteboard in breakout rooms also allowed for:
- the application of problem-solving skills as a team while being spontaneous;
- eliciting the engagement of participants with the hopes of enhancing interactions and accessing critical thinking in a new way;
- highlighting the limitations of “group think” when evaluating the outcome of the activity
Activity and Results
The course I supported for this specific activity was the PROP (power, race, oppression, and privilege) course at the Columbia University School of Social Work, learning about social justice and anti-oppressive practice. The instructor provided me with the instructions and agenda for the next class session and requested four breakout rooms with a whiteboard in each room. The instructor also requested that all whiteboards be present and visible when returning to the main room. I set up the Adobe Connect classroom with the layouts requested and we tested my proposed layouts and the activity during our instructional team meeting prior to the week’s class.
When the instructor provided instructions for the activity on the day of class, the instructions were left intentionally vague. The students were told they would be randomly assigned breakout groups for 10-15 minutes, there would be a whiteboard setup for their use, and their instructions were to “draw poverty.” To reduce pressure, the instructor highlighted that no one was expected to be an artist with extraordinary whiteboard skills using a computer mouse.
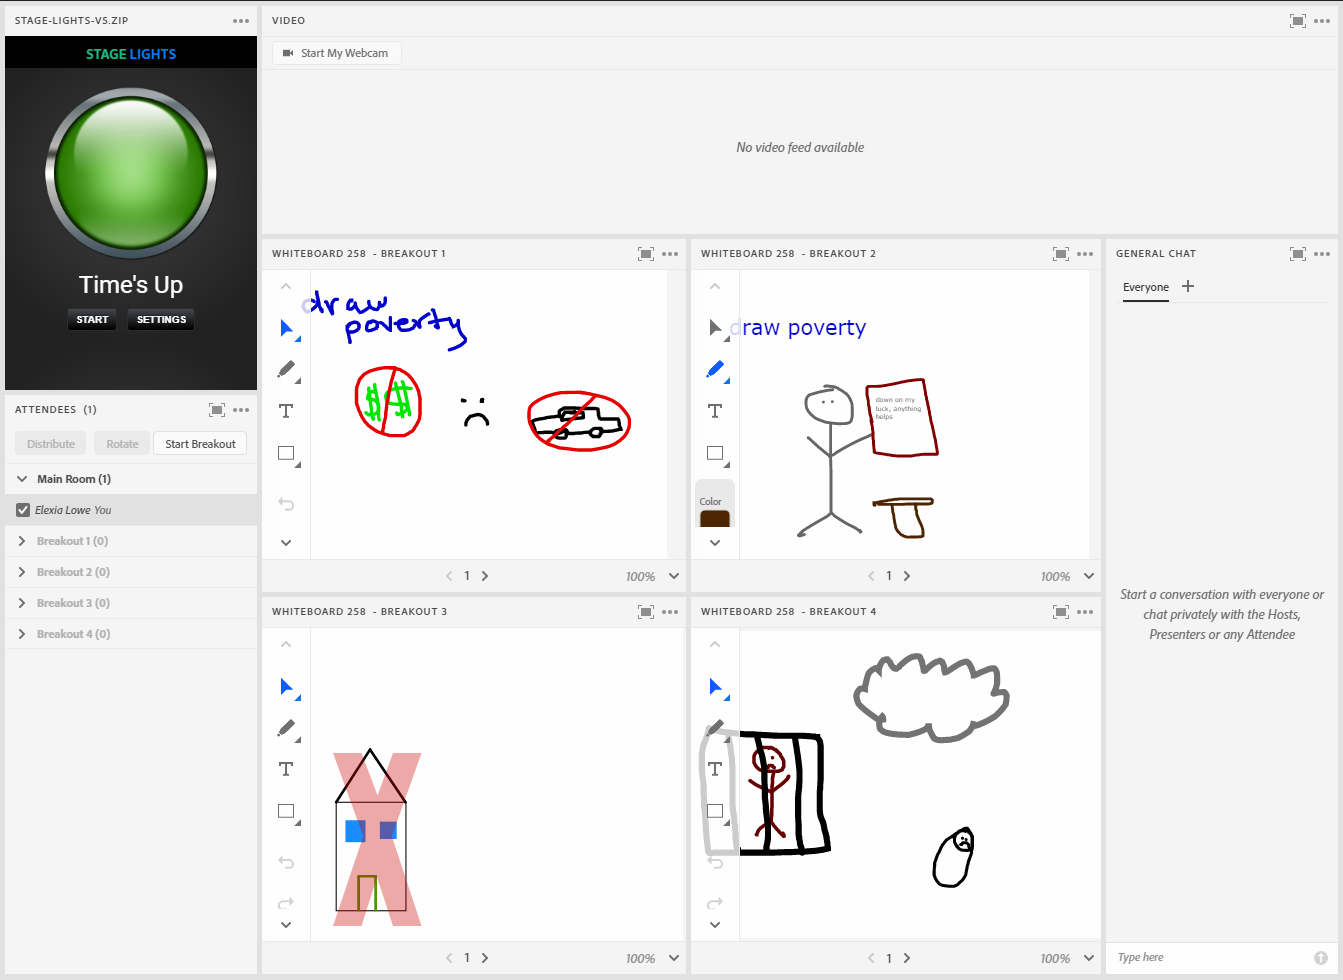
Once the breakout groups were started, the instructional team was able to view the activity of all four rooms from the “bird's eye view” layout (Image 2). A barrier to participating for some students was either a lack of a strong internet connection or joining from a mobile device. If a student lost connection during the breakout group activity, they would appear in the main room and I would return them to their assigned group.
Initially, when watching from the “bird's eye view” layout, there appeared to be little to no activity occurring on the whiteboards. The slow start was likely due to discussing the activity prompt, confusion about the instructions, or learning how to use the whiteboard tools. The instructional team was able to visit each room to answer questions and soon we were able to observe movement on the whiteboards.
At the conclusion of the activity, the breakout groups were ended and all participants were brought back to the main room for presentations and debriefing. Each group took turns presenting their whiteboards and discussing their process. Many of the drawings consisted of sadness, depravity, and loss when drawing poverty. None of the drawings approached the activity from an empowerment or strengths-based perspective with respect to people experiencing poverty. Leaving “draw poverty” up for interpretation led to a valuable discussion about assumptions and biases commonly held about people experiencing poverty by social workers in the field.
The students were receptive to the disconfirming reflection of the activity and provided the following feedback in the chat throughout the discussion:
- “So powerful”
- “It was fun. Good brain exercise”
- “Def the most fun breakout activity all semester”
- “It was difficult! Hard to conceptualize”
- “It is hard to visualize a concept”
- “It was really enjoyable/good brain exercise hah”
- “I also thought about not wanting to offend anyone”
I really enjoyed being a part of creating and facilitating this activity. This was my first time using whiteboards in breakout rooms and it provided a way for students to connect and process beyond the use of words. I felt that I also learned along with the collective as I saw how they accepted and learned from their blindspots. While the lack of instructions led to a need for additional time, the ambiguity was also what allowed the importance of this activity to surface and become revealed.
Technical Details and Steps
Prior to class
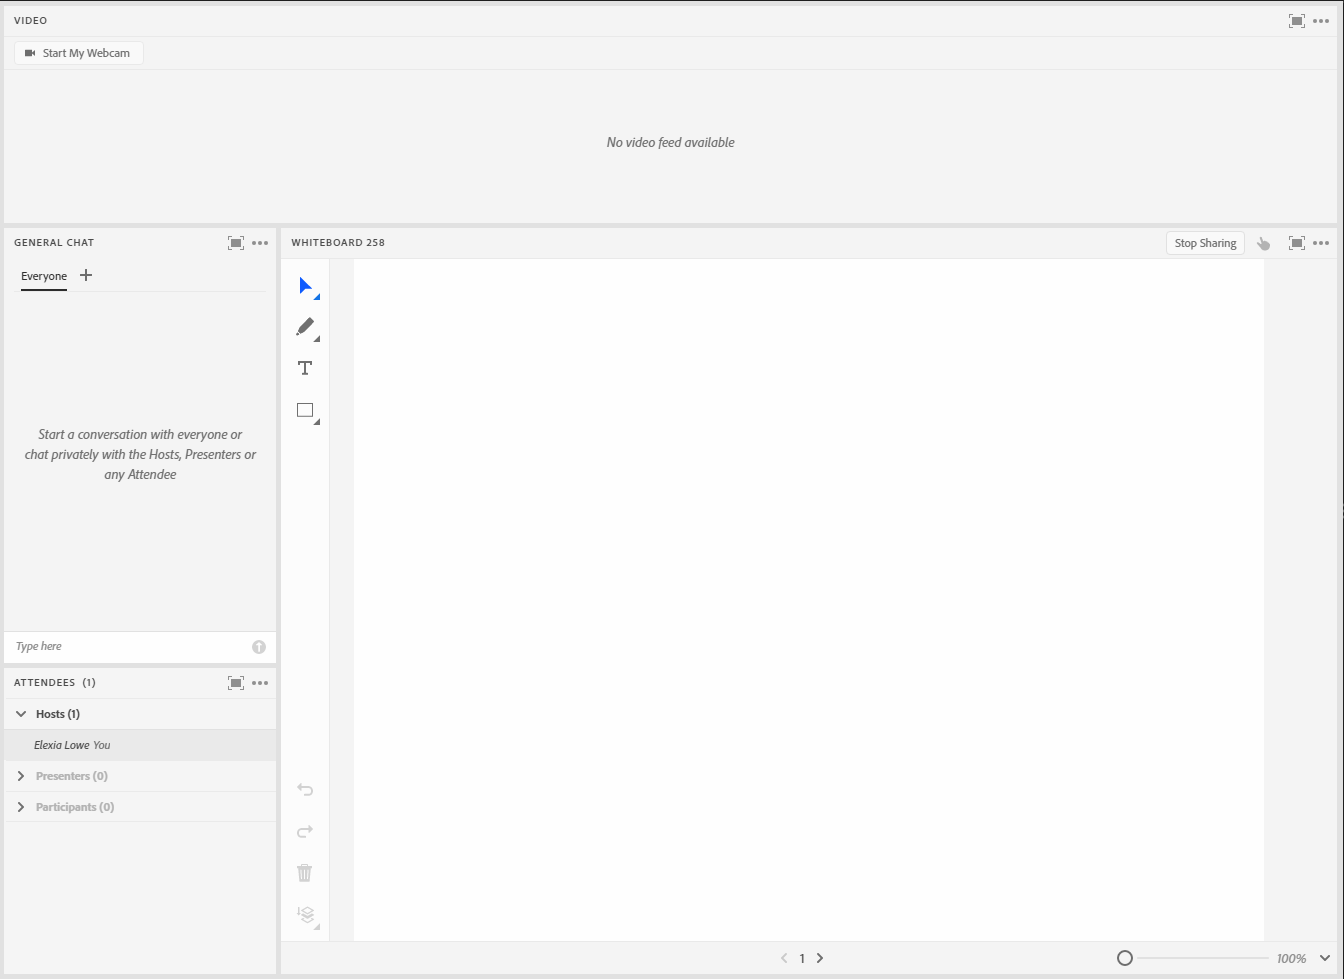
- Create the layout you want for the breakout rooms (Image 1). Choose the “whiteboard” option in the share pod you have created. You may also include a chat pod, note pod and video pod or a separate pod with instructions loaded, if desired.
- Add the desired number of breakout rooms using the breakout room layout you created.
- Create a “bird’s eye view” layout (Image 2) and insert the whiteboard share pods from each breakout room for viewing during the plenary debrief, if desired. You will also be able to view the whiteboard activity from the main room during breakouts from this layout.
- Test the activity with other members of your team prior to class.
During class
- When introducing the activity to your class, remind students that joining from a mobile device or with low-bandwidth wifi may inhibit participation.
- It may be advisable to provide a brief tutorial of the various whiteboard tools, if needed.
- Distribute students to the desired breakout rooms. (You can begin pre-distributing students as soon as they join the class, so that the groups are ready to go when you start the breakouts.) I would recommend at least 3-4 students per group. In the case that one of the group members loses connection, the remaining members can continue working together.
- Before starting breakouts, move to the “bird’s eye view” layout, if desired.
- Start breakouts and watch for questions and engagement. I would recommend allowing for at least 10-15 minutes for this activity.
- Sometimes students may lose connection and reappear in the main room. When this happens, you may move them back to their breakout group room.
- Visiting each breakout room may be helpful.
- Provide periodic broadcasted messages during the breakout to let students know how much time they have left to collaborate.
- When ending the breakout and returning to the main room, everyone will see their whiteboards in the main room for them to present.
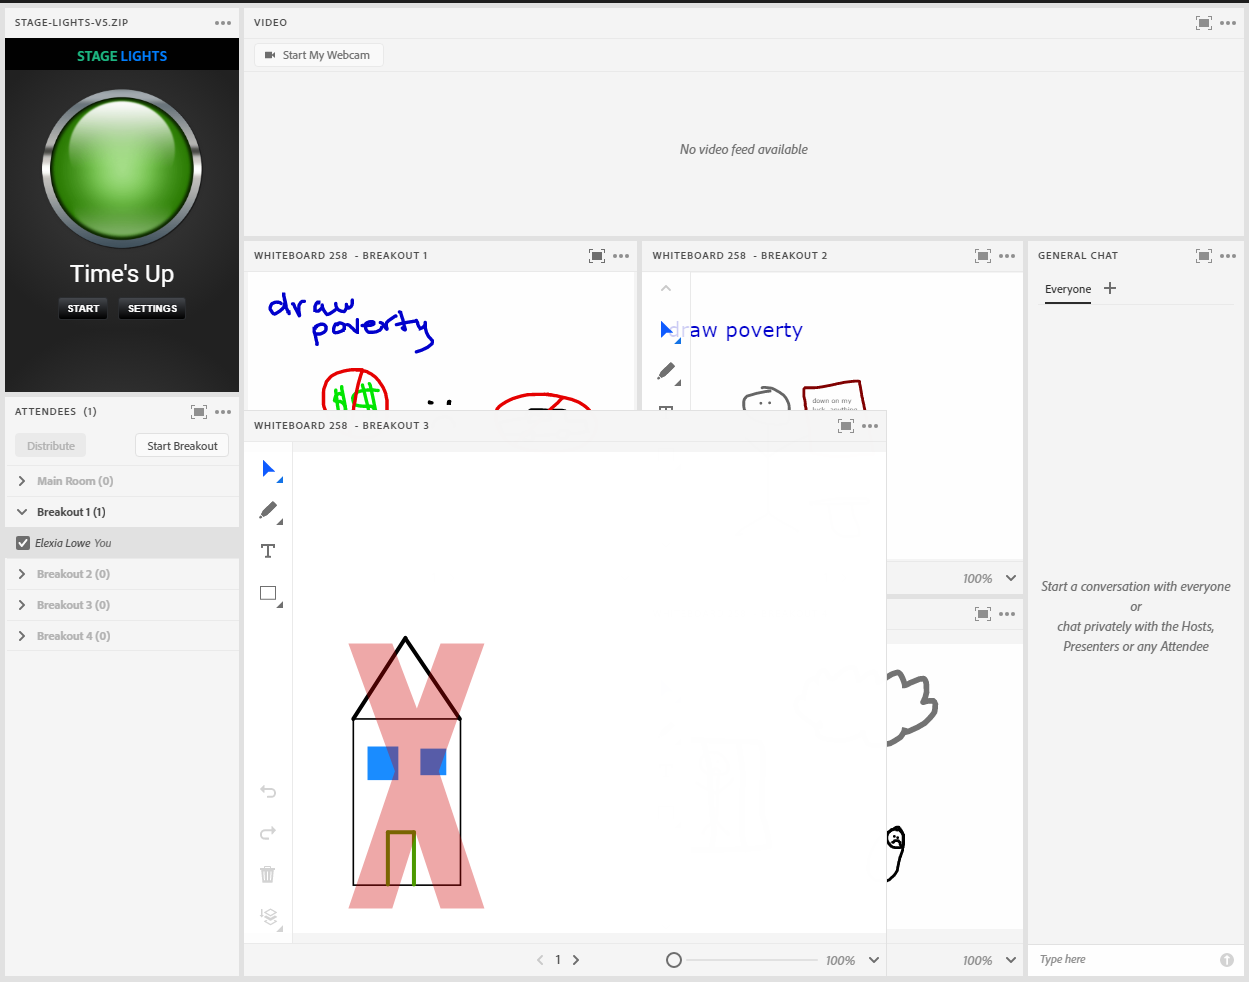
- If needed, you may drag a corner of a specific whiteboard to enlarge it when that group presents (Image 3).
What this looked like in Adobe Connect
These images, including the whiteboard art, are my recreations, not a screenshot of actual students' work.
Image 1: Example breakout room layout created with a whiteboard included. Adobe product screenshot(s) reprinted with permission from Adobe.
Image 1 Alt-Text: This is a screengrab of an example layout for a breakout room with the whiteboard share pod. The top of the image has a video pod that stretches across the screen to allow for multiple people to be on camera. Underneath the video pod to the left is a short and narrow chat pod. Beneath the chat pod is a short and narrow attendees pod where attendee names can be viewed. The center of the layout has the share pod with the whiteboard. The whiteboard has multiple tool options in a bar to the left that includes a pointer, marker, text box, and shape making tools.

Image 2: Example “bird’s eye view” layout created with all breakout room whiteboards included. Adobe product screenshot(s) reprinted with permission from Adobe.
Image 2 Alt-Text: This is a screengrab of the “bird’s eye view” layout where the instructional team can view the breakout room activity from the main room. This is also the layout you can use to present each breakout room’s work at the conclusion of the breakout activity. The far left corner has a “stage lights” pod for timing the presenters. Beneath the stage lights is the attendees' pod in a narrow column. At the top of the layout is the video pod stretching from the edge of the stage lights pod to the far right of the layout to allow for multiple participants on camera. Beneath the video pod, to the far right, is a long and narrow chat pod. The center of the layout beneath the video pod are four whiteboard share pods side by side with drawings created in the breakout rooms viewable.

Image 3: Same image as Image 2 with one of the whiteboards enlarged and overlapping the other whiteboards. Adobe product screenshot(s) reprinted with permission from Adobe.
Image 3 Alt-Text: This screengrab is the same image from Image 2 with one difference. The bottom left whiteboard is overlapping the other whiteboards to show how to enlarge the image during presentations if needed.
Acknowledgements
I would like to acknowledge and thank Ashley Stewart, PhD (Instructor), Hannah Tenadu (Associate), and Taryn Dwyer (Associate) for their creativity and thought leadership. Working on the PROP course with them was a wonderful experience. I would also like to thank Matthea Marquart for including and considering me for wonderful opportunities to further my career, such as contributing to this book.